Creating a 3D Model In SketchUp

The SketchUp software package is an incredibly powerful solution for all your 3D and 2D modelling needs. The free download edition has all the tools you need to get started, while the Pro version will take your ideas to a whole new level.


If you’re just getting started with computer-aided design, SketchUp is the ideal environment to develop your skills. Its simple interface keeps the whole process clear and concise throughout. And with the help of our SketchUp 3D modelling tutorial, you’ll be on the way to producing your first creation in next to no time.

This guide will help you get to grips with the basics and includes the following areas:


  • Choosing a style
  • Drawing lines, shapes and 3D objects 
  • Applying colours, photos, materials and textures 
  • Adding premade components and dynamic components
  • Classifying objects
  • Organising a model 
  • Viewing a model
  • Placing movie cameras in a model of a production set


For a little help with some of the other basic elements that we don’t cover today, you can always check out the tutorials page.

Choosing a Sketchup Style

Your style says a lot about you and how you want others to perceive you. And choosing a style in SketchUp helps bring that sense of identity to your designs. 


In essence, styles are a group of display settings that you can quickly and conveniently select from the Styles Palette. They add a feel to your work that sets it apart from the rest with aspects such as hand-rendered lines, coloured faces and background effects.


There is a fantastic range of predefined styles to choose from. And you can also edit and customise them to suit your designs. In addition, Pro users can create their own non-photorealistic styles.

Choosing a style

To take your pick from the standard set of styles on offer, head to the Default tray and choose the Styles panel. You can see the name of the current style at the top.

Go to the Select tab within the Styles panel and choose a collection of style settings from the list. This will produce thumbnails for the options in that collection. There are several to choose from including Sketchy Edges and different colour sets.

To apply the desired style, you just need to click on the thumbnail and it will be applied to your design instantly.

Customising a preset style

Styles have a series of customisable settings to adjust the sky and ground appearance. These include using colours or a photo. There is also a Transparency slider should you require it. Just select the Edit tab to make these changes.

In addition, you may also alter the appearance of faces and edges to personalise your styles further.

Drawing Lines, Shapes and 3D Objects

Lines and faces make up the bulk of your modelling creation. And pulling them out into 3D objects is where the real magic starts to happen.


Lines are the most basic component. And without them, you wouldn’t have any faces to give your model depth. They essentially create the edges that form the faces of your model. So first, let’s take a look at the most fundamental action—drawing a line.

Drawing a line

To add a line to your drawing, select the Line tool from the main toolbar.


Your first step is to click where you wish to begin drawing your line. You can press the Esc key to reset.


Move your mouse around the screen and you’ll see that the line begins to follow you around. When you want to stop drawing, you can simply click once more. And depending on the units set in your template, you’ll see the length of the line in the Measurements box.


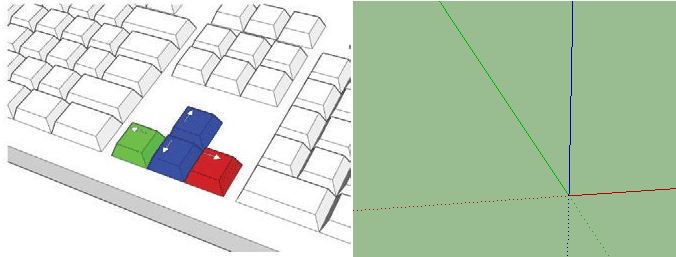
The colour of your line will change as it relates to one of the coloured axes (x, y or z). This helps maintain your creation’s perspective as you progress.


If you need to adjust the length of a line, then choose the Move tool and click and drag the end of the line to where you require it.

Creating shapes (faces)

By connecting your lines into a closed shape, you’re effectively producing your first face. 


But this isn’t the only way to create faces for your model. You can also use the various shape tools to instantly create the basic shapes that you require.


You can fill your faces too! Select your shape and then open the Shape Style panel. Here, you can click on the Fill option and choose a colour. 


Drawing a rectangle or square


Let’s take a quick look at some basic shapes; rectangles and squares. When creating a 3D model, these shapes are going to be your bread and butter.


You can draw these basic shapes anywhere on the ground plane, vertical plane and on existing faces too.


On the toolbar, select the Rectangle tool and you’ll see the pencil with a rectangle appear in place of the cursor.


Click where you wish to start drawing and drag the cursor to expand the shape. The Measurements box will show exactly how big the rectangle is. You can now manually change the shape measurements to suit your needs.


Basic 3D objects (pulling a 3D object from a face)


To bring the shapes out of themselves and create a third dimension, you’ll need to select the Push/Pull tool—it’s the one with a square and a small arrow pointing upwards.


Click the shape that you wish to add volume to and the face will now become shaded.


Next, move the cursor away from the face to expand the shape and click a second time to finish. Again, you can use the Measurements box to enter precise figures. To add an identical 3D shape on top of the original, hold the Ctrl button (Windows) or Option (macOS) and double click on the face.

Inspecting an entity

Any line and face in SketchUp is considered an entity. And you can easily bring entities together to form a group that is called a Component Entity.


All of these entities have various characteristics that you can change via the Entity Info panel. To access the panel, go to Window > Default Tray > Entity Info on a Windows machine or Window > Entity Info for macOS.


You’ll find info regarding the entity’s size, layer, type and more.

Applying Colours, Photos, Materials and Textures

Adding effects to your design helps to make faces stand out from each other. They add a realistic touch and make models easier to imagine in their natural surroundings as a finished concept.


You can add basic colours to lines and faces or go a step further and give them a textured feel to show how that element fits with the design. These may be roofs, gardens, walls or windows, for example.


You are able to add these textures by going to Tools > Paint Bucket and click the Select tab. Choose your material from the list and click on the face onto which you wish to apply the texture.


Furthermore, you can use photos to add more textured effects where necessary.  


Material images are usually a tiled photo displayed on an individual face. But it’s also possible to use a single image to create the same result. You might even want to try taking a snippet from a Google Street View image that fits your model. This is a great way to keep your design in keeping with where it will eventually sit in the real world.


To add an image, go to File > Import and choose the file you want to use. You can import the image as a standard image, a texture or a matched photo.


Beware of the image resolution and the effect it may have on SketchUp’s performance. The higher the resolution, the more RAM your system needs to process the job. This can slow things down considerably, depending on your setup.

Wrapping textures

After importing an image file as a texture, you can wrap it around a shape such as a box or cylinder. 


  • Click on the lower-left corner of a face and then the upper-right corner
  • Click on the Paint Bucket tool and hold down the Alt key for Windows users or Command key for macOS
  • You’ll now see the Eyedropper appear
  • Click on the existing texture and release the Alt or Command key
  • Select the adjacent face to apply the wrapped texture

Modelling terrain and other rounded shapes

Modelling a landscape or a terrain for your model to sit on is done through SketchUp’s Sandbox tools. It uses hidden geometry to create a Triangulated Irregular Network (TIN) that you can then sculpt into the form you require.


The easiest way to begin is to import an existing terrain from Google Earth. Alternatively, you can draw a plain flat TIN to start working on.

Adding Premade Components and Dynamic Components

Components such as windows, for example, appear several times on a building. And rather than creating everything yourself and repeating the process, you can simply use a premade component to add to your design.


Components use edges and faces, like all of SketchUp’s geometry. And you need to make sure that each component has a definition and an instance.


The definition tells you how the component appears. It’s basically a description of what it is and how it looks.


And every time you add the same component repeatedly, you’re creating a new instance of it in your design.

Dynamic Components

Dynamic components are like regular ones, except that they can produce more advanced effects.


These will include at least one of the following:


  1. Constrained values. Certain aspects of a component may need to stay the same regardless of the overall size. This could be the width of a fencepost, no matter how tall it is.
  2. Repetitive elements. Subcomponents within a component can multiply as you increase the scale—such as stairs, for example.
  3. Configurable values. Predefined values in a kitchen appliance, or something similar, are useful when adding some components.
  4. Animated features. Animated dynamic components make use of the Interact tool to move them. Windows and doors, for instance, can open and close.

How to insert a component

It’s simple to insert a component through the Components panel. There’s a sampler that shows a number of possibilities. You can use one of these or go for the more complete selection at the SketchUp 3D Warehouse.


Just enter a word into the 3D Warehouse search box and find the best match for your needs. 


It’s also possible to insert your own components from a file on your device. Select File > Import and go to where your component is saved. Click Open.


After downloading or selecting one of SketchUp’s components, click on the area where you would like to enter it into your design.


You can later replace the components if necessary. To do this, go to the Components panel and choose the Model icon to show the components in your model’s collection.


Select the component or components that you want to replace. Now context-click the new component and click Replace Selected.

Editing and developing components.

Developing components and dynamic components is fairly straightforward once they’re inserted. And some of the most commonly used edits include scaling, flipping and rotating.


Scaling a component only affects the individual instance that you select. To do this, use the Scale tool.


Flipping means mirroring the component along an axis. Simply context-click the component and select Flip Along.


Rotating a component utilises the Rotate tool and the Move tool. 


If you want to reload a component from its original file, then this will override any changes. And to create a separate file from any changes, context-click and choose Save As.

SketchUp can’t connect to the internet

SketchUp is showing a message about how you need to have an Internet connection to do that feature.

The features affected would include Add location, Generate Report, 3D Warehouse, and Extension Warehouse. It also would prevent you from being able to add a Classic license, or use an existing Network license. Some extensions may be affected too, if they rely on having an Internet connection (to check the license for example).

This issue primarily affects users running SketchUp 2018 and older.

Google have recently disabled the website that SketchUp uses to check if there is an internet connect. Because the web page doesn’t exist SketchUp can’t access it and thinks there is no internet acces.

For 2019 and later you can read this article to see how to edit the URL that is used:

https://help.sketchup.com/en/sketchup/cant-connect-web-tools-3d-warehouse-extension-warehouse-add-location-and-licensing 72

Look for the part that includes "OnlineTetURL": "",


If the line doesn’t appear in the Preferences section, go ahead and add the whole line.

"OnlineTestURL": "https://www.bing.com/",


For SketchUp 2018 the URL is stored in a different file. On Windows the file is here:

C:\Program Files\SketchUp\SketchUp 2018\Resources\en-US\i18n.dat

Right click the i18n.dat file and choose open with with Notepad, and you will see this line:

ONLINE_TEST_URL=http://www.google.com/ncr

Edit that line to change the address that is being used:

ONLINE_TEST_URL=https://www.bing.com/

save the chanages

SketchUp should then be able to see that you are online.

For Mac users, use the Go menu in Finder, Go to Folder… and paste in this path:

/Applications/SketchUp 2018/SketchUp.app/Contents/Resources/Content/Resources/en-US/i18n.dat

Many people reporting the problem have seen success when making this change.

SketchUp 2018 included 12 months of Tech support from SketchUp, which will now have expired. If you still need tech support and local assistance for Sketchup Please contact us for options to purchase SketchUp Pro Subscription

You can also purchase SketchUp directly from us!

SketchUp 2019: License FAQ’s

SketchUp 2019 landed yesterday! In case you missed the list of features, you can whizz over to here and check them out.

There is also a brand new way to access SketchUp; a subscription option is now available – as well as the classic perpetual license. So what does this mean for you?

I have a SketchUp Pro 2018 license, what now?

If your license has an active maintenance and support contract, your UK reseller will be sending out your 2019 licence information – the serial number and authorisation code you will need to access SketchUp Pro 2019. If you are yet to receive this, please contact us at sales@elmtec.co.uk

How do I activate my SketchUp Pro 2019 Classic licence?

Once you’ve downloaded and installed version 2019, you will see the following screen – make sure you hit the ‘Classic License’ option:

You will then be prompted to enter your 2019 license details as follows:

Enter your details (provided by your UK reseller) and ‘Add License’ to authorise SketchUp Pro 2019.

Once you are in SketchUp Pro 2019 – you can go to Help → Manage License to see your status:

The ‘Classic’ tab will show as active. The Subscription tab will show as in trial mode, since you have a Classic Perpetual licence and not a subscription license.

What happens to my previous license when I upgrade to 2019?

If you had a 2018 single user license, your current 2018 version will continue to run as an existing installation and you can run 2019 alongside 2018 if you wish to.  You can’t install 2018 on a new machine.

If you had a 2018  network license, authorising your new 2019 licence on a single machine starts a 60 day countdown, after which your previous license will be disabled on all machines.

We recommend keeping your existing version of SketchUp installed until you know that 2019 is running smoothly on your machine.

I had an older version of SketchUp Pro but my maintenance contract has expired. What are my options?

If your maintenance contract expired within the past 3 years, you can still upgrade that license to version 2019, as a perpetual license. Contact the reseller you ordered through originally for a quote. If you are unsure who your reseller was, let us know and we can assist.

Instead of upgrading this license, you may instead purchase a new SketchUp Pro Subscription if you wish to. Again, your reseller can assist.

My SketchUp Pro maintenance contract expired over 3 years ago – what now?

That  license can no longer be upgraded. You can either purchase a new SketchUp Pro 2019 perpetual license with a maintenance and support contract, or you can of course choose to subscribe to SketchUp Pro. The choice is yours!

What are the differences between a SketchUp Pro 2019 Classic (perpetual license) and a SketchUp Pro Subscription?

The SketchUp Pro perpetual license does not expire – it is only the maintenance and support contract against it that is renewed. The maintenance contract gives you access to new versions as they are released and technical support. If you choose not to renew the M+S contract once it expires; SketchUp will continue to run.

The Subscription is annual access to SketchUp Pro. If you choose not to renew your subscription, you will not have access to SketchUp Pro.

In terms of features, this is what each option offers:

What is SketchUp Free?

SketchUp free is ideal for hobbyist. It is not permitted for commercial use. If you’re not using Pro you’re missing out on a wide range of features designed for producing professional-grade work.

I’m still not sure what SketchUp I should buy/subscribe to! Can I talk to a real human for some more advice?

Sure can! Give us a call on 01844 263750 and we will be happy to talk you through all of your options.

Happy SketchUpping!

What’s new for SketchUp in 2019?

SketchUp Pro 2019 is here, it’s faster and more powerful than ever, with big fixes, system improvements, and some shiny new features. Here are a few of the highlights:

SketchUp 2019 is here

SketchUp Pro 2019 for Desktop

You’ll notice a nifty upgrade to your welcome window where you can easily locate recent projects and find lots of helpful learning content.

Recent project finder

Brand new for 2019, SketchUp Pro & LayOut: Layers now have dashes. A much-anticipated feature, dashed lines allow you to simplify your drawings with effective drawing communication. Learn how to use dashed lines and make your drawings communicate more effectively.

Dashed lines

The Tape Measure tool got a face-lift this year. Now you can see measurement info right where you’re modelling. Model more accurately — and more efficiently — right where you’re working.

Tape Measure tool

LayOut

In both SketchUp and LayOut, improvements have been made to the .dwg import and export feature. Including but not limited to support for AutoCAD 2018 file format, increased precision and stability. There is now the added ability to import and export with materials for better BIM interoperability and workflows using the .dwg format.

The handshake between SketchUp and LayOut has also improved by creating an “Export for SketchUp” feature for the .dwg exporter that sends all LayOut entities along with any SketchUp viewport data to the model space. Now any filled shape created in LayOut will be passed over to SketchUp as face ready to be Push/Pull’d. So now, SketchUp & LayOut work even better together.

LayOut will also now let you know which files are already open so you’re not creating multiple versions.
Also new this year, an easy way to learn the basics of LayOut.  It’s time to go 2D: What are you waiting for?

SketchUp Campus

Better than textbooks: the official learning hub is here. SketchUp-built courses, all created by the SketchUp in-house team, make learning SketchUp convenient and simple. Plus, more content is always being uploaded

SketchUp Campus: One stop learning shop

No matter your skill level, SketchUp Campus guides you through official SketchUp training with different tracks and sequential courses to get you up to speed. The classes consist of short videos and quizzes that make learning topics such as Rendering, LayOut, and SketchUp Fundamentals, fun, quick, and easy.
Learn more about SketchUp Campus, or dive right in!

3D Warehouse

With millions of models and 17 languages, it’s not always easy to find exactly what you’re looking for on 3D Warehouse. Say ‘hello’ to categories! This update boasts better browsing, search refinement, subcategories, and filtering by real products. This year, 3D Warehouse enables you to spend less time searching and more time creating.

Head to the warehouse to give it a try!

That’s a whole lot of new things for you to explore. Ready for the new SketchUp? Contact us or visit our website.

[ninja_forms id=2]

Why Buy Sketchup Pro Package As Beginners?

What’s the difference between SketchUp Free and SketchUp Pro?

First things first – SketchUp Free is for non-commercial use ONLY. If you are using SketchUp commercially, you will need to purchase a licence of SketchUp Pro.

If you’re not using Pro, you’re missing out on a range of features designed for producing professional-grade work.

SketchUp Free is a very capable and powerful tool for drawing in 3D, so why would you want to upgrade to SketchUp Pro? Here are our pick of the key features that SketchUp Pro can offer:

Design Presentation Features

Rendering and Walk-through Animations in High Resolution

Imagine shrinking into a tiny person and jumping into your computer to check out (or show off) your 3D models. That’s basically what SketchUp’s walkthrough tools enable you to do. But instead of altering your entire body composition, you just click a few tools — namely the Position Camera, Look Around, and Walk tools.

SketchUp can animate scenes of a 3D model. Animations are a great way to show off your model from different angles or share shadow studies. For example, say you create a scene with a morning shadow, another scene with a noon shadow, and a third with an evening shadow. With SketchUp’s animation feature, you can watch the shadow transition from morning to evening. Then there’s rendering; that’s what’s really going to bump up your whole game.

Rendering using SU Podium

Design Presentations with LayOut and Create Detailed Construction Documents

We’ve written at length before on LayOut. LayOut and SketchUp Pro are designed to work together. Obviously we use 2D drawings to convey design and details when presenting work to clients. However, LayOut is the most efficient way to turn SketchUp models into diagrams, drawings, CD sets, presentations, or even just scaled prints. With SketchUp and LayOut, there’s no need for ourher providers; it does it all. We love it and so will you.

LayOut and SketchUp
LayOut and SketchUp

Workflow Features

Start from As-Built Drawings

With Pro, import whatever drawings you like.

Export to Other Software

SketchUp plays nicely with all the others out there.

Pro Power Tools

Sandbox Tools

This is native to Pro. Terrain is important to many SketchUp modellers: Your building needs ground to stand on, or maybe you’re modelling the ground itself to create a landscape. But wait. SketchUp’s Sandbox tools — the tools you use to model terrain — can also create forms completely unrelated to terrain. How can terrain include all these other possibilities? The secret is in the hidden geometry. When you’re modelling terrain (or other shapes) with the Sandbox tools, you’re technically sculpting a special type of geometry called a TIN, or triangulated irregular network. That’s a fancy way of saying, “a group comprised of triangles.”

Solid Tools

With SketchUp’s Solid tools, you can create new shapes by combining or cutting one shape with another, making it easy to model an outer shell or joinery. SketchUp’s Solid tools work only on SketchUp solids. In SketchUp, a solid is any 3D model (component or group) that has a finite closed volume. A SketchUp solid cannot have any leaks (missing faces or faces that do not meet at an edge).

Dynamic Component Tools

SketchUp components enable you to reuse objects. For example, pretty much every building has at least one door and window. Instead of modelling these common objects, you can insert a component that someone else has already made. Hours, if not days, of work time saved with this one feature alone.

Advanced Camera Tools

The Advanced Camera Tools (ACT) are designed for people in the film and television industry who use SketchUp pro to create storyboards, design sets, visualize scenes, and plan locations. Use ACT to place real-world cameras in your SketchUp models and preview real camera shots.

Extensions

Feast your eyes on this. Extensions bring SketchUp Pro to a whole new fun and efficient way of working. Have a read of our pick of the best free extensions in Pro here.

The Extension Warehouse. All this could be yours! But only with Pro 😉

Questions about SketchUp Free? SketchUp Pro? Send them our way!

[contact-form][contact-field label=”Name” type=”name” required=”true” /][contact-field label=”Email” type=”email” required=”true” /][contact-field label=”Website” type=”url” /][contact-field label=”Message” type=”textarea” /][/contact-form]

Get Speedy with SketchUp: Our Top 5 Tips

We’re all familiar with the old adage, ‘seconds turn into minutes and minutes turn into hours.’ So no matter if you’ve been using SketchUp for years or are a newcomer, we’ve compiled five of our favourite tips that will get you designing smarter – and faster.


  • Use the Shortcuts

Yep, we’re going with the most obvious one first. SketchUp comes with a predefined set of shortcuts, but you can customise these to best suit you. Using shortcuts will help you work faster, make your user interface cleaner, and allow for more screen space for you to model. When shortcuts are used efficiently, they’ll enable you to skip menus and toolbars and boost productivity. Some SketchUp users tell us they barely even use the standard menu for their work and keeping only those related to plug-ins that can’t be conveniently switched to a shortcut. Need more information on customizing the keyboard? Have a look here.

  • Guidelines are your friends

Actually, maybe they’re better than your friends. Unless your friends happen to be multi-directional and infinitely flexible, too. They really are an amazing tool for speeding up your workflow unless you have super-human abilities to mentally visualize the model you’re working one (if you do, tell us how!). Add parallel guidelines and check distances using the Tape Measure tool. Check angles and set slopes using the Protractor tool. Added bonus: Too many guidelines? Just clear ’em all out with one shortcut and start all over again.

  • Group first, Layer later

Remembering ‘group first, layer later’ is an excellent rule of thumb when using SketchUp. By grouping first you can separate your geometry while also ensuring that the base geometry of the grouped object stays on Layer0. Having two levels of information separation allows it to be enhanced by using the scene system for more than just saving viewpoints.

  • Photo Matching

Success in using SketchUp’s photo matching relies on two things. First, you must ensure you’re using unedited original photography. Second, you need to ensure your model matches the scale of the subjects in the photo. A further tip is to get the camera’s focal length to match to the photo you’ve selected. To do this, place your yellow origin mark at the spot on the photo where you will place your model. From there, align the green and red axes to the features of the subjects in the photo to ensure everything is following the same direction.

  • Get in the habit of Good Housekeeping

Because SketchUp models save all the information inside the file, you’ll need to keep this in mind – the information stays inside even if you delete it from the workspace. This can clearly slow down your file performance. Therefore, a good tip is to do some regular housekeeping in order to keep your workflow speedy and snappy. To clean the excess element, go to ‘Purge Unused’ command in the components, material and layers.


So there we have it. Five of our favourite tips for speeding up your SketchUp workflow.
Let us know in the comments if you have a great tip to share!


[contact-form][contact-field label=”Name” type=”name” required=”true” /][contact-field label=”Email” type=”email” required=”true” /][contact-field label=”Website” type=”url” /][contact-field label=”Message” type=”textarea” /][/contact-form]

SketchUp + SU Podium

These images show how invaluable SketchUp can prove to be at the early stages of design, through to manufacture and fit out. The model was produced in SketchUp, and then rendered in SU Podium.

Credit to James Ogston from, SEE-IT-3D, who created these images for Simply Ace, a display and signage company.

(click images to view full size)

About Elmtec

Elmtec have been the UK distribution partner for SketchUp since 2010, and service a network of UK and Irish resellers. We have over 22 years’ experience within the digital design community.

Contact Us

T: 01844 263 750
E: sales@elmtec.co.uk
W: www.elmtec.co.uk/sketchup