“You Have Exceeded Your Allowed Activations”: How to manage your Subscription Activations

It can be alarming to read the notice in SketchUp “You have exceeded your allowed activations” when trying to use or sign in. It will prevent you from using the software altogether. However, this doesn’t mean that your subscription is over or that you’ve done anything wrong.

Some of the most common reasons for this error are the following:

  • You’re trying to use SketchUp Pro on a new computer or device, and you haven’t deactivated it on your old one yet.
  • You’ve uninstalled SketchUp on a computer or device, and you’re trying to use it again without reactivating it first.
  • There’s a problem with your network or internet connection.
  • There’s a billing issue with your subscription.

If you see this on your screen, don’t worry. In most cases, it’s easy to fix. In this guide, we’ll show you how to manage your subscription activations so you can keep using SketchUp, starting with how to activate SketchUp on any device.

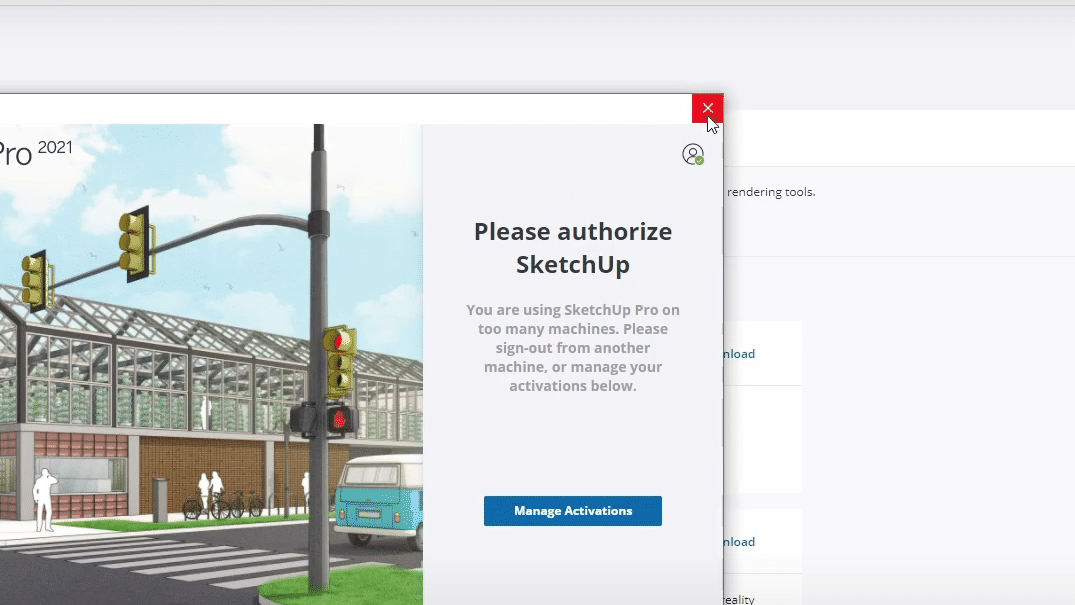
Please authorize SketchUp
You are using SketchUp Pro on too many machines. Please sign-out from another machine, or manage your activations below

No need to panic. It just means you’ve reached your activation limit for SketchUp.

Activating Your Sketchup Pro Subscription

Before you can resolve the SketchUp “You have exceeded your allowed activations” error, you need to understand how SketchUp Pro subscription activation works.

When you buy a SketchUp Pro subscription, you’re given a certain number of activations to use. This is the number of devices or computers you can use SketchUp Pro on at the same time.

You can use and re-use these activations as often as you want. However, if you try to activate SketchUp Pro on a new device without deactivating it on an old one first, you’ll get the “You have exceeded your allowed activations” error.

The most important thing to remember is how many devices or computers your subscription is already activated on.

For a refresher, here’s how to sign in, download, activate, and manage SketchUp Pro on your devices:

  1. First, open your browser and go to the SketchUp Pro account management portal.
  2. Next, sign in with your Trimble account or the email address and password you used to buy your SketchUp Pro subscription.
  3. If you don’t have a Trimble account, you can create one for free. You can also use your Google or Apple account to sign in.
  4. Once you’re signed in, click “My Products” to see the products associated with your account.
  5. If you have an active SketchUp Pro subscription, it will be listed here.

Note: If SketchUp Pro does not appear in your “My Products” list, it means that you do not have a license assigned to your account. The license is generally assigned to the owner of the subscription. This may be you or your company.

Manage Activations

Error message

The first step is to click the “Manage Activations” Button which will take you to the SketchUp and Trimble account management site. If for any reason you struggle to load this, you can access this via a web browser using this link.

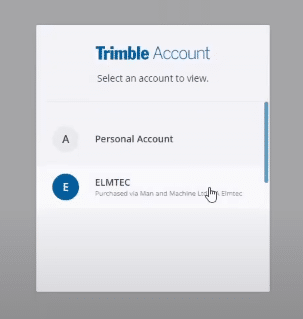
Sign in with the email account your SketchUp subscription is allocated to. If you have multiple accounts, choose the sub-account to which your subscription is also attached. In this instance, it is the second option, ”Elmtec.” It may be the case that it is a business name or simply a personal account.

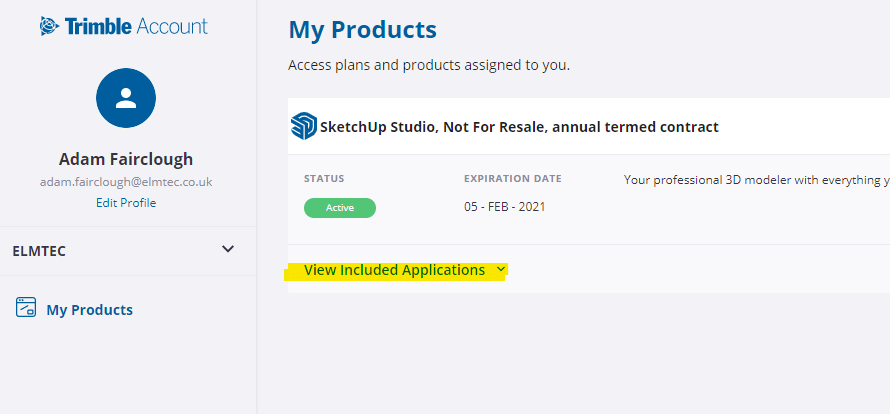
This brings you through to the “My Products” Screen.

On this screen, you’ll now see any active subscriptions (indicated by the green “active” badge) as well as any expired or legacy products you may also own.

Click through into "View included Applications"
Below your current Active Subscription choose “View Included Applications”

My Products

Manage Devices

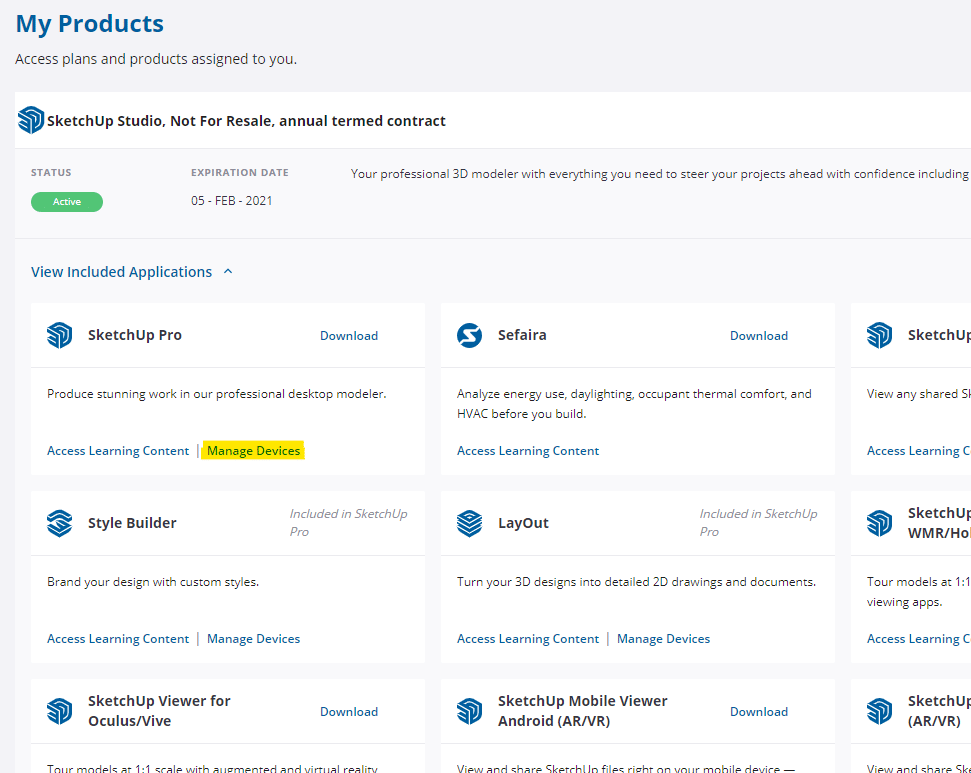
The above image shows all of the products included with a SketchUp Subscription. This particular subscription is for SketchUp Studio, hence the inclusion of Sefaira.

If you think you should have a license but don’t see one, contact your SketchUp Pro administrator or Trimble customer support to seek help or assistance immediately.

If you’re the one who owns the license, you may need to assign it to your account by downloading it from the SketchUp Pro account management portal and then activating it on your computer. To do so, simply follow the instructions below:

  1. Once you’ve signed in to your account, navigate to the “Download” page.
  2. Then, scroll down to the “SketchUp Pro (the relevant version of your purchase)” section and click the “Download” button.
  3. Next, save the installer file to your computer and then run it.
  4. Once SketchUp Pro is installed, launch the program on your computer.
  5. When SketchUp Pro starts up, you’ll see a welcome screen with several options. Click “Sign In.”
  6. After that, sign in with the same Trimble account or email address and password you used to sign in to the account management portal.
  7. Once you’re signed in, SketchUp Pro will automatically activate.

From here, you can now check and manage the status of your SketchUp Pro subscription. To do this, go to Help > Manage License.

The “Manage License” window will show you the status of your subscription and how many activations you have remaining.

How to Manage Sketchup Pro Subscription Activations

Once you understand how SketchUp Pro subscription activation works, it’s easy to keep track of your activations and resolve the “You have exceeded your allowed activations” error.

But first, here are a couple of things to keep in mind:

  • You can have SketchUp Pro installed and activated on as many devices as you want, but you can only use it on three devices at the same time.
  • For instance, if you’ve previously installed SketchUp 2019 and 2020 on your desktop workstation, then SketchUp 2020 on your laptop or another PC, you’ve already used up your three activations.
  • If you try to activate SketchUp Pro on a fourth device without deactivating it on one of the other three first, you’ll get the “You have exceeded your allowed activations” error or the “You are using SketchUp on too many machines” notification.

To reset your SketchUp Pro activations and use the software on a different device, follow these steps below:

1. Click “Manage Activations” to reach the account management page

  • On the page which shows you the “You are using SketchUp on too many machines” error, you’ll see a button that says “Manage Activations.”
  • Click on that, which should take you to the account management portal.

If it doesn’t, you can also access the account management portal by using this alternative link.

2. Sign in and go to “My Products”

  • You’ll need the same email address and password you used when you first purchased your SketchUp Pro subscription.
  • If you have multiple accounts, such as a business account and a personal account, choose the one linked to the subscription.
  • Then, navigate to “My Products.”

3. Locate SketchUp Pro in your list of products

  • Under the “My Products” section, you should see a list of all the products which are currently associated with your account.
  • Find SketchUp Pro.
  • You’ll see a live link called “Manage Devices.” Click on that.

 4. Revoke all current activations for SketchUp Pro

  • You should see a list of all the devices on which SketchUp Pro is currently activated.
  • Click on the “Deauthorize All” button to revoke all these activations at once.
  • Upon clicking, a pop-up window will appear, asking you to confirm the deauthorization.
  • Click on that to proceed.

Note: This will NOT cancel your SketchUp Pro subscription or delete your license. It will only revoke the activations for SketchUp Pro on all devices, allowing you to then activate it again on three new devices.

5. Close and restart SketchUp Pro on the device you want to use

  • To begin using SketchUp again, close the program and then restart it.
  • After that, you’ll see the welcome screen with the “Sign In” option.
  • Finally, input your credentials, and you can now activate SketchUp Pro on that device!

This process should resolve the “You are using SketchUp on too many machines” or “You have exceeded your allowed activations” error.

If you have other products in your account, such as Style Builder or LayOut, you can follow the same process to manage those activations as well.

Confirm Deauthorization

Click ‘Deauthorise All’

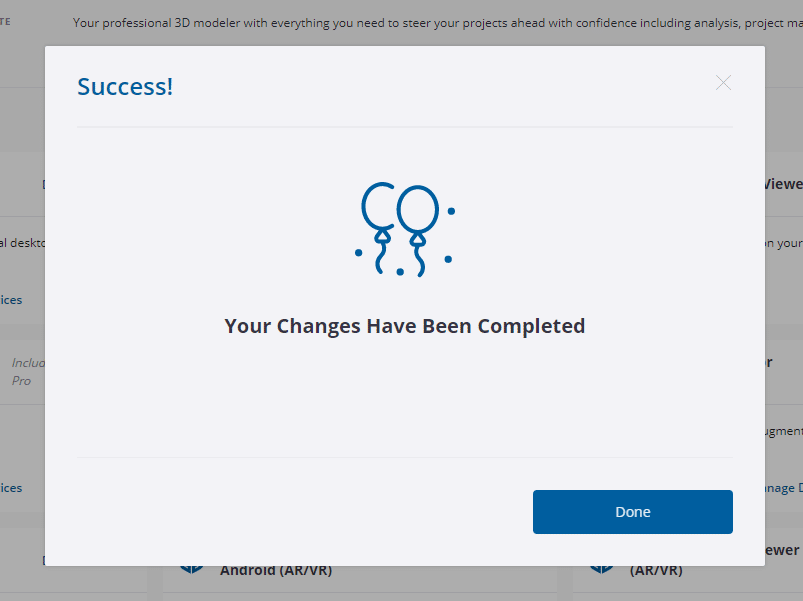
SketchUp has now been deauthorised for all the machines and versions it had been activated on previously. Great! Now, all that is left is to sign back into SketchUp.

Restart SketchUp by closing it and reopening it

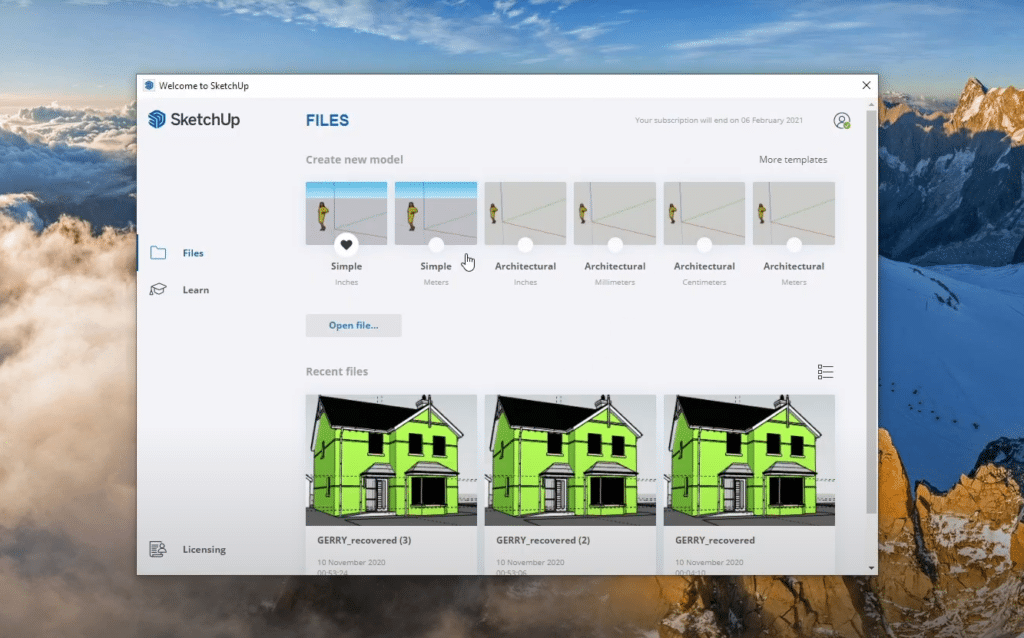
You are now signed in, and ready to get your SketchUp on again!

Final Thoughts

Managing your SketchUp Pro subscription activations is a breeze once you understand how subscriptions, activations, and limits work. As long as you keep track of how many devices you have SketchUp Pro installed on and remember to deactivate it before trying to install it on a new device, you shouldn’t run into any issues moving forward.

SketchUp can’t connect to the internet

SketchUp is showing a message about how you need to have an Internet connection to do that feature.

The features affected would include Add location, Generate Report, 3D Warehouse, and Extension Warehouse. It also would prevent you from being able to add a Classic license, or use an existing Network license. Some extensions may be affected too, if they rely on having an Internet connection (to check the license for example).

This issue primarily affects users running SketchUp 2018 and older.

Google have recently disabled the website that SketchUp uses to check if there is an internet connect. Because the web page doesn’t exist SketchUp can’t access it and thinks there is no internet acces.

For 2019 and later you can read this article to see how to edit the URL that is used:

https://help.sketchup.com/en/sketchup/cant-connect-web-tools-3d-warehouse-extension-warehouse-add-location-and-licensing 72

Look for the part that includes "OnlineTetURL": "",


If the line doesn’t appear in the Preferences section, go ahead and add the whole line.

"OnlineTestURL": "https://www.bing.com/",


For SketchUp 2018 the URL is stored in a different file. On Windows the file is here:

C:\Program Files\SketchUp\SketchUp 2018\Resources\en-US\i18n.dat

Right click the i18n.dat file and choose open with with Notepad, and you will see this line:

ONLINE_TEST_URL=http://www.google.com/ncr

Edit that line to change the address that is being used:

ONLINE_TEST_URL=https://www.bing.com/

save the chanages

SketchUp should then be able to see that you are online.

For Mac users, use the Go menu in Finder, Go to Folder… and paste in this path:

/Applications/SketchUp 2018/SketchUp.app/Contents/Resources/Content/Resources/en-US/i18n.dat

Many people reporting the problem have seen success when making this change.

SketchUp 2018 included 12 months of Tech support from SketchUp, which will now have expired. If you still need tech support and local assistance for Sketchup Please contact us for options to purchase SketchUp Pro Subscription

You can also purchase SketchUp directly from us!

What You Can Find in the Sketchup 3D Warehouse

SketchUp’s 3d Warehouse is a huge treasure trove of 3D design magic. Is SketchUp 3d Warehouse free? Yes, it is! If you’re busy researching the SketchUp 3D Warehouse you can relax and enjoy the ride. Read on to discover exactly how you’ll benefit from this legendary free-to-use creative resource.

What is the SketchUp 3D Warehouse?

So what is the SketchUp model Warehouse? It’s a massive library of third party extensions designed to help you optimise your workflow, everything from furniture to plants to materials. All you do is open 3D Warehouse via SketchUp itself or your browser to access the 3D Warehouse main page, from where you can easily search, browse by category, find collections of models created by your fellow users, or explore catalogues provided by manufacturers and developers. Simply click on the thumbnail image to see a description, statistics, viewing tools, sharing tools, comments from other 3D Warehouse users, and lots more.

How to use 3d Warehouse in SketchUp? The 3D Warehouse open library lets you download models directly into the programme without saving them to your machine. The files can be as large as 50 MB. And everyone can make, change and re-upload models for free. Every model in the warehouse is free to use, whether you’re going to use them in SketchUp itself or in something like AutoCAD, Revit or ArchiCAD, all of whose apps let you get models from 3D Warehouse. No wonder Trimble says 3D Warehouse is the most popular 3D content site on the internet, your first and best stop for endless inspiration.

The result of all this brilliance? You can share your own models with the community, find any model you can possibly imagine, and even create models for others to buy. The warehouse is used by millions of people, which means more eyes on your brand and more appreciation for your talent if you want to design and upload new models of your own. Advanced search makes it easy to find what you want. The products are real and tangible, lending your model a freshly realistic appeal. And the range of attractive pre-made 3D models and objects is quite simply enormous.

Is SketchUp 3D Warehouse Free?

So is SketchUp 3d Warehouse free? In a word, yes. At the moment all models made available and distributed through your SketchUp 3d Warehouse license are free of charge thanks to the free SketchUp 3d Warehouse license. SketchUp Pro 3d Warehouse is free to Pro users, too.

SketchUp 3D Warehouse Extension

The popular 3D Warehouse Sketchup extension is actually a collection of 3D Warehouse check tools to help you review your model according to nested groups, model size and so on, easily removing unnecessary lines, marks and more before you upload your work to 3D Warehouse. Showing nesting levels makes it easy to analyse a selection of a model or the whole thing, making a layer for each nesting level and setting it so it reveals colour by layer using AutoCAD colours.

When you save the screen image you can quickly add notes to your model in SketchUp, then grab the screen as a jpg to share or analyse, saving it in the same folder as the model. You can just as easily save images via the review, where they’re sequentially numbered for convenience. And you can use the Model Report feature to view either your selection or the entire model.

SketchUp 3D Warehouse Models

What does the incredibly extensive range of models immediately available from 3D warehouse include? It contains mechanical components, bridges, plants, trees, furniture, brand icons and vehicles, lighting, shelving, pallets, windows and doors, cats and dogs, paintings, bathroom fixtures, kitchen equipment, materials… the list goes on and on, including literally millions of really cool drawings to choose from, all designed to help you create winning models.

The 3D Warehouse is packed with complex industrial models including entire water treatment plants, irrigation pump stations, mining ordinance, port terminals for oil, even cake factories. And the models are described in a clear, logical way that makes everything easy to find, like this fantastic model of an oak tree. Take a look at the Model Info box on the right hand side to see the number of materials and polygons, the file size, the date it was last modified, the layers, units of measurement, bounds and distance from the origin. You can also explore more designs by the same author and take a look at their ‘collections’. 

SketchUp 3D Warehouse Materials

When you want to add colour and texture to a Sketchup 3D model, you can harness the amazing power of SketchUp 3d Warehouse materials. SketchUp lets you paint materials on faces, materials being paints with a colour and an optional texture defined in an image file. Maybe you’d want to create a grey roof with a texture like metal? It’s easy to achieve. You can easily replace one material with another, for example replacing your metal roof with shingles. You can even edit materials, treating the colour and texture separately to create your own unique look.

It’s easy to work out how much of a given material you’ll need by creating a precise model reflecting its actual size. Whatever you want to do, the 3D warehouse provides a wide selection of fabulous materials, including delights like metals, wood, brick, tile and decorative wall panels.

SketchUp 3D Warehouse Furniture

3D Warehouse provides an extensive selection of pre-designed furniture models, much of it real items of furniture designed by well-known popular brands that are actually available in the shops, including furniture from Ikea. You can see how this saves designers and architects an impressive amount of time and effort. There’s no need to create the model yourself, it’s free to download. It’s no surprise the SketchUp’s 3d Warehouse contributes to the production of so many high quality, engaging 3D designs, including beautiful outdoor furniture of every imaginable design, furniture for interiors in a wealth of styles, colours and designs, plus some of the world’s best creative furniture models made by masters of their craft.  

SketchUp 3D Warehouse Plants

How about plants? The SketchUp model Warehouse not only provides materials, models and furnishings. It also offers a vast selection of plants and trees to add realism and enhance property designs. It’s amazing how real-looking plants and trees can bring architectural designs springing to life, and it’s so much easier to imagine them being used by actual people. The plants, flowers and trees collection, for example, contains everything from contemporary plant walls to traditional potted plants for offices and homes, hanging planters, bushes and shrubs, ornamental grasses plus many, many models of specific species of plants and cut flowers.

The trees and plants collection is equally large and exciting, packed with everything from low-growing box hedges and topiary to the tallest of trees, created with leaf colours and styles to match every season. There’s even plenty of brilliant landscape models, from simple lawns to beautiful old walls, moss-covered rocks, pebbles and stones, and masses of amazing models of realistic grass. 

Browse SketchUp 3D Warehouse

Excited by the potential? Now you know what’s available in the 3D Warehouse, what will you explore first? Why not visit the SketchUp 3D Warehouse and take a look at the huge choice of gorgeous 3D models for yourself? You can also enjoy all sorts of useful resources for SketchUp Free and Pro, including a range of popular tutorials.

New updates in SketchUp Pro 2021.1

This image has an empty alt attribute; its file name is SU2021.1-PointRelease-Blog-Hero-HighRes-1024x576.jpg

We’re happy to announce some more updates in SketchUp Pro. The goal of this latest release is to improve the consistency of how modelling works from tool to tool, increase workflow efficiency, and build on the learnability of SketchUp.

Changes to SketchUp’s modelling modifiers 

In SketchUp 2021.1, the way that ten core tools work in modifier states is changing. For example, SketchUp’s Move tool can also work as a Copy tool. And, with a modifier, Push/Pull can create new faces when you extrude. Here are the highlights:

Modifier Toggles

The most explicit change is that more tool modifiers behave as toggles that can be turned on and off by tapping a key. This means fewer press-and-hold modifier interactions for tools and more predictable modelling outcomes.

For any tool, you can identify what modifiers are available in the Status Bar (at the bottom of the screen) and confirm the current modified state of the tool by examining the cursor or on-screen modelling behaviour. With more modifiers behaving as toggles, we think it’s easier to switch the tool state before you complete a given operation. 

Sticky Modifiers

We’re now persisting modifier tool states across multiple operations. This means being able to make multiple copies of objects with Move or being able to hide edges with Eraser across view changes using Orbit.

[Insert Video: Move tool copying]
Using the Move tool.
Hiding edges with the Eraser tool.

To get out of a modified tool state, either hit the modifier key again or change tools. 

Pre-lock Inferences

As you may already know, many SketchUp tools feature the ability to ‘pre-lock’ an inference direction or drawing plane. In this release, we are starting to apply this pattern to other tools. You’re now able to pre-lock an inference direction before the first click with the Line, Tape Measure, and Move tools. 

Push/Pull Updates

In SketchUp 2021.1, you’re likely to notice some differences with Push/Pull. In addition to making the Push/Pull Copy modifier a persistent toggle, we are also formalizing Push/Pull’s hidden modifier, Stretch.

Stretch is a modifier state that has actually existed in SketchUp for years but has never been referenced in the Status Bar or the Push/Pull cursor. ‘Stretching’ a face is roughly equivalent to moving a face perpendicular to its drawing plane, and especially useful at the earliest stages of form development. 

Stretch in action

Alongside improvements to Push/Pull noted above, we are also making a change to the front-face orientation when modeling in SketchUp. Now, SketchUp will always orient newly drawn faces with the front side facing up, when drawing on the ground plane, and with the front face ‘facing’ the camera in other cases. For example, if a face is drawn over the top of an existing face, the new face will still inherit the orientation of the face that it is drawn on.  Push/Pull and Follow Me operations behave more predictably with these changes, resulting in correctly oriented faces. 

Watch our Skill Builder to see exactly how these tool patterns and modeling behaviors will impact your workflow.

Performance improvement for big mesh extensions

Some SketchUp extensions are designed to create or manipulate large amounts of geometry. Of course, the bigger the mesh an extension is adding to SketchUp, the longer it will take to generate. We’re pleased to announce an improvement to how efficiently SketchUp’s API generates large meshes. Once you get meshes above 20,000 polygons, the improvement is especially noticeable. If you’re eager to explore this new API, check out extensions such as Artisan, SubD, Bezier Surface, and Skimp.

Updates to the Extensions menu

Going forward, the Extensions menu heading will always be visible, regardless of whether extensions have been installed there or not. We’ve also relocated extension management and developer tools to this menu. 

We aren’t forcing developers to put extension commands in the Extension menu, but it is best practice. Speaking of best practices, we recently published our Extension UX Guidelines. We want to help developers make extensions that function predictably in SketchUp.

Unit translation for Live Components

Live Components continue to evolve in SketchUp Labs to make them more useful. Specifically, Live Component parameters now display in the same unit format that you are using in your SketchUp model. So, when you are lining up a measurement with the Tape Measure tool, it’s a lot quicker to type that measurement into a Live Component parameter.

2021.1 also includes an improvement in the draw time of Live Component editing.

If you haven’t explored Live Components yet, you can check them all out in 3D Warehouse

IFC 4 classification and export

In addition to support for the IFC 2×3 schema and file format, SketchUp Pro now includes an IFC 4 classification set and the ability to export IFC 4 files. 

Learn more about how to use IFC types with SketchUp’s Classifier tool.

LayOut improvements

In 2021.1, we are introducing a faster way to set the scale of a viewport. Now, you can simply type in the desired scale in the Camera tab of the SketchUp model panel. This new type-to-input will neatly parse a number of inputs: 1:50, 1” = 50”, 1/50, .02, 2%, or even 6” = 25’ will all quickly apply a 1:50 scale to a viewport.

Also, in January we released an update that included a performance improvement to LayOut’s ability to inference SketchUp viewports. 

As you can see, we’re actively evolving SketchUp to provide a better 3D modeling experience. Your feedback is important to us. Please let us know how these updates have impacted your modeling in the forums.

To view all of our updates, including bug fixes, check out the complete release notes.

How to Change Measurements in SketchUp

How to Change Measurements in SketchUp

SketchUp is an incredible tool for interior designers, architects and even individuals passionate about 3D design but knowing how to use the tool efficiently and correctly are essential to get the most out of the software. Resizing in SketchUp is one of those essential skills and knowing how to use SketchUp to change measurements or edit dimensions is something that we should all know. 

To answer how to change measurements in SketchUp, we will look at the different methods you can use to make your designs even more accurate.

Setting up a SketchUp Template

You may want to start by setting up a SketchUp template. Most templates will define a model’s default settings which includes things like the unit measurements. Templates include all the settings in the Model Info dialogue box with elements such as Style settings and Shadow settings. 

If you are looking for high accuracy, you can create a template that uses more granular measurement such as millimetres which can be used for larger scale applications in interior and exterior design. 


Depending on your requirements, you can create templates and customise these as much as you need them to be.

To create a template is very simple: 

  • Create a new SketchUp file with the current template
  • Make all the modifications you want to save with the template
  • Select File > Save as Template 
  • Save your template in a location where you can easily access it
  • Give the template a name
  • Click Save

Settings in the Model Info Window

You can set up the Model Info Window in the dialogue box where the settings are made for the entire model. Here, templates which are using the settings for the template can be made here. 

If you want to access the dialogue box do so by: 

  • Select: Window > Model Info
  • This is where the units and the precision are set. I.e. Inches and 1/16”
  • Precision settings are selected from the drop down list. 
  • When using inches the highest precision setting appears to be 1/64”

How to Scale and Resize in SketchUp

Sometimes we can get carried away with our designs that we forget to scale the image correctly. Luckily there is a tool in SketchUp that makes it easy to scale and resize entire models or parts of the models without spending too much time doing so.

There are two tools you can use, depending on your requirement. One is the tape measure the other is the scale tool.

The tape measure tool allows you to scale your entire model but, when you want to scale a part of a design or even a singular surface, the scale tool is best. (Note: you can still use the measure tool for the latter.)

We will look at both of these tools and where you can use them. 

Scale an entire model with the tape measure tool

  • Select the tape measure tool
  • Click either end of line for which the measurement is required to change
  • Enter the newly defined dimension

Scale a selection proportionally

  • This can be achieved using either the tape measure tool or the scale tool
  • You can use both tools to select an area and rescale the measurement. I.e. a room maybe 15 feet wide but the rest of the floorplan can be the same as designed.
  • Select the element you want to scale > type the desired dimension in the “length” box in the bottom right corner > hit enter
    This will resize the whole model. If you don’t want to do that you need to create a group.
  • Scaling can be done as a percentage. (Note:  in the Measurements box, you see a scale of 1.00, which means your geometry is at its original size or scaled to 100%. Or you could simply input the scale you want to see the measurement at, i.e. 50% of full size.) Your Dialogue box will give you the information you need.

Scaling one or more dimensions

  • You can use the selection tool to select the specific geometry for which measurements are required to be changed
  • With the Select tool, select the geometry you want to scale
  • Click an edge or face grip on the object
  • Move the cursor to scale the entity
  • Click to set your selection’s new scale
  • The scale tool can be used to make the required changes allowing revised dimensions to also be entered

Scaling components

  • Scaling a component works like every other scaling procedure mentioned
  • The difference with scaling a component is that you can resize a single instance of the component or all component instances in your model
  • For example, you could have a house design where the front door needs to be scaled, leaving all the other dimensions the same
  • Do this by double clicking on the door
  • The object will have a dotted line around it
  • Use the measure or scale tool to scale the new measurement

    If you want to check the dimensions of your object before making any changes to the size or the scale, you can use the SketchUp Dimension tool. By selecting two points and moving away from the object, the display shows the measurement in an annotated form so you can clearly see what sizes you are working to. 

How to Mirror in Sketchup

How to Mirror in Sketchup

Mirroring and flipping objects in Sketchup is a quick way to create variation in your CAD design and make it stand out. It’s also an excellent way to check for errors in your design since any mistakes will be immediately obvious when viewed in reverse.

In this article, we’ll discuss how to mirror in SketchUp using several methods, including the Scale Tool, the Flip Along command, and various extensions. We’ll also share with you some useful tips like how to mirror geometry in SketchUp without losing its original position, how to mirror a group of objects, and more.

Using the Sketchup Scale Tool to Mirror

Unlike other 3D design programs, Sketchup does not have a dedicated “mirror” tool. However, there are several ways to mirror objects and geometry using the existing tools in Sketchup.

Out of them all, the SketchUp Scale tool is by far the most popular.

It’s easy enough for SketchUp novices to pick up yet versatile enough for designers working on more complex projects.

Here’s how to use the SketchUp Scale tool to mirror an object:

  1. First, select the object you want to mirror.
  2. Then, copy and duplicate the object (Ctrl + Move).
  3. Next, position the duplicate where you want the mirror image to appear.
  4. With the duplicate selected, click on Scale and enter a negative number (e.g., -1). This will create the mirror image.
  5. After that, press the Enter button to confirm the change and exit the Scale tool.

Repeat the process for each object you want to mirror.

Keep in mind that you can also use the Scale tool on SketchUp to resize objects, not just mirror them. To do so, simply enter a positive number to increase the size of an object or a negative number to decrease it.

Together, these techniques give you a lot of control over the look and feel of your SketchUp design.

Using the Flip Along Command to Mirror

Another way to mirror in SketchUp is to use the “Flip Along” command.

To mirror an object in SketchUp using the Flip Along command, follow these steps below:

  1. To get started, select the object you want to mirror.
  2. Next, similar to the Scale tool, create a duplicate by copying and pasting the object (Ctrl + Move).
  3. After that, select the duplicate.
  4. Then, right-click before choosing the “Flip Along” option. This will instantly mirror the object.
  5. Repeat the process for each object you want to mirror.

This method is just as simple as using the Scale tool but gives you a bit more control over the orientation of your mirror image.

For example, it also allows you to flip geometry along an axis. This technique can be especially useful when working on designs with a lot of symmetry, like furniture or buildings.

To flip your geometry, simply follow these steps:

  1. First, choose the geometry you want to flip using the Select tool ().
  2. Then, context-click the geometry you selected.
  3. From the resulting menu, choose Flip Along.
  4. Finally, in the submenu that appears, select an axis.

This will create a mirror image of the original geometry, flipped along the axis you selected. Manipulate and position the new geometry as needed.

Using a Sketchup Extension to Mirror

One of the best things about using SketchUp is the huge library of extensions and plugins available to customize your experience.

These extensions can do everything from speed up the modeling process to adding new tools and features.

There are also a number of SketchUp plugins that allow you to mirror objects, geometry, and groups of objects with just a few clicks.

Many of these extensions are free to download and use. Others are available for a small fee, but these usually come with even more powerful features and customization options. In addition, most of them work on both Mac and Windows platforms, making them accessible no matter what type of computer or operating system you’re using.

That said, here are a few of the best SketchUp plugins for mirroring objects:

TIG Mirror (FREE SketchUp Plug-in)

The TIG Mirror plug-in for SketchUp is a free extension that allows you to mirror selected objects.

To use it, simply define a plane, line, or point by picking 1/2/3 points. This will mirror the selected objects. You can then choose to keep or delete the original objects.

This plugin is compatible with all versions of SketchUp and works on both Mac and PC.

Magic Mirror (FREE SketchUp Plug-in)

The Magic Mirror plugin is another free SketchUp extension that allows you to quickly mirror objects with just one click. It’s faster and easier to use than the TIG Mirror plugin, making it a good choice if you’re looking for something that’s quick and simple.

The Magic Mirror plug-in was created by CyberAvocado and is compatible with both Windows and Mac operating systems.

S4U Mirror 4 (PAID SketchUp Plug-in)

S4U Mirror 4 is a SketchUp plug-in that also lets you mirror objects. It’s a bit more powerful than the previous two plugins.

Aside from one-click mirroring, you can also use it to mirror and duplicate objects. On top of that, you can also set the plane by selecting 2 points and the Z-axis, 3 points, or an edge, axis, guide line, or face.

S4U Mirror 4 is an in-app purchase and costs $10. You can use it on both Windows and Mac operating systems. They offer a free trial, so you can test it out before you buy.

These are just a few of the many useful extensions you can use with SketchUp. Browse the SketchUp Extension Warehouse to find more plugins that can help you execute your CAD designs.

How to Mirror Objects in Sketchup

Aside from basic object mirroring, Sketchup also offers several ways to flip or rotate geometry. CAD designs often include a lot of symmetry, and being able to quickly mirror or rotate geometry can save a lot of time in the design process.

Additionally, SketchUp allows you to mirror a variety of objects, including group geometry and raw geometry. This functionality expands what you can do with the software even further. You also get to experiment with different variations of your design without having to start from scratch each time.

Again, the most common way to mirror geometry in SketchUp is by using the Scale tool. Here’s what you can do:

  1. First, select the raw geometry, component, or grouped geometry you want to mirror.
  2. Then, use the Copy/Paste or Duplicate function to create a copy of the object. The fastest way to do this is with the CTRL + Move shortcut.
  3. Next, position the resulting duplicate carefully. You’ll want to make sure there’s enough space to allow for negative scaling.
  4. After that, enter a negative value in the Scale dialog box. This will create a mirror image of the original raw geometry, component, or grouped geometry.
  5. Repeat this process as necessary to create additional objects.

As we touched on earlier, you can also use the Flip Along command to mirror geometry in SketchUp. The difference is the “axis” element. Flipping along an axis will result in a mirror image while flipping along a plane will simply rotate the geometry.

To use the Flip Along command, simply follow these steps below:

  • To get started, select the geometry you want to mirror. This can be grouped geometry, raw, or components.
  • Next, duplicate your chosen object.
  • With the object selected, right-click on it, then select Flip Along from the options.
  • A sub-menu will appear, from which you can select the axis along which you want to flip the object.
  • The geometry will be mirrored along the chosen axis.
  • Finally, manipulate the geometry as necessary to achieve the desired results.

Wrapping It Up

Knowing how to mirror objects in SketchUp is an essential skill for anyone who uses the software for CAD design. You can use SketchUp’s native tools like the Scale tool and the Flip Along command to quickly create mirror images of your geometry.

Additionally, there are a number of plugins that can help you mirror objects in SketchUp, including TIG Mirror, Magic Mirror, and S4U Mirror 4.

Feel free to give each one a try until you find the tool that works best for you and your workflow.

SketchUp for 3D Printing

SketchUp for 3D Printing

3D printing has become popular for businesses, hobbyists and the general public alike. What used to be something that could only be dreamed of is now a reality for many people. When it comes to easy to access, learn and use, you can’t go wrong with SketchUp as a 3D printing design tool.

We will explore more about the world of 3D printing and how you can use SketchUp to help transform your designs into a 3D model. 

What is 3D Printing Software?

3D printing is the process of making three dimensional solid objects from a digital file. 3D printing software allows you to create designs that can be repurposed into a 3D printed model. 

In order to create a 3D printed object, the design goes through an additive process. What this means is that the object is created by laying down successive layers of material until the object is created – this is all calculated through the design stage, and by the 3D software tool. 

Using tools like SketchUp Pro is one of the easiest and most fun ways to get started. The tool allows you to design and put together a creation that is easily transferable to a 3D modelled design.

Model Your 3D Designs Accurately

When it comes to 3D design, many think that it is a complicated business of learning software and understanding every element of the design process. Many will see the barrier to entry and having to learn complex 3D design software, this is far from the case. 

SketchUp Pro is fun and easy to learn. It’s simple layout and features make getting involved with 3D design a joy. You don’t need to learn any code, or have a complete understanding of CAD design packages to start. 

A key element of 3D printing is the need to be accurate, this is essential for the design to transfer correctly into a three dimensional model. Software like SketchUp Pro does the hard work for you with its precision and accuracy elements of the design package. You can choose how precise you want the scale of the model to a multitude of different features that enhance your accuracy throughout the design. 

Transform Shapes into 3D Structures

No matter how simple or complex your model, every model in SketchUp is really just edges and faces. The drawing tools enable you to create those edges and faces. There are differences between drawing shapes from 2D to 3D, be sure to use the SketchUp inference engine to guide you through the process. 

For example, if you wanted to create a 3D bowl design, you draw a circle on the ground plane and a profile of the bowl’s shape directly above the circle. Using the SketchUp Pro tool, you can create an outline into the bowl by having it follow the original circle on the ground plane. This is then the profile that is used to help you create your 3D design. There is a more in-depth explanation that can be found here

Using software like SketchUp Pro makes creating a 3D design to be printed, a simple and easy to use prospect. 

Find Inspiration with 3D Warehouse

3D Warehouse is where you can be inspired by other designs, feature your own creations and find a model of something you were looking to create in one location. 


There is a huge repository of 3D elements available from the warehouse which can be used to create your own personalised items to off the shelf designs that are already designed to be used for your own purposes. 

The search feature is a powerful tool that helps you find exactly what you are looking for and the opportunity to share your 3D designs via the warehouse is an added benefit of the SketchUp Pro family. 

SketchUp 3D Printing Extensions

SketchUp extensions are additional pieces of software that help you create your own designs with additional features and help. You can find the extensions here.

Accessible to Windows and Mac platforms, each 3D extension provides various capabilities that help you create your own design. Many of the extensions are free to use with some exceptions for small payments being required for the use of the extensions. 

For example, one extension – 3YOURMIND – allows you to optimise your model for 3D printing and upload the design with one click into the 3YOURMIND portal. This allows you to choose from a number of different materials and compare the prices of the best 3D printing services in real-time.

SketchUp 3D Printing Tutorials

If you wanted to learn more about SketchUp Pro, you can find a body of tutorials on all topics including 3D printing across the internet and through the elmtec tutorial section

There are also some really good tutorials available on sites like YouTube where you can go from beginner to more advanced.   

SketchUp 3D Printing FAQs

Here are some of the more common questions when it comes to using SketchUp 3D Printing tools:

How Does 3D Printing Software Work? 

3D printing software can encompass a variety of products that help the 3D printing or 3D design process including slicers, design automation, computer-aided manufacturing (CAM) and computer-aided design (CAD) technologies. 

Is 3D Printing Software Hard to Learn?

3D printing software is not hard to learn, like anything it takes time and practice. SketchUp Pro is the easiest 3D printing software to learn and use making 3D printing easy. 

Which Software is Best for 3D Printing?

You want a 3D software package that is easy to use, simple to learn and supported with lots of resources and used extensively within design communities. That makes SketchUp Pro the best 3D printing software to use. 

Sketchup Pro Plans and Pricing

If you want to take advantage of SketchUp Pro, you can purchase a license from here. There are three options to choose from including, one for education (schools and lecturers) and a subscription option.   

How to Ungroup in SketchUp

How to Ungroup in SketchUp

You love SketchUp? You’re not alone. It’s a brilliant visualisation tool used by millions to create projects faster, save money, bring clarity to your designs, and delight clients. If you’ve been wondering exactly how to ungroup in SketchUp, grouping and ungrouping entities in SketchUp is a fundamental capability and skill that we’ll reveal in this brief article.

Grouping in SketchUp

What is a group in SketchUp? Groups are how you keep related elements organised in your drawing area. Groups also make it easier to select and copy multiple elements at the same time. You might, for example, always want to move a text box along with its associated shape. When you make them both into a SketchUp Group all you have to do is select the group once rather than select the text box and the shape separately again and again. This saves you time as well as cutting the risk of mistakes.

How to make a group

Here’s how you create a Group. First, use the Select tool arrow to choose all the items you want to include in the Group. Next either use Select Edit > Group, which you’ll find in the menu bar, or context-click your selection and choose ‘Make Group’ from the menu that pops up. Now everything in your selection is clearly grouped together inside a box.

How to edit a group

It’s just as easy to edit a Group. Just double-click the Group using your Select tool or select it then ‘Enter’. Now everything outside the Group has faded. If you’ve created nested Groups keep double clicking to get to the Group you want to change. Once you’ve finished editing, you simply click anywhere outside the Group to save your work.

Ungrouping in SketchUp

If you no longer need a group, Ungrouping in SketchUp is easy, too. It’s basically the reverse of the grouping process.

How to ungroup

Select the group then choose Edit > Ungroup from the menu bar. You can also context-click your selection then pick Ungroup from the menu to make everything inside the group into a separate entity. There’s one important thing to remember. This SketchUp guide talks about a context menu option ‘Ungroup’ but it isn’t available. Instead you use the ‘Explode’ context menu to ungroup entities.

Did you find that nice and simple? Like everything else about SketchUp it’s designed to make your life easier. Let’s go create!

There’s lots more to learn, and we make learning a pleasure. You can find out more about how to use this popular visualisation tool using our popular tutorials, and decide whether to use the free or Pro version by checking out our comparison page. 

SketchUp for Construction

SketchUp for Construction

Have you been looking for information about SketchUp for construction? SketchUp construction design software is widely used in your sector, a respected and popular tool used to speed up design, making the entire process smoother and faster. SketchUp Pro lets you identify potential issues before they become real-world problems, figure out a fair price for a construction project, and help your clients understand the plans more clearly and easily than ever before. Here’s what you need to know about the benefits of creating top class SketchUp construction drawings. By the end of this article you’ll know exactly why it’s such a good idea to know how to build a house in SketchUp.

SketchUp 3D Construction Modelling

SketchUps 3D construction modelling capabilities provide incredibly valuable design visualisation. As someone who works in the construction sector building plans are second nature to you, but not necessarily for your less-experienced clients. SketchUp construction documents make it a whole lot easier for non-experts to understand your plans.

SketchUp Viewer lets people investigate, evaluate and explore construction design projects before they’re brought to life, something that saves money, time and hassle. It means you can carry out revisions at an early stage before actually committing to the final construction documentation. SketchUp construction plans even come with the capability to use AR/VR to evaluate the different construction design options virtually. It’s a powerful tool that’s very easy to use as well as fun. And that makes it the perfect choice for construction contractors, small and large.

SketchUp Construction Drawings

SketchUp for construction, using SketchUp Pro in conjunction with Layout, is a brilliant way to create accurate, useful, clear construction drawings directly from 3D models. It can be done in two ways, each with its own pros and cons.

Firstly, you can get the 2D information from the model itself. This means the model has to be very accurate in the first place. It’s important to add colour and texture to the interior of the elements so the sectioned model is good and clear. It also helps to apply a different colour or texture to each different kind of material. Using this method means your plans and sections are always closely related to the model. When you make a change in 2D it doesn’t take much work to make it appear in 3D. On the down-side the modelling takes longer and you need to know all about the construction of the building in detail. 

Alternatively you can generate a 2D group in SketchUp that contains all the 2D info you need, generated simply by right-clicking on the section plane. When you edit this group you can add all the fine detail you need to create accurate plans and sections. It’s handy not having to model everything in detail and being able to control the level of detail, but on the down side there’s no link between the model itself and the Layout presentation. Plus, the details of the section cut involves a 2D job, something SketchUp isn’t primarily designed for. On the other hand there are always TIG 2D Tools to rely on, and Layout itself helps a lot.

Layout lets you include essentials like dimensions, labels and text, all of which matter when you’re trying to get the details of a construction project across quickly, clearly and accurately. In exactly the same way you’d use old-school word processor tech, you type text into the drawing area. You can also import text from a file or even add Auto-Text defined on special fields inserted into the document. And the text can be formatted to your brand for great brand synergy.

Labels and dimensions are impressive. Labels come with an arrowed leader line which makes it easy to highlight individual elements. It can show Auto-Text as well as data from a SketchUp model. And dimensions display measurements either on the page or from a SketchUp model. You can share your SketchUp drawings in a variety of popular standard formats and import them into different CAD software tools. And you can print SketchUp for construction drawings easily, which is great when you prefer to work from printed diagrams rather than a screen.

Would you like to check out how to use more aspects of this great tool? Take a look at our tutorials, then figure out whether you need the free or Pro version via our handy comparison page. 

Now you know what SketchUp drawings, SketchUp dimensions and SketchUp diagrams can do for you. Will you be harnessing the amazing power of SketchUp Pro for your next construction project?

How to Copy in SketchUp

How to Copy in SketchUp

Are you wondering how to copy in SketchUp? Or how to copy and paste in SketchUp? Or how to copy scenes in SketchUp? Copying and pasting objects, scenes and components is a fundamental SketchUp skill and capability, and we’re going to show you exactly how to do it in this article. By the end of it you’ll know how to move objects whether you intend to rotate them, copy them or do something else creative with them.

How to Copy and Paste in SketchUp

The first thing to know is that the process of copying and pasting in SketchUp is much the same as it is in many other programs. The standard CTRL+C and CTRL+V keypress combinations work perfectly, which means your learning curve isn’t going to be that steep. And the select tool is an arrow, exactly as you’d expect.

The Select tool specifies the items you want to change using other SketchUp tools and commands. You’ll find it via the Getting Started toolbar, the Large Tool Set toolbar, the Principal toolbar in MS Windows / Tool Palette in macOS, and also via the Tools menu.

How to copy multiple objects in SketchUp? Using the Select tool, select an object you want to copy or select multiple objects. To change a line’s length, for example, you need to select the line. Scaling a box involves selecting the box. You can also select a group of objects to change at the same time, creating a ‘selection set’. To select more than one thing, simply hold down the Shift key and click all the items you want to select.

Choose Edit > Copy from the menu or use a shortcut – either Ctrl+C for Windows or Command+C for a Mac. Next choose Edit > Paste from the menu bar, Ctrl+V for Windows or Command+V for a Mac – and you’ll see the cursor change into a Move tool. The SketchUp components you’ve copied float around as you move the mouse. To place SketchUp objects, simply click where you want them to go.

How to select and copy multiple objects in SketchUp

You’ll probably need to select specific, multiple objects when copying in SketchUp. So how do you do it? It’s simple. You use the Shift key to select multiple objects, and the same key to remove objects from your selection set.

Double clicking faces selects the face you want along with all of the adjoining edges. In the same way, double clicking an edge selects it along with its adjoining faces. When you triple click on a face you select the entire object that it belongs to, which it forms a part of. And when you select an element it changes colour to blue making it easy to keep track of what you’re doing.

How to Copy Scenes in SketchUp

A SketchUp Scene is simply a saved image of your mode associated with a tab. Scenes are what you use to save different views of models and their properties, which you can present to colleagues or clients. It makes more sense than opening a drawing with the view you want, erasing the contents, then pasting in the new model.

Creating a Scene triggers a tab at the top of your drawing area. To view the Scene – the saved view – you click the tab to display it. You can also import and export Scenes to other models using a special plugin costing five US dollars, PageExIm.rb by Rick Wilson

While you can’t animate Scenes with SketchUp for Web yet, you can export all your video animations as image sets. As you can imagine, animations are a great way to present models from different angles and create useful shadow studies, revealing exactly where the light falls throughout the day.

Before you create an animation you need to make scenes of your model, each with different settings. Once you’re ready to animate, you can either play an animation in SketchUp, export your animation to a video file, or export the image set as a collection of image files to be animated via video software, something you can do via SketchUp Pro. It’s good to know that copies made across a variety of standard image formats can be imported into SketchUp.

Download SketchUp today!

Now you know how to copy in SketchUp, what will you create? Find out more about how to use this exceptional tool via our popular tutorials, and explore the choice between the free and Pro versions of SketchUp here. 

About Elmtec

Elmtec have been the UK distribution partner for SketchUp since 2010, and service a network of UK and Irish resellers. We have over 22 years’ experience within the digital design community.

Contact Us

T: 01844 263 750
E: sales@elmtec.co.uk
W: www.elmtec.co.uk/sketchup