“You Have Exceeded Your Allowed Activations”: How to manage your Subscription Activations

It can be alarming to read the notice in SketchUp “You have exceeded your allowed activations” when trying to use or sign in. It will prevent you from using the software altogether. However, this doesn’t mean that your subscription is over or that you’ve done anything wrong.

Some of the most common reasons for this error are the following:

  • You’re trying to use SketchUp Pro on a new computer or device, and you haven’t deactivated it on your old one yet.
  • You’ve uninstalled SketchUp on a computer or device, and you’re trying to use it again without reactivating it first.
  • There’s a problem with your network or internet connection.
  • There’s a billing issue with your subscription.

If you see this on your screen, don’t worry. In most cases, it’s easy to fix. In this guide, we’ll show you how to manage your subscription activations so you can keep using SketchUp, starting with how to activate SketchUp on any device.

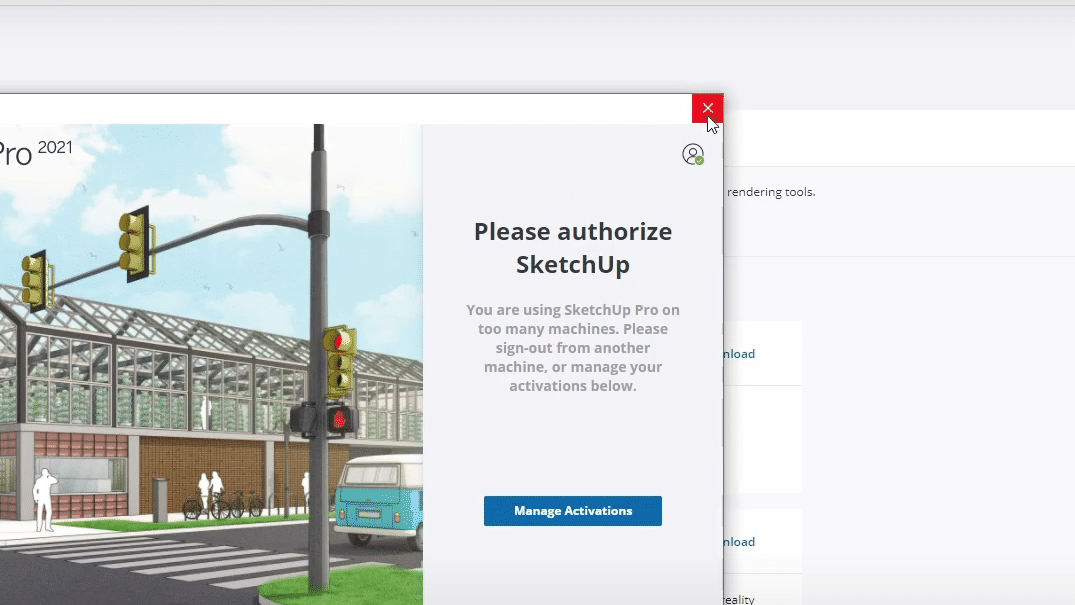
Please authorize SketchUp
You are using SketchUp Pro on too many machines. Please sign-out from another machine, or manage your activations below

No need to panic. It just means you’ve reached your activation limit for SketchUp.

Activating Your Sketchup Pro Subscription

Before you can resolve the SketchUp “You have exceeded your allowed activations” error, you need to understand how SketchUp Pro subscription activation works.

When you buy a SketchUp Pro subscription, you’re given a certain number of activations to use. This is the number of devices or computers you can use SketchUp Pro on at the same time.

You can use and re-use these activations as often as you want. However, if you try to activate SketchUp Pro on a new device without deactivating it on an old one first, you’ll get the “You have exceeded your allowed activations” error.

The most important thing to remember is how many devices or computers your subscription is already activated on.

For a refresher, here’s how to sign in, download, activate, and manage SketchUp Pro on your devices:

  1. First, open your browser and go to the SketchUp Pro account management portal.
  2. Next, sign in with your Trimble account or the email address and password you used to buy your SketchUp Pro subscription.
  3. If you don’t have a Trimble account, you can create one for free. You can also use your Google or Apple account to sign in.
  4. Once you’re signed in, click “My Products” to see the products associated with your account.
  5. If you have an active SketchUp Pro subscription, it will be listed here.

Note: If SketchUp Pro does not appear in your “My Products” list, it means that you do not have a license assigned to your account. The license is generally assigned to the owner of the subscription. This may be you or your company.

Manage Activations
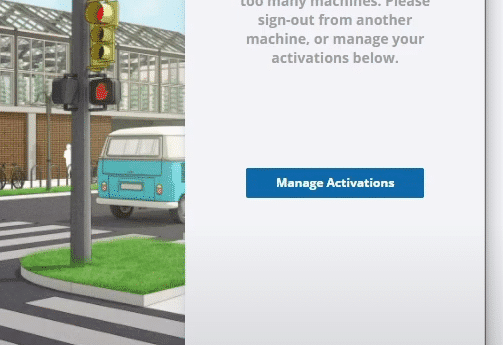
Error message

The first step is to click the “Manage Activations” Button which will take you to the SketchUp and Trimble account management site. If for any reason you struggle to load this, you can access this via a web browser using this link.

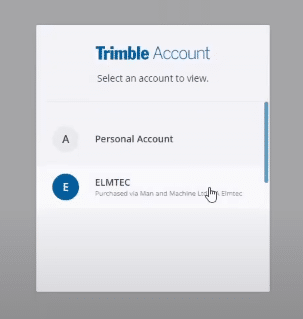
Sign in with the email account your SketchUp subscription is allocated to. If you have multiple accounts, choose the sub-account to which your subscription is also attached. In this instance, it is the second option, ”Elmtec.” It may be the case that it is a business name or simply a personal account.
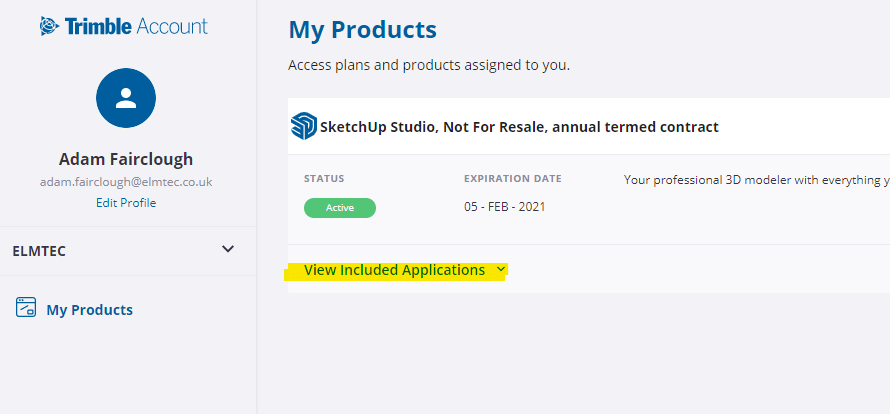
This brings you through to the “My Products” Screen.

On this screen, you’ll now see any active subscriptions (indicated by the green “active” badge) as well as any expired or legacy products you may also own.
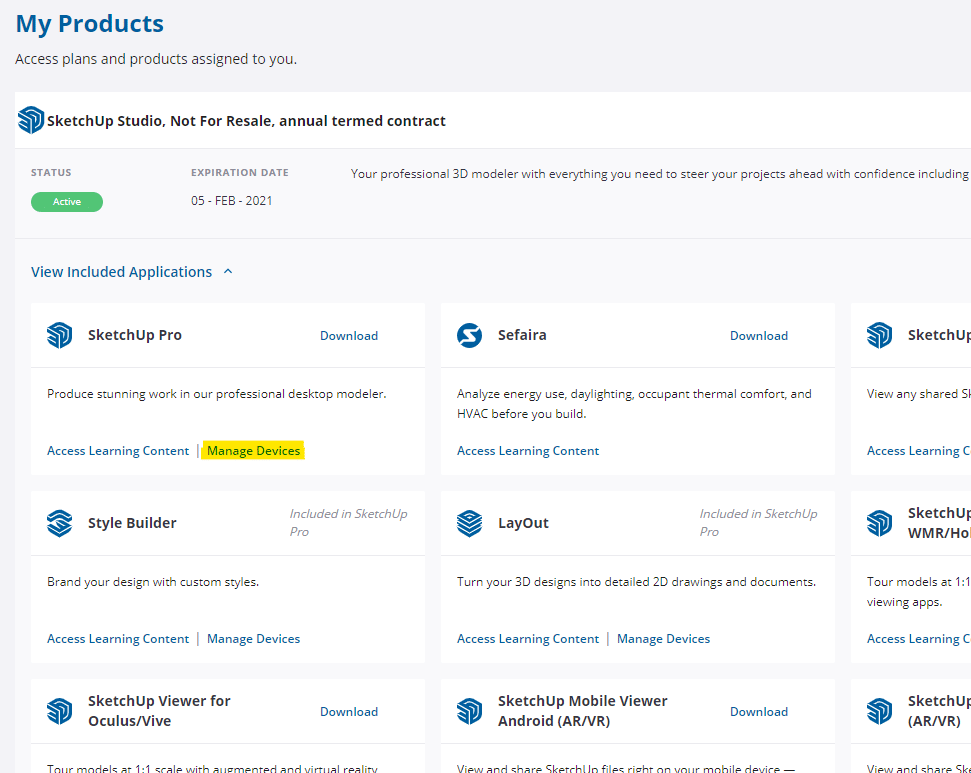
Click through into "View included Applications"
Below your current Active Subscription choose “View Included Applications”

My Products

Manage Devices

The above image shows all of the products included with a SketchUp Subscription. This particular subscription is for SketchUp Studio, hence the inclusion of Sefaira.

If you think you should have a license but don’t see one, contact your SketchUp Pro administrator or Trimble customer support to seek help or assistance immediately.

If you’re the one who owns the license, you may need to assign it to your account by downloading it from the SketchUp Pro account management portal and then activating it on your computer. To do so, simply follow the instructions below:

  1. Once you’ve signed in to your account, navigate to the “Download” page.
  2. Then, scroll down to the “SketchUp Pro (the relevant version of your purchase)” section and click the “Download” button.
  3. Next, save the installer file to your computer and then run it.
  4. Once SketchUp Pro is installed, launch the program on your computer.
  5. When SketchUp Pro starts up, you’ll see a welcome screen with several options. Click “Sign In.”
  6. After that, sign in with the same Trimble account or email address and password you used to sign in to the account management portal.
  7. Once you’re signed in, SketchUp Pro will automatically activate.

From here, you can now check and manage the status of your SketchUp Pro subscription. To do this, go to Help > Manage License.

The “Manage License” window will show you the status of your subscription and how many activations you have remaining.

How to Manage Sketchup Pro Subscription Activations

Once you understand how SketchUp Pro subscription activation works, it’s easy to keep track of your activations and resolve the “You have exceeded your allowed activations” error.

But first, here are a couple of things to keep in mind:

  • You can have SketchUp Pro installed and activated on as many devices as you want, but you can only use it on three devices at the same time.
  • For instance, if you’ve previously installed SketchUp 2019 and 2020 on your desktop workstation, then SketchUp 2020 on your laptop or another PC, you’ve already used up your three activations.
  • If you try to activate SketchUp Pro on a fourth device without deactivating it on one of the other three first, you’ll get the “You have exceeded your allowed activations” error or the “You are using SketchUp on too many machines” notification.

To reset your SketchUp Pro activations and use the software on a different device, follow these steps below:

1. Click “Manage Activations” to reach the account management page

  • On the page which shows you the “You are using SketchUp on too many machines” error, you’ll see a button that says “Manage Activations.”
  • Click on that, which should take you to the account management portal.

If it doesn’t, you can also access the account management portal by using this alternative link.

2. Sign in and go to “My Products”

  • You’ll need the same email address and password you used when you first purchased your SketchUp Pro subscription.
  • If you have multiple accounts, such as a business account and a personal account, choose the one linked to the subscription.
  • Then, navigate to “My Products.”

3. Locate SketchUp Pro in your list of products

  • Under the “My Products” section, you should see a list of all the products which are currently associated with your account.
  • Find SketchUp Pro.
  • You’ll see a live link called “Manage Devices.” Click on that.

 4. Revoke all current activations for SketchUp Pro

  • You should see a list of all the devices on which SketchUp Pro is currently activated.
  • Click on the “Deauthorize All” button to revoke all these activations at once.
  • Upon clicking, a pop-up window will appear, asking you to confirm the deauthorization.
  • Click on that to proceed.

Note: This will NOT cancel your SketchUp Pro subscription or delete your license. It will only revoke the activations for SketchUp Pro on all devices, allowing you to then activate it again on three new devices.

5. Close and restart SketchUp Pro on the device you want to use

  • To begin using SketchUp again, close the program and then restart it.
  • After that, you’ll see the welcome screen with the “Sign In” option.
  • Finally, input your credentials, and you can now activate SketchUp Pro on that device!

This process should resolve the “You are using SketchUp on too many machines” or “You have exceeded your allowed activations” error.

If you have other products in your account, such as Style Builder or LayOut, you can follow the same process to manage those activations as well.

Confirm Deauthorization
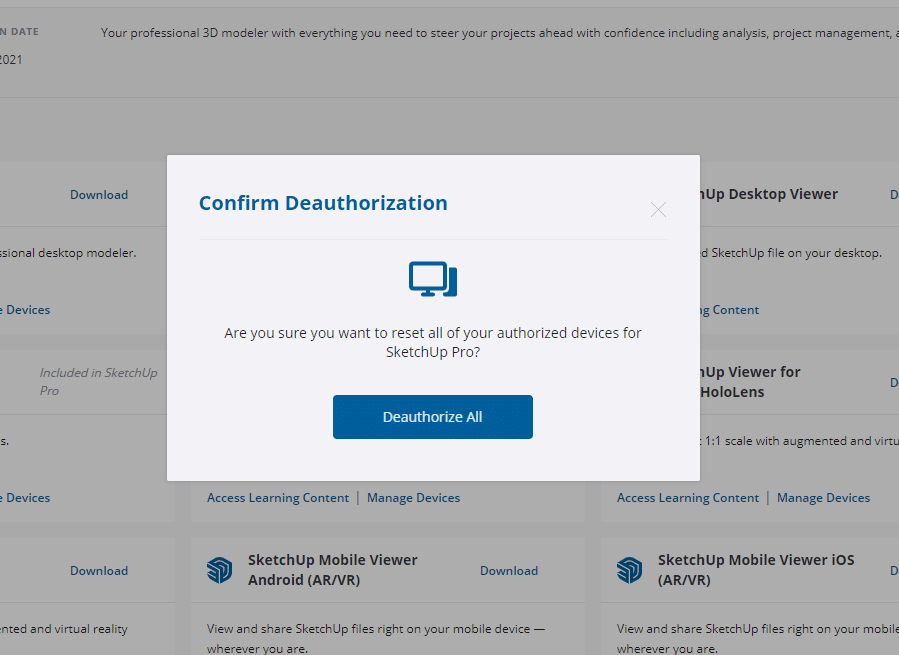
Click ‘Deauthorise All’

SketchUp has now been deauthorised for all the machines and versions it had been activated on previously. Great! Now, all that is left is to sign back into SketchUp.
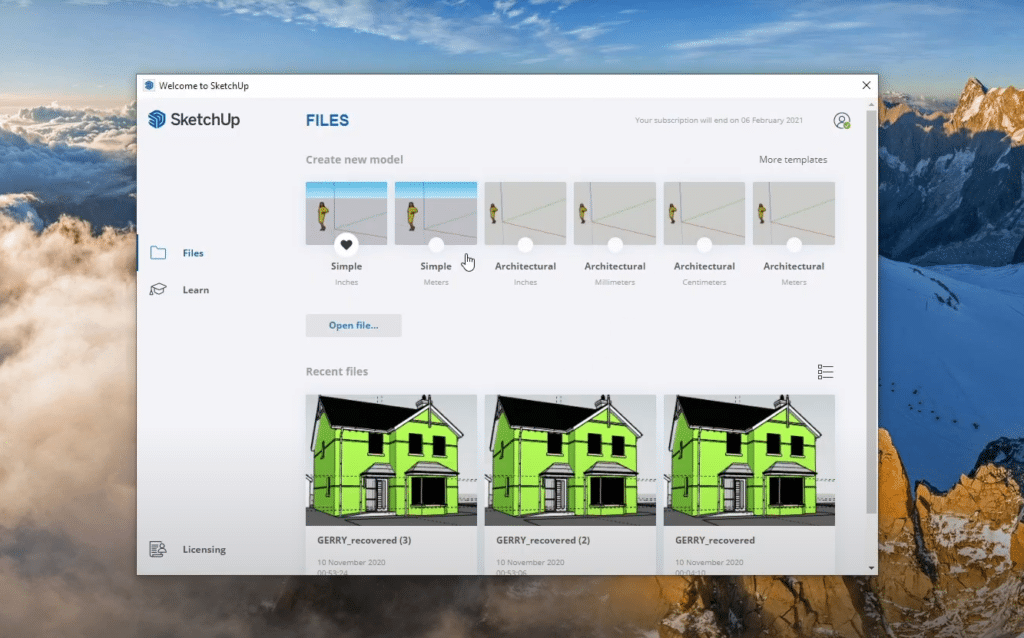
Restart SketchUp by closing it and reopening it

You are now signed in, and ready to get your SketchUp on again!

Final Thoughts

Managing your SketchUp Pro subscription activations is a breeze once you understand how subscriptions, activations, and limits work. As long as you keep track of how many devices you have SketchUp Pro installed on and remember to deactivate it before trying to install it on a new device, you shouldn’t run into any issues moving forward.

Getting Started with SketchUp

You’ve maybe heard about it on the grapevine. Perhaps it’s completely new to you. What is Sketchup? Are you researching sketchup for beginners? It’s a totally brilliant way to draw almost anything you like in 3D, loved by professionals and amateurs alike and popular in schools as a cool way to learn CAD.


It looks like you’re in for a treat with a Sketchup download. So how do you go about a   

Sketchup download of the free version or a Sketchup pro download? How do you use the Sketchup installer? What about troubleshooting Sketchup, and what do you need to know about Sketchup previous versions? Read on to find out. By the end of this article you’ll know exactly how to get the right version, install it, and troubleshoot your way out of any issues.

Downloading Sketchup

Let’s tackle the most important things first – here are the links to the Sketchup for Windows download and Sketchup for Mac download. Click on the link to start your download.


Sketchup installer is all you need. It works for all the available languages and downloads in the language you choose.


The free web version of Sketchup is another great resource, perfect when you want to test-drive the magic for yourself before downloading the full version. And as far as the remaining essentials go, here’s what you need.

Essential system files for Sketchup download 2022

If you’re going to download SketchUp 2022 for Windows you’ll need Visual C++ Redistributable for Visual Studio 2015 and Microsoft .NET Framework 4.5.2 on your machine. They might already be there. If not, SketchUp Installer will try to install them for you. You must be online for it to work.


If you’re on a Mac, you’ll need an internet connection to authorise SketchUp and use all the features. You must have QuickTime 5.0 installed, and the Safari web browser for multimedia tutorials.

What graphic cards do I need for Sketchup?

For Mac and PC we recommend you have the most up to date current drivers installed for your graphics card or cards. It’s also important to check your machine has the right hardware for Sketchup.

What hardware do I need for Sketchup?

Recommended hardware for Windows machines:


  •         A 2+ GHz processor
  •         A Discrete Graphics card, for example the latest generation AMD or NVIDIA
  •         8+ GB RAM
  •         2GB available hard-disk space
  •         3D class video card with 1 GB of memory or higher and support for hardware acceleration
  •         Your video card driver must support OpenGL 3.1 or higher, and be up to date
  •         You can test your graphics card’s compatibility by running the SketchUp Checkup application, free to download
  •         A 3 button, scroll-wheel mouse

The minimum hardware to run Sketchup pro download on a Windows PC:


  •         1 GHz processor
  •         4GB RAM
  •         1GB free hard-disk space
  •         3D class video card with 512 MB of memory or more, plus support for hardware acceleration
  •         Your video card driver must support OpenGL 3.1 or higher, and up to date


Recommended hardware for Macs:


  •         2.1+ GHz processor or current Apple M1 processor
  •         8GB RAM
  •         2GB available hard-disk space
  •         3D class video card with 1 GB of memory or more, plus support for hardware acceleration
  •         Make sure the video card driver supports OpenGL version 3.1 or higher, and is up to date
  •         A 3-button, scroll-wheel mouse


The minimum hardware to run Sketchup pro download on a Mac:


  •         2.1+ GHz Intel™ processor
  •         4GB RAM
  •         1GB available hard-disk space
  •         3D class video card with 512 MB of memory or more, plus support for hardware acceleration
  •         Make sure the video card driver supports OpenGL version 3.1 or higher, and is up to date.
  •         3-button, scroll-wheel mouse

How many devices can Sketchup be activated on?

A single-user licence or subscription is designed for one registered or assigned user, but they can activate their licence or sign in on two different computers.

How do I download Sketchup without the internet?

There are two versions of the SketchUp installer. One requires an internet connection, the other lets you install Sketchup without an Internet connection.

Installing Sketchup

It’s very easy to install Sketchup, a quick process you’ll probably be familiar with. Here’s how to install Sketchup on a Windows PC:

  •         Log in as an Administrator to open the Installer file you’ve downloaded
  •         Click Install to begin
  •         The Installer will show you a progress bar
  •         Click ‘Finish’ when it’s completed the job – this closes the installer
  •         It’s a good idea to reboot your computer after the installation is finished

It’s just as simple to install Sketchup on a  Mac:


  •         Make sure you’re logged into your computer as a user with Administrative powers
  •         Close down any existing application versions on your machine
  •         Double-click the Installer file
  •         Drag and drop the SketchUp icon into the Applications folder
  •         The progress bar reveals the install’s progress
  •         Go to the SketchUp folder and Double Click the SketchUp icon
  •         You might get a security message – if so, open it
  •         Close the Installer window
  •         Delete the Disk Image drive icon


How to install Sketchup updates:

You’ll need to update SketchUp regularly to get new features, bug fixes and more, and SketchUp does it all for you.  SketchUp regularly checks its servers during launch to make sure you’re always up to date. If there’s a new version available you’ll be notified. Most of the time all you need to do is download and install the update. But you can also check out the release notes first, skip individual updates if you like, and even avoid future notifications for a specific part of an update. And you can delay the option to update by asking for a future reminder.

Clicking ‘download and install’ kicks things off. You can monitor the download process and can also read the release notes at this stage, or set up a reminder. Once the download is finished, just click ‘continue’ and the latest version will download to your machine.

Activating Sketchup Pro

You’ve downloaded Sketchup Pro. Now you have to Open and Activate your Subscription Plan before opening Layout or StyleBuilder for the first time, simply so you can agree to the Licence Agreement. Once you’ve completed that, it’s time to open Sketchup.

Here’s how to do it on a Windows machine:

  •         SketchUp creates shortcuts on your desktop. You can also open it from C:\Program Files\SketchUp\SketchUp 2022 (or whichever version you have) by double-clicking on the program file

Here’s how to open Sketchup on a Mac:


  •         Go to the Applications folder
  •         Open the SketchUp folder of the version you want (2021, 2022 or whatever)
  •         Open the SketchUp or Layout application you find in the folder

Remember, to activate your Sketchup pro subscription you’ll need to be online. A single license can be used on a maximum of two computers. If you don’t see a welcome dialogue box, choose the help option.


You might opt for an annual subscription. This lets you pay once when you start, and use all the features in the subscription you choose for a full year. Sketchup is currently looking for cool ways to improve their choice of subscriptions, so keep an eye open for announcements.

Migrating from a Previous Version

What happens when you need to migrate to a new version of Sketchup?

Let’s explore Sketchup migrating for Windows first.

Migrating Materials & Components in SketchUp Windows

 Navigate to the root folder in SketchUp 8 and older. This is usually C:\Program Files\SketchUp\SketchUp 2013\Materials (or Components)

  •         Select the files in the Plugins folder
  •         Ctrl+C to copy the items
  •         Go to C:\Program Files\SketchUp\SketchUp #\Materials (or Components)
  •         Press Ctrl+V to paste the files
  •         If you’re asked to Merge the folders and Confirm Folder Replace, click yes
  •         The next choice is copy or paste. Choose Don’t Copy to keep the original file names  
  •         New content files are simply copied  
  •         You can choose Do this for the next ### conflicts to avoid having to approve loads of files one by one
  •         Open SketchUp and your new materials should be in the Materials dialogue box – and your new components will be in the Components dialogue box

Migrating Plugins in SketchUp Windows

First, migrate the extensions from Extension Warehouse:


  •         Open your newly-installed SketchUp
  •         Open Extension Warehouse and sign in
  •         Go to My Extensions by hovering over your username in the top right corner and selecting My Extensions
  •         The My Extensions page lists your installed extensions on other versions and installations of SketchUp
  •         Scroll through the list and install the extensions you want to bring to your new version

Next, migrate all your other extensions:

  • Figure out which extensions you use that aren’t in the Extension Warehouse
  • Find out where to download the current version of them, and reinstall them – usually from the  extension developer’s website
  • These files are usually things like renderers and hardware extensions you use for Sketchup, for example special mouse controllers

If a plugin needs a custom installer, you’ll have to contact the plugin developer for specific instructions on updating it to support the latest version of SketchUp. If you’ve ever copied and pasted .RB, .RBS, or .RBZ files into the SketchUp plugins folder, this is what to do:

  •         Open a new Windows Explorer window.
  •         Navigate to the root folder of the older version of SketchUp, for example C:\Users\USERNAME\AppData\Roaming\SketchUp\SketchUp 2021\SketchUp\Plugins
  •         Select the files in the Plugins folder
  •         Press Ctrl+C to copy them
  •         Navigate to C:\Users\USERNAME\AppData\Roaming\SketchUp\SketchUp 2022\SketchUp\Plugins
  •         Press Ctrl+V to paste the files
  •         Open SketchUp 2022 or newer
  •         Access the plugins the way you usually do it
  •         You might see older plugins that are not compatible with your current version of SketchUp. If so you’ll need to contact the plugin developer to find out what to do
  •         Remember some SketchUp plugins are not compatible with the current version of SketchUp – again, contact the plugin developer for help

What hardware do I need for Sketchup?

Recommended hardware for Windows machines:


  •         A 2+ GHz processor
  •         A Discrete Graphics card, for example the latest generation AMD or NVIDIA
  •         8+ GB RAM
  •         2GB available hard-disk space
  •         3D class video card with 1 GB of memory or higher and support for hardware acceleration
  •         Your video card driver must support OpenGL 3.1 or higher, and be up to date
  •         You can test your graphics card’s compatibility by running the SketchUp Checkup application, free to download
  •         A 3 button, scroll-wheel mouse

The minimum hardware to run Sketchup pro download on a Windows PC:


  •         1 GHz processor
  •         4GB RAM
  •         1GB free hard-disk space
  •         3D class video card with 512 MB of memory or more, plus support for hardware acceleration
  •         Your video card driver must support OpenGL 3.1 or higher, and up to date


Recommended hardware for Macs:


  •         2.1+ GHz processor or current Apple M1 processor
  •         8GB RAM
  •         2GB available hard-disk space
  •         3D class video card with 1 GB of memory or more, plus support for hardware acceleration
  •         Make sure the video card driver supports OpenGL version 3.1 or higher, and is up to date
  •         A 3-button, scroll-wheel mouse


The minimum hardware to run Sketchup pro download on a Mac:


  •         2.1+ GHz Intel™ processor
  •         4GB RAM
  •         1GB available hard-disk space
  •         3D class video card with 512 MB of memory or more, plus support for hardware acceleration
  •         Make sure the video card driver supports OpenGL version 3.1 or higher, and is up to date.
  •         3-button, scroll-wheel mouse

Migrating LayOut in Sketchup Windows

You can define the location where Templates, Scrapbooks and Pattern-Fills are stored with each version of LayOut in the Preferences dialogue box, which you’ll find under the Folders section.

Sketchup stores new Templates and Scrapbooks by default in the paths below. When you’re upgrading from an older version of SketchUp all you do is find the right folder, copy the contents and paste them into the new folder. Alternatively you can make a new folder anywhere you like, for example your Documents folder, and simply point LayOut to the location in the Preferences box.

  •         Templates – LayOut 2022 C:\Users\USERNAME\AppData\Roaming\SketchUp\SketchUp 2022\LayOut\Templates
  •         Scrapbooks – LayOut 2022 C:\Users\USERNAME\AppData\Roaming\SketchUp\SketchUp 2022\LayOut\Scrapbooks
  •         Pattern-Fill Images – There Is No User Folder

Now we’ll look into Sketchup migrating for Mac:

Migrating Materials & Components in SketchUp Mac

 Open a new Finder window

  •         Open the Go menu and click Go to Folder
  •         Enter the following and click Go: ~/Library/Application Support/SketchUp 2022/SketchUp, using the file for the version you have installed – 2020, 2021, 2022 and so on
  •         Select the files in the Materials folder and press Command+C to copy them
  •         Open the Go menu and click Go to Folder
  •         Enter the following and click Go: ~/Library/Application Support/SketchUp 2022/SketchUp – change the year if you’re using a different version
  •         If there’s no Materials folder, create one
  •         Press Command+V to paste the files

Migrating Plugins in SketchUp Mac

First, Migrate extensions from the Extension Warehouse:

  •         Open your new version of SketchUp
  •         Open the Extension Warehouse Window and sign in
  •         Navigate to My Extensions by hovering over your username in the top right corner, and selecting My Extensions
  •         The page lists the extensions you’ve installed in the past on other versions of SketchUp
  •         Install the extensions you still want to use

Second, Migrate all the other Extensions:

  • Figure out which extensions you use that aren’t in the Extension Warehouse
  • Find out where to download the current version of them, and reinstall them – usually from the  extension developer’s website
  • These files are usually things like renderers and hardware extensions you use for Sketchup, for example special mouse controllers

If a plugin needs a custom installer, you’ll have to contact the plugin developer for specific instructions on updating it to support the latest version of SketchUp. If you’ve ever copied and pasted .RB, .RBS, or .RBZ files into the SketchUp plugins folder, this is what to do:

  •         Open a new Finder window.
  •         Open the Go menu
  •         Choose Go to Folder
  •         Enter the following and click Go: ~/Library/Application Support/SketchUp 2021/SketchUp/
  •         Select the files in the Plugins folder – if you’re using a different version, change the year
  •         Click Command+C to copy them
  •         Open the Go menu
  •         Click Go to Folder
  •         Enter the following and click Go: ~/Library/Application Support/SketchUp 2022/SketchUp
  •         Press Command+V on your keyboard to paste the files.

Open SketchUp 2022 or newer and access the plugins as you have in the past. Note that there may be some older plugins that are not compatible with your current version of SketchUp. In this case, please contact the plugin developer for help.

Not all SketchUp plugins are compatible with the current version of SketchUp. Please contact the plugin developer if you need help.

Migrating LayOut in Sketchup Mac

The tilde sign or ~ at the beginning of each path means it’s a User Level folder, often laid out like this:  Users/USERNAME/. If a Templates or Scrapbooks folder doesn’t already exist you might need to manually make one.

You can define the location where Templates, Scrapbooks and Pattern-Fills are stored with each version of LayOut in the Preferences dialogue box, which you’ll find under the Folders section.

Sketchup stores new Templates and Scrapbooks by default in the paths below. When you’re upgrading from an older version of SketchUp all you do is find the right folder, copy the contents and paste them into the new folder. Alternatively you can make a new folder anywhere you like, for example your Documents folder, and simply point LayOut to the location in the Preferences box.

Templates

  •         LayOut 2022 ~/Library/Application Support/SketchUp/SketchUp 2022/LayOut/Templates

Scrapbooks

  •         LayOut 2022 ~/Library/Application Support/SketchUp/SketchUp 2022/LayOut/Scrapbooks

Pattern-Fill Images

  •         There Is No User Folder

You might notice, when creating your storage location under Preferences, every item is also stored in ‘Contents’. This is a System level storage location, not recommended for this context.

Here’s how to do it on a Windows machine:

  •         SketchUp creates shortcuts on your desktop. You can also open it from C:\Program Files\SketchUp\SketchUp 2022 (or whichever version you have) by double-clicking on the program file

Here’s how to open Sketchup on a Mac:


  •         Go to the Applications folder
  •         Open the SketchUp folder of the version you want (2021, 2022 or whatever)
  •         Open the SketchUp or Layout application you find in the folder

Remember, to activate your Sketchup pro subscription you’ll need to be online. A single license can be used on a maximum of two computers. If you don’t see a welcome dialogue box, choose the help option.


You might opt for an annual subscription. This lets you pay once when you start, and use all the features in the subscription you choose for a full year. Sketchup is currently looking for cool ways to improve their choice of subscriptions, so keep an eye open for announcements.

Troubleshooting a Trial Message After Buying Sketchup

So what about troubleshooting Sketchup Pro? There are two pro packages. The first is a classic licence with a serial number and authorization code. The second is a yearly subscription plan with no serial number or authorization code. Instead, it activates SketchUp with a sign-in.

How to troubleshoot your pro subscription? Check this:


  •         Is the end-user’s email address properly assigned or spelled wrongly?
  •         Did the end-user sign in with the wrong email address?
  •         Is the end-user having a sign-in issue?


How to troubleshoot a classic licence? That’s easy. All you do is enter your serial number and authorisation cod

Administrator: Performing a Silent Install

As the Administrator, you might want to perform a silent install. What is it, and why would you want to do that? SketchUp can be run silently for distributed installations but you won’t need to worry about it unless you’re deploying SketchUp on a large scale, when working with larger installations and a network licence.

A silent install is a procedure for the experts, a job for your network administrator. It describes what happens when an application is uploaded to a user’s computer without any dialogues or user input after it starts. This means once the installation begins the user can’t change or edit the installation process. You’d make a silent install because it’s the best way to update multiple machines at once without bothering users or users getting in the way of the process.

How would you install without an internet connection? You need to install these, which will automatically install if there’s an internet connection:

  •         Microsoft Visual C++ 2015-2019 Redistributable (x64) – 14.23.27820
  •         KB2999226 – Windows 7 Only
  •         Microsoft .NET Framework 4.5.2


You can also run the silent installer with default options: English as the language, C:\Program Files\SketchUp\SketchUp 2022 as the install directory.


  •         Download a SketchUp 2022 installer – the full installer includes all of the language packs
  •         From an elevated command line or script run: SketchUpPro-2022-0.exe /silent
  •         If using Windows 10, you can use the search box inside the Start menu. Type cmd then press CTRL + SHIFT + ENTER to launch the command prompt elevated
  •         No windows open while the install is running
  •         Give it a couple of minutes and SketchUp will be installed


How to run a custom installer? For customised installs, feel free to specify the language and/or the install destination path. Use FEATURES= to add languages and INSTALLDIR= for specifying your install destination.

Downloading Older Versions

What is Sketchup? It’s sheer brilliance at your fingertips whatever version you use. Plenty of you will be using the latest version of Sketchup. If you want to download Sketchup previous versions, here’s a list of links to older versions of Sketchup:


Download SketchUp Pro 2021


Download SketchUp Pro 2020


Download SketchUp Make 2017


Sketchup Subscriptions

There’s a great choice. But how do you choose the right Sketchup licence or pick the perfect Sketchup subscriptions?  The answer lies in knowing exactly what each subscription provides, what the features and benefits are, and what the experts recommend. Here it is, all in one place. By the end of this article you’ll be fluent in the various types of Sketchup software: the Sketchup Pro licence, Sketchup Pro Student, Sketchup free and the rest. Read on to know the score.  

Sketchup Licences

First, let’s explore the many excellent features of each Sketchup software licence. Your choice depends on exactly what you want to use the tool for, in what context, and the functionality you need. Every choice comes with access to a fantastic free library of tutorials and learning resources.

Sketchup Free

Sketchup Free is a great way to test-drive the software for yourself, see how it works and performs. It has everything you need to get a grip on the magic of Sketchup.  This is the simplest free 3D modelling software out there, web based for flexibility. It lets you bring your 3D ideas online and makes SketchUp projects portable, not restricted to the machine you work on. Because it comes with such great functionality it’ll do everything you need a 3d drawing tool to do. Just bring inspiration and you’re off. This is what you get with Sketchup free:


  •         The Basic SketchUp modeller
  •         A Trimble Connect Personal subscription
  •         SketchUp Viewer applications for iOS and Android
  •         Basic importers for .PNG and .JPG files
  •         Exporters for .PNG and .STL files

Sketchup Go

Previously Sketchup Shop, SketchUp Go is a bundle of superb collaborative Sketchup software tools designed for conceptual 3D designs. It’s a subscription-based version of web-based SketchUp including professional-level features, Trimble Connect for Business, plus email support. This is the one you need when you want to design, mark up concepts, and share everything with your team quickly. It’s a great way to get buy-in, get the best ideas from everyone, and do it all via a simple, easy to use mobile solution. Here’s what’s included:


  •         The premium quality online modeller, SketchUp for Web
  •         A Trimble Connect for Business subscription
  •         Augmented reality viewing on SketchUp Viewer for iOS and Android
  •         Advanced importers .3DS, .DAE, .DEM, 2D and 3D .DWG/DXF, .KMZ and .STL
  •         Advanced exporters .3DS, 2D and 3D .DWG/DXF, .FBX, .KMZ, .OBJ, .VRML, .XSI and COLLADA
  •         Editable Styles
  •         Editable Materials

Sketchup Pro

A Sketchup Pro licence offers a wonderfully intuitive way to design, document and communicate ideas in 3D. You actually iterate in 3D. You create detailed, accurate models from the start. You can design, define, and plan in every stage of a project and it plays nicely with other design tools. The Extension Warehouse offers exciting extra functionality. Objects let you work fast and smart. Customisation makes everything unique. It generates detailed reports for stakeholders. And it harnesses inferencing for optimal accuracy and speed. This is what Sketchup Pro UK

 Includes under the Sketchup Pro licence:


  •         A Premium online modeller
  •         A Trimble Connect for Business subscription
  •         SketchUp Pro for Desktop, LayOut, and Style Builder, desktop apps only previously available through a Classic SketchUp Pro licence
  •         Augmented reality viewing on SketchUp Viewer for iOS and Android
  •         Viewing on these Mixed Reality (XR) applications: HTC Vive, Oculus Rift, Hololens, and HP Windows Mixed Reality

Sketchup Studio

Sketchup Studio offers everything you get in the Pro version in the Sketch licence plus some brilliant extras you won’t want to miss out on. This gives you the full suite of Sketchup tools in one place, so you can deliver excellence every time, in no time. It has:

         V-Ray for SketchUp, bringing gorgeous photorealistic rendering to your workflow

  •         Scan Essentials, letting you work with point cloud scanned data in SketchUp. It’s great to be able to use Scan Essentials to import point cloud data in all sorts of popular formats

What’s new in SketchUp Studio

V-Ray 5 for SketchUp provides stunning visuals. With its help it’s easy to present beautiful, workable designs that look uncannily real. And it’s easier to convince your stakeholders. It’s all about the lighting. When you present ideas lit with realistic lighting that can track the time of day, moving with the sun, and change at night, it’s incredibly real-looking. You’ve brought your idea to life. Here’s what V-Ray can do for you:  

  •         Auto-generate a range of lighting options in just a few clicks without any expert lighting knowledge – it’s so intuitive
  •         Achieve global illumination
  •         Create rendered lines
  •         Make realistic natural and artificial lighting features to inspire your clients’ imagination
  •         Access to 20 cloud credits via Chaos Cloud, V-Ray’s superb cloud rendering service
  •         Access to a robust 3D content library, Chaos Cosmos, a great source of easy-to-render content to download into your design


Scan Essentials lets you import, view, and interact with point cloud data in the SketchUp modelling environment. You use your imported point cloud inside SketchUp to model the scanned as-built condition of the design, reveal accurate visual context to the Sketchup model you’ve made, and collect accurate data about measurements. As you can imagine, it saves designers a lot of time, which means saving money.  


  •         Import and view point cloud data directly in SketchUp
  •         Model on point cloud data in SketchUp
  •         Document point cloud data clearly in 2D with LayOut

What’s included in SketchUp Studio

Sketchup Studio is absolutely crammed with amazing features, all created to make your design life better, easier, more cost effective, faster, and more efficient. Your work will be more inspiring. Your clients will be delighted. You’ll be able to get even more creative. So what does it offer? Here’s a comprehensive list of all the goodies that come with popular Sketchup Studio:


  •         SketchUp Pro – top class 3D design software that thousands of people around the world swear by, across a multitude of sectors and industries  
  •         V-Ray 5 for eye-poppingly good 3D renders
  •         Scan Essentials for fast, accurate point cloud data work
  •         LayOut
  •         StyleBuilder
  •         PreDesign
  •         Add Location
  •         Access to the Extension Warehouse
  •         Access to the 3D Warehouse
  •         XR Viewer
  •         Mobile Viewer
  •         Trimble Connect Business
  •         SketchUp for Web, the portable version you can take with you anywhere

Sketchup Studio FAQs

Finally, let’s answer some of your most pressing questions about Sketchup software.

What is offered in a Studio subscription?

Sketchup Studio provides designers with the full suite of products. You get everything available in SketchUp Pro plus V-Ray for rendering stunning realistic lighting effects, and Scan Essentials to enable work on super-fast point cloud data. It comes with SketchUp Pro, SketchUp for Web, Trimble Connect Business, Scan Essentials, V-Ray, LayOut, Extension Warehouse, 3D Warehouse, Mobile Viewer, XR Viewer, PreDesign, StyleBuilder, unlimited Trimble Connect cloud storage.

What’s the difference between a SketchUp Studio subscription and a SketchUp Studio for Higher Education subscription?

SketchUp Studio for commercial use includes V-Ray and Scan Essentials. SketchUp Studio for Higher Education includes Sefaira but not V-Ray and Scan Essentials. Sefaira provides cloud-based software for energy efficient building design, winners of the Green Building Innovation of the Year award at London's Ecobuild. These days it’s part of Trimble Inc.

Is Studio a Windows-only offering?

Your SketchUp Studio subscription includes Windows-only V-Ray 5 and Scan Essentials.

How do I upgrade from SketchUp Pro to SketchUp Studio?

It’s easy to move from Sketchup Pro UK to Studio. Just sign in to your account with your Trimble ID. Go to Plan Settings. Then click on the plan you want to upgrade to, and it’ll take you through the buying process.

How can I access SketchUp Studio?

When you already have a SketchUp Studio subscription, it’s easy to download the products in your Trimble Account Management Portal or AMP. Don’t forget, SketchUp Studio is Windows-only.

Can I try SketchUp Studio before I purchase?

Yes, feel free to give it a try even if you’ve already signed up for Go or Pro.

I am a current SketchUp Studio subscriber. What are my options?

If you already have a Studio subscription, you can access V-Ray and Scan Essentials via your Trimble Account Management Portal. You’ll still have Sefaira. When renewal comes around, it’s time to decide whether you want to hang onto Sefaira or remove it. The Sketchup price is lower without it.

Trimble and SketchUp Accounts

Trimble and SketchUp Accounts

You’ve heard it’s absolutely brilliant. You’re keen to give it a go. You want to test drive a Trimble sketchup account, and you want a simple, comprehensive guide to support your explorations. You’ve got it! What is Trimble Sketchup? Read on to find out. What, exactly, can Trimble Sketchup do for you? You’ll know by the end of this article. Get busy to find out about Trimble Sketchup login, and discover what you need to know about Trimble Sketchup free. Here’s how to get started in the Trimble Sketchup app.

Trimble Sketchup Accounts

Let’s kick things off with the basics. What is Trimble Sketchup? SketchUp is a collection  of tools owned by Trimble Inc. The subscription-based tools include SketchUp Pro Desktop, a popular 3D modelling computer programme used by a wide range of people for an equally broad range of drawing and design applications. It’s used for architectural design and interior design, industrial and product design, landscape architecture, civil and mechanical engineering, as well as creative applications like theatre, movie and game development. There’s a Trimble Sketchup free version too, plus a wealth of tutorials and learning resources.

Once you’ve set up a Trimble Identity, you can access Sketchup Trimble accounts with your Sketchup Trimble login.

Frequently Asked Questions About Trimble Identity

What is Trimble Identity? Trimble Identity is basically an authentication system, a way of confirming you are who you claim to be. Sketchup uses Trimble Identity to give access to the various Trimble applications and websites. This includes Trimble SketchUp accounts and every application that belongs to SketchUp subscriptions. You can use your Trimble Identity to sign in to one Trimble online service or site then click through to another without having to sign in again.

Troubleshooting

Having Sketchup login Trimble problems? In January 2022 a major upgrade took place to Trimble Identity, changing how it works with SketchUp accounts. If you haven’t used your Sketchup applications for a while you’ll need to sign out then sign back in for the upgrade to take effect. If you have any issues, this should fix them: 

  •       If you use several version of Sketchup, sign out of each one, close it, then restart it and sign back in
  •       If you can sign in but the SketchUp application still doesn’t work, try clearing your sign-in. If you’re on a Mac, find the login_session.dat file in the Library folder Library/ApplicationSupport/SketchUp[Version Year]/login_session.dat. For Windows find your  login_session.dat via the search box in the Start menu

You created a Trimble Identity but you still can’t sign in – What do you do?

    Check you’ve used the right email address

  •         Try signing in using the Google or Apple options – if that’s how you created the account in the first place it’ll be the easiest way to get back in
  •         Remember to set up your Trimble Identity password before trying to use the email address and password associated with your Google or Apple account
  •         To set up your Trimble password, type in your email address and follow the ‘forgot password’  instructions
  •         If your email address is right and you’ve never used Google or Apple, use ‘forgot password’ to set a fresh password  

What to do if Trimble says your email address doesn’t exist?

If it says ‘The entered email address does not exist’ when you’re trying to reset your password, it means there isn’t an account for the email address. Have you made any mistakes? If not, create a Trimble account and try again. It can sometimes happen even when you use an email address you’ve used in the past, for example for a classic SketchUp license. Simply click on the ‘create an account’ link on the sign-in page.

I have created my account or reset the password but haven’t had confirmation emails

If you don’t get emails confirming your account set-up or password change, check the firewall and spam filter then ask your IT people to let emails through from *@trimble.com, *@trimblepaas.com and *@mail.trimblepaas.com. If the messages are in your spam folder, whitelist the email addresses 

What if you get stuck in a loop verifying Trimble Identity?

Please contact Customer Service and create a help ticket. We’ll need to know your contact details, the email address you used to set up the Trimble Identity, and the steps you took to get where you are. Screenshots are always useful, as is the context and details like the browser you’re using and the type of device.

What if you get locked out of your account?

Trimble Identity locks your account when you use the wrong password too many times. It locks for 15 minutes. You can either wait or use the ‘forgot password’ process to avoid waiting.

Creating a Trimble ID

So how do you create a Trimble ID? Let’s look at Trimble sign in Sketchup. Creating a Trimble ID is easy and fast. But as we’ve mentioned, you can always access all the resources using your third party Apple ID or Google ID login instead. Here’s what you need to do to set up an account. We recommend you list and link all the primary Sketchup sites where you can set up an account.

   Open SketchUp 2019 or later, or visit a SketchUp site like the 3D Warehouse and click ‘Sign in’

  •         On the sign in page, add your email address into the box then press ‘next’
  •         If you’ve already used the email address to create a Trimble ID you’ll see a box to enter your password. If you’ve forgotten it, simply click ‘reset password’ to go through the steps to set up a new one
  •         If you’ve never used the email address  you’ll be given the chance to set one up in the ‘Sign in to all things Sketchup’ box – fill in the details, click ‘I am not a robot’ then click ‘create new account’  
  •         You will be sent an email asking you to activate your account. Click on the email link within 72 hours
  •         Click the link in the email to finish creating your Trimble ID
  •         If you don’t get an activation email, check your spam folder or give it five minutes

Using 3rd Party Sign-in Options with Trimble Accounts

There’s no need to create a Trimble Sketchup Account. If you prefer you can simply log in with either your Apple ID or Google ID. If you want to do that, you have to use the same email address  you used to create your Trimble Account.

Do you have to sign in with Apple or sign in with Google?

No, the default sign-in is via your Trimble account. Apple and Google sign in simply give you more options for signing in.

Why would you sign in with Apple or Google?

Third party sign in lets you sync your password with each service, so you only need the one password to access multiple services. If you want a unique password for Trimble Services, you’ll need to use your Trimble Account to sign in. You can only use Trimble Account sign-ins for Trimble services.

How can you change your password?

Because passwords are directly connected to their original ID service, Trimble Account, Apple ID and Google Sign-In have their own passwords, so you’ll have to change or reset your passwords with each provider. When you sign in to Trimble ID with a third party login, you’ll use the email address and password for that third party, not the password you created on Trimble’s site.

Once you’ve set up a Trimble Identity, you can access Sketchup Trimble accounts with your Sketchup Trimble login.

What if your password isn’t working?

You can have a separate Google ID, Apple ID and Trimble Account, each with its own unique password. Just make sure you’re using the right one!

Remember – if you choose ‘Turn Off Email Forwarding’ in your Apple ID settings it will change the email address you share. If you created your Trimble Account with ‘turn off email forwarding’ then disable it later, you won’t be able to use the account to sign into your Trimble Account. A new login is the only way.

You sign in with Apple but your files and purchases have gone – What’s happened?

If you used ‘Hide My Email’ we can’t link your existing Trimble account when you sign in with an Apple ID. This is because the ‘privaterelay’ email doesn’t match the original email you used to set up your Trimble Account.

To see everything you bought and made, tell Apple to stop using your Apple ID with your Trimble Account via the Apple ID settings page. Sign in to appleid.apple.com then share your email with Trimble by clicking on the ‘manage’ link under ‘apps & websites’. Remember your Apple ID email must match the email you originally used to create the Trimble Account.

  •         Sign in with Apple and do the two factor identification steps
  •         Choose the option to connect your Apple ID to Trimble applications. This lets you share your email address directly with Trimble Account
  •         Alternatively choose ‘Hide My Email’ to create a new, anonymous email address. Hiding your email will create a new Trimble account for you
  •         If you hide your email from Trimble, the system provides Trimble with an anonymous email address as the username for your account
  •         Apple lets you hide your email from sources you don’t trust – Emails sent by Trimble to the new email address are received and redirected by Apple to your actual email address
  •         This email address will be the one you use to sign in using an email address
  •         If you decide to turn Hide my Email off, it might create a new Trimble Account. If so you’ll need to re-enable hide my email to get to the data and purchases under the privaterelay email address
  •         Click ‘done’ and your Trimble Account will be created using the private relay email as your user name. You’ll be signed in and can go to the site you want to visit

Bulk Uploading and Managing Members in Your Trimble Account

Did you know multiple users can be provided with access to a Trimble Sketchup account? You can even  assign ‘user’ or ‘admin’ privileges. Instead of entering each person one by one and assigning roles and product access the same slow way, you can automate the process, as an Account Owner or Company Admin, using Bulk Upload and Bulk Change.

Bulk Sketchup Trimble Account Changes

  •         First, choose the right company account when you sign in
  •         If you don’t see My Products and need to switch between accounts, click on ‘account name’ at the top left for a drop-down list of options
  •         Under the Members page, click on Add New Users in the upper right corner
  •         Pick ‘Bulk Add’ (.csv)
  •         Click Download template.csv to access the CSV template
  •         Open the CSV file in any CSV editor like Google Sheets or MS Excel
  •         Enter the user details: Email, First Name, Last Name
  •         Save the file in a .csv format
  •         Please only add a maximum of 200 users at a time
  •         Click Upload .csv file
  •         Select your edited file
  •         It can take several minutes to add the maximum number of users
  •         You might see a list of errors to fix. You can skip fixing them and continue if you like
  •         Select the preferred Role and Product Access for the uploaded users. Most of the time you’ll use Product User, promoting the relevant users to higher roles later using the edit menu for individuals via the Members page, or using Bulk Change
  •         A Product will be disabled if there are not enough space available for new users – you can always do it manually later on
  •         The Account Owner role is disabled for Bulk Add, with one Account Owner allowed per account
  •         The Secondary Account Owner role is disabled if any of the new users is an Account Owner or Secondary Account Owner in other accounts
  •         The Secondary Account Owner role won’t be shown when the logged-in user is a Company Admin

·         Click Save and you’re done

How to Classify Objects, Organise Models and Place Moving Cameras in SketchUp

Classifying Objects

The SketchUp Classifier lets you add detail to components and groups to create an object that you can then manage.

Objects have various details that you can use to count, measure, dimension and tag as well as generate reports, analyse a model and export the objects too.

You’ll need to be a SketchUp Pro user to do this.

How to classify objects

Before you start, check the following:

  • Make sure that the object that you’d like to classify begins as a component
  • Check that the classification system is loaded into the template
  • Make the Classifier tool visible on the toolbar

Now you can select the component and choose the classifier tool. Click on the arrow next to your classification system and choose the object type. You can then go ahead and classify the object by inputting any of the necessary info.

Generating a report

Using SketchUp’s generate report service, you can report all of the listed attributes in the form of a .csv file.


These reports are particularly useful for getting a snapshot of how many of each component is needed when it comes to the construction stage. This helps with planning and costing the final project.


Go to File > Generate Report and create a new template. You can now choose which components to include in the report. 


When you’re happy that you have everything you need, go ahead and click on Run Report.

Organising Models

Using the array of organisational tools lets you keep your model tidy. Not only does it help for finding everything when you come to use them, but also for generating reports as well.


Organising geometry into groups and components. This allows you to separate smaller parts of your model and work on specific areas individually.


Nesting groups and components. Giving hierarchy to these items allows you to easily select what you need in a logical way. When creating reports, you can choose components that fall within a certain level of the hierarchy. And this allows you to report on the specific objects with matching data.


Changing group and component visibility. You don’t need to see everything all of the time. In fact, when working on your SketchUp model, it’s always advisable to only have the screen present relevant groups and components to keep you focused on the task at hand.

Viewing a Model

Viewing a model from every aspect is essential to ensure that your design continues to meet your spec.


It is possible to orbit, zoom and pan to check out your model from various angles.


Orbit. You can move around above and below your model to get a general idea of how it looks from every side. Select the Orbit tool and click on the drawing area. You can now move the cursor to orbit around the central point of that area.


Zoom. Zooming in lets you focus on a specific element when you don’t want to be distracted by the rest of your model. And zooming out offers you a snapshot of your vision to include everything together in your design. Select the Zoom tool. Then click and drag up or down to zoom in or out.


Pan. Panning simply sends the camera angle to the left or right to get a better idea of how things are looking on both sides. Go to Camera > Pan. Click and hold the scroll wheel and the left mouse button to pan left or right. 


It’s possible to switch each of the views on and off as you wish. 


You will find that using a three-button scroll wheel mouse makes this job, and modelling in general, a whole lot easier.

How to preview a model in Google earth


After preparing your model, you can go ahead and export it as a .KMZ file. This is the format that Google Earth will recognise. You can open the file with Google Earth and the map will appear with your model in place.


You can zoom in and move around the site to see how the design feels in its chosen surroundings.


How to place models in the ocean


Sometimes you’ll need to see how a structure fits into ocean surroundings. And this can be done through Google Earth thanks to its ocean layer addition.


In SketchUp, go to Window > Extension Warehouse and select the Ocean Modelling extension. After installing the extension, you can now preview your model in the ocean by following the above steps.


How to save a model in Google earth


Google Earth loads into Temporary Places by default. But you may wish to save the preview for future reference. To do this, context-click on the model name in the Temporary Place folder and choose to Save to MY Places instead. 

Camera menu

The Camera menu includes standard views of your model. These are Top, Bottom, Front, Back, Left, Right and Iso.


In addition, there are also 3 perspective options.


Parallel projection. This allows lines to appear parallel in 3D and 2D.


Perspective. Here, lines disappear to the Horizon point to give perspective to the items on your model.


Two-point perspective. This is often used for creating 3D buildings. This gives a linear perspective along the width and depth of the objects as they meet at two individual points on the horizon.

Placing Movie Cameras in a Model of a Production Set

If you are designing sets for a film, then SketchUp Pro will let you access all areas using the Advanced Camera Tools (ACT). You can access this by going to Tools > Advanced Camera Tools.


It’s possible to place cameras anywhere in the model of a production set to show you a preview of real camera angles.


Once you have placed your cameras on the set, you can then view the previews from each of them in separate frames. It gives you a different perspective of the same scene and this can help when deciding where to utilise the cameras during the filming of the movie.


You may need to install the ACT extension from the Extensions Warehouse before you begin. 


To add a camera using ACT, choose Select Camera Type from the toolbar and go to Categories and then Camera. The camera view will now appear and the area within any shaded bars to the top, bottom or sides will be your visible area through the camera.


To choose that camera view and add it to your design, click on the Create Camera button. You will now see a dialog box where you can add the name of the camera. Click done.


The crosshair will now show you the central point where the camera is aiming and you can see the properties of that camera in the bottom-left corner. You can edit these properties as needed.


You can also use the Orbit, Pan and Zoom tools to change the position of your camera. And the arrow keys will also come in useful for making any fine adjustments to your camera view.


Click Lock Camera when you are happy with the view to make sure that it doesn’t move around. 


Now, you can contact-click and choose Done.

Delete an ACT camera

If you decide that you no longer require a certain camera angle, then you can go ahead and remove it permanently. Make sure that you are no longer in the camera view mode and zoom out to make the camera visible on the screen. You can then delete the camera. Beware that this will remove any corresponding scenes and tabs as well.

How to Print your Models and View them in Google Earth

Printing Views of a Model

Getting your design ideas onto paper is as trouble-free as you’d expect. There are various ways to customise the results including scale changes, orientation and desired quality to name but a few. 


Straightforward model printing is possible on both Windows and Mac OS X. And both contain a similar range of options to bring your designs from screen to paper.


Printing views of a model in Microsoft windows


Windows users can take advantage of several Print Setup and Print Preview options. The majority of setup choices and additional preview features are quite familiar.

Print preview 

Before you begin, it’s worth noting that to print your model to a different scale, you need to click Camera > Standard Views to make the changes prior to printing. There are various views to choose from. It’s also important to change to Parallel Projection view from the default Perspective view.


Reaching the Print Preview dialog box requires 2 simple clicks: File > Print Preview. The dialog box now appears with an array of optional functions. 


Tabbed Scene Print Range – the Current View radio button is selected by default. Change this to Selected Scenes Only by checking the Scenes button. Enter a value ‘from’ and ‘to’ in order to select the scene numbers.


The Copies function lets you simply choose the number of copies you need.


Print Size options include Fit To Page and Use Model Extents—both are checked by default. 


Fit To Page will automatically make your image fit on the selected paper size. Uncheck the box to enter your own values. Now you can also select a specific scale for the printer to use.


Use Model Extents will zoom to the model extents and ensure that it fits the entire model in the print. This is only possible if the whole model is visible in the current view. If it isn’t, then you won’t have this option.


Print Quality options let you choose from Draft, Standard, High-def and Large formats.


When your model includes a slice, you can check the 2D Section Slice Only box to print it.


Selecting the Use High Accuracy HLR box will transmit your image to the printer in a vector format.

Print Setup

Setup choices include printer selection and paper configurations and to access these options click File > Print Setup.


    • Select your printer from the list of available devices
    • Select Properties to make any changes to your printer configuration 
    • Select the paper size required and the source
    • Choose the Portrait or Landscape printing button
    • Click OK to begin printing

Printing views of a model in Mac OS X

There are 3 areas where you can perfect your print output using the Mac OS X system. These are Page Setup, Document Setup, and Print dialog.

Page Setup

Head to File > Page Setup where you can apply any current settings to Any Printer. Alternatively, you can select another printer from the list.


You can also select the paper size and choose portrait or landscape print results. The Scale box lets you increase or decrease the scale of your printout. Save these settings as the default from here if you wish.

Document Setup

Click on File > Document Setup where you can Fit View to Page or change the height and width.


As with Windows printing, you’ll need to go to Camera > Standard Views and select a view before printing. Again, change from Perspective view to Parallel Projection view.


Set the scale using the In Drawing and In Model options to change the measurements of your printout and model respectively.

Print Dialog

To finally send your image to the printer, you need to select File > Print. There are a few adjustments you can make to the potential results at this stage.


  • Firstly, select the printer you wish to use
  • Input the number of required copies
  • Change the print quality to either Draft, Standard, High or Extra High
  • Select Vector Printing if needed
  • Decide which line weight is necessary for your printout
  • Click Print

Viewing Your Model in Google Earth

Within SketchUp, you can preview your model in Google Earth to see how it sits in its natural surroundings when construction begins. To do this, you’ll need both SketchUp and Google Earth installed on your computer.

How to optimise a model for display from Google earth

Before viewing your model in Google Earth, you’ll need to optimise the model. The following steps will show you how to get your design ready.


  1. Set your model geolocation. With the Add Location function, you can choose to either import a terrain or display it on Google Earth. SketchUp will locate your model ready for previewing.
  2. Create accurate model dimensions. This is essential if the scale of your model is going to be comparable to the map.
  3. Minimise model faces. Complex models will take up a lot of processing power to display on Google Earth.
  4. Face orientation. Keep your front faces pointing outwards to avoid losing textures when shown on a map.
  5. Add images to faces. Import and apply images of a building to add to your model when previewing in Google maps. And if you need to see through certain faces, then check the transparency options for the image.

How to preview a model in Google earth


After preparing your model, you can go ahead and export it as a .KMZ file. This is the format that Google Earth will recognise. You can open the file with Google Earth and the map will appear with your model in place.


You can zoom in and move around the site to see how the design feels in its chosen surroundings.


How to place models in the ocean


Sometimes you’ll need to see how a structure fits into ocean surroundings. And this can be done through Google Earth thanks to its ocean layer addition.


In SketchUp, go to Window > Extension Warehouse and select the Ocean Modelling extension. After installing the extension, you can now preview your model in the ocean by following the above steps.


How to save a model in Google earth


Google Earth loads into Temporary Places by default. But you may wish to save the preview for future reference. To do this, context-click on the model name in the Temporary Place folder and choose to Save to MY Places instead. 

Communicating Your Designs in SketchUp

SketchUp’s 3D modelling software is robust yet simple to use. And thanks to a wealth of clever features, it’s even easier than you think to share your design ideas with other people. 

Whether you want to slice your 3D creations and share cross-sections of key aspects or offer your audience animated scenes from every angle, it’s up to you. Share your SketchUp model your way. 

Add shadows to showcase your ideas at distinct times of day. Or perhaps view your project on Google Earth to truly bring your creation to life.

Need to document your design elements?

LayOut with SketchUp Pro lets you create presentations using your designs with added extras to give documents a professional and branded feel. Add your own images, text, labels and more.

And the best way to store and share these files is via Trimble Connect.

Take advantage of the Trimble Connect for Business capability when you sign up for a SketchUp subscription. Storing your files online and auto-syncing them between devices is fast and secure. And you can even view and recover previous file versions and gain access to a host of additional project management tools too.

This guide will not only show you how to share a SketchUp model with your clients but also highlight some of the visual options you have at your fingertips as a SketchUp user. 

  • Sending a SketchUp model to LayOut
  • Using Trimble Connect with SketchUp
  • Slicing a model to peer inside
  • Walking through a model
  • Creating scenes
  • Animating scenes
  • Casting real-world shadows
  • Using the credits feature
  • Watermarking a model
  • Printing views of a model in Microsoft Windows & Mac OS X
  • 3D printing a model
  • Viewing your model in Google Earth

Sending a SketchUp Model to LayOut

Sending a SketchUp model to LayOut is easy. Simply click on the ‘Send to LayOut’ button on the Large Tool Set or Getting Started toolbars. But knowing how to make the most of the fantastic set of tools when you’re there is key to documenting your ideas perfectly.


3D models are amazing reproductions of your architectural visions, but they aren’t much use to a building contractor waiting to lay the foundations. Orthographic projections get your ideas across in an accurate and functional way. 


2D CAD drawings, elevations and floor plans are necessary for mapping out the exact footprint of a building design. And that’s where LayOut comes in.


But before sending your 3D models across to LayOut, you need to be sure to create your scenes first. SketchUp and Layout files link seamlessly to automatically update the designs. Setting specific scenes lets LayOut show you exactly what you want to see rather than the last saved version from your model.


After creating your scenes and sending a SketchUp model to LayOut, you can now input as many viewports as you need to showcase the design from various angles. Then it’s time to dimension and document the drawings.


LayOut’s documentation tools allow you to produce 2D plans based on the original design. From here, you’re able to produce a set of precise construction drawings that you can save and share with those who need them.


Any changes that you make to the original design are quickly applied to the 2D plans. Your clients can then access these updates as soon as you’re finished making the necessary adjustments.

Using Trimble Connect with SketchUp

Sharing your SketchUp model changes is fundamental to keeping all parties in the loop. And with Trimble Connect you can achieve this effortlessly.

This functionality comes with a paid SketchUp subscription and opens the door to a world of collaboration opportunities.

  • Save and store an unlimited number of creations and associated files
  • Share updated designs through the open BIM viewer
  • Grant teams access auto-sync data any time, any place
  • Recover previous file versions
  • And more…

How to sign in to the Trimble Connect website

Using Trimble Connect with SketchUp allows you to manage your designs in a simple yet productive way. And it all happens through the Trimble Connect Website.

The site stores all of your files on the cloud and gives you and other linked collaborators access whenever you need it. It’s available for Mac and Windows and is compatible with their mobile operating systems and Android too.  

Signing into this common data environment is easy. Simply head to the Trimble Connect site and enter your subscription email address and password. 

Once you’ve accessed your account, you can add your projects and begin. Select the subscription from the drop-down menu to grant access to the full range of tools and give your project a name. You can now start to add the files that you wish to share and publish your models using the Trimble Connect extension in SketchUp.

The Trimble Connect 2.0 extension

In SketchUp, head up to the main menu bar at the top of the screen and click File. At the bottom of the drop-down list, you’ll see the expandable Trimble Connect options. These include Open Model, Collaboration Manager, Publish Model, Publish As, Import Reference Model and Launch Trimble Connect.

Open Model 

This is where you can open any existing SketchUp files stored on Trimble Connect. Each file opens in a separate model window for you to view.

Collaboration Manager

Once you’ve opened your model file, you can now begin to collaborate with other users. Assign them tasks, control your ‘to do’ list, respond to comments and update reference models as well as open a Trimble Connect pane within SketchUp.

Publish Model

To share a SketchUp model, you can add it to an existing project over on Trimble Connect. Details of the new model are now available for collaborators to view and work with.

Publish As

In much the same way as a ‘Save As’ command, you can save your SketchUp files with a new name or add them to another folder.

Import Reference Model

Importing multiple files to use as a reference in an open model file is simple in the following formats:

  • .skp
  • .ifc
  • .dwg
  • .dxf

Other members collaborating on the project can work on their own design files and integrate them into a master drawing set. Any updates to those files can then be viewed within the main file by simply updating each added element.

Launch Trimble Connect

You can open the Trimble Connect web app directly with this option. From here, you can complete any necessary tasks and adjust any of the configurations as needed.

The Trimble Sync facility

Trimble Sync lets you keep your PC, laptop and mobile constantly updated with the latest project info—giving you complete access to real-time project info. Simply log in on another compatible device and pick up where you left off.

Slicing a Model to Peer Inside

Section planes in SketchUp make slicing a model to peer inside extremely simple to achieve. Planimetric views, either horizontally or vertically, give you visual access to floor plans and sectional views of multiple floors at the same time.

How to add a section plane

The first step is to deselect all other areas of the model to ensure that you aren’t working on the wrong area. Next, open the object that you wish to slice and input any height measurements for your plane.

Select tools from the menu bar and select the Section Plane tool. Or go straight to the icon on the Tool Set palette if you’re a Windows or Mac user.

Using the plane cursor, select the face where you wish to create the slice. Your section plane will appear along with a dialog box for you to name the section.

Finally, you can make any necessary adjustments to your plane by changing the placement, reversing the cut direction or aligning the camera view. You can also select an active cut if multiple planes are present and hide/show planes as needed.

How to fill voids in section cuts

Depending on the type of object that you choose to slice, your cut may result in open voids appearing. To fill these voids in a closed loop, you can open the Styles panel, click on the Edit tab, select Modelling Settings, and check the Section Fill box. You can also change the fill colour if required.

How to create a new geometry from a section plane

To create a new geometry from a new section plane, simply context-click on the section plane and select Create Group from Slice. You can now move that group to where you need it in your model.

You can also divide your model by exploding the group.

How to hide section planes and cuts

SketchUp comes complete with a versatile set of controls to adjust the visibility of a plane and cut independently. It’s possible to:

  • Hide a single section plane by right-clicking on the section plane and select ‘Hide’
  • Hide all section planes by clicking the Display Section Planes tool
  • Hide all section cuts with a click on the Display Section Cuts tool

How to export section cut effects

Showcasing and sharing your section cuts is possible with both SketchUp Make and Pro versions. But with SketchUp Pro, you can also export a 2D vector image known as a Section Slice.

You can use these 2D slices to create scaled drawings and edit them in other programs that work with vectorised images.

To do this, select the appropriate plane and head to the following: File > Export > Section Slice.

Now all you need to do is select the folder where you want to save the file, give it a name and click on ‘Export’.

Walking Through a Model

Getting up close and personal with your designs is the only way to check every intricate part of your model. Browsing an image from afar gives you a great idea of how it all feels in general. But you need access to all areas to give you complete confidence in the final product.


Walking through a model using a few of SketchUp’s additional tools will open the door to your design and let you step inside.

Methods for positioning cameras

You can choose to view your work from specific points by simply changing the camera position. Using the Position Camera tool will initially place the camera 5’ 6″ above where you click. After that, you can adjust the eye height to view from a different perspective.


To make this happen, choose the Position Camera tool from the toolbar, click and hold where you wish to place the camera and drag the cursor to the point that you would like to view. To adjust the camera height, just enter the figure in the Eye Height box.

How to use the look around tool

After positioning the SketchUp camera, you will automatically trigger the Look Around tool.


You will now begin to view your model from the preset height. Make your height adjustments as necessary and bear in mind that it is relative to the ground plane regardless of the surface height of your model. 


Click and drag the cursor in any direction to turn your head and view your design.


How to walk through a model

You can easily walk through your 3D model by using your mouse or trackpad. Select the walk tool that is represented by a pair of shoes and place your cursor on the screen to show the direction in which you would like to start walking. 


Click and drag upwards to move faster and downwards to slow down again.


The tool also has automatic collision detection to prevent you from walking through walls and other geometry. You can toggle the collision detection off to make it easier to pass from one side of the design to the other if necessary.

How to Set Up Templates and Improve Sketchup’s Performance

Setting up Templates

There are several templates to choose from that will help speed up your design setup. Having the model’s default settings predetermined makes it much faster to get started.


You can add your own elements to a template and create your own if you wish. These include changing settings in the Model Info dialog, Geometry info, Styles and Shadows. 

  • The Model Info dialog box allocates the model defaults and your template should reflect these settings 
  • Saving existing geometry to a template means that it can be instantly available when you create a new model 
  • The styles browser presents sets of styles or the alternative is to set an individual face, background and watermark value
  • Shadows aren’t switched on by default but you can add them along with their own preferences to a new template

How to change the default template

To begin, head to Windows > Preferences for Windows users and SketchUp > Preferences with macOS. Next, choose the template you would like to set as the default and click OK.

How to create a new template

Many of the designs that you create may well have a familiar group of settings. Setting up your projects is a matter of personal preference and depends on the type of models you often work on. Customising SketchUp by creating templates that match your individual needs is extremely useful.


You can use your existing default template to get started.


Simply make any of the changes you want to include in a template and select File > Save As Template. 

Improving Sketchup Performance

There are 3 key elements that combine to create the peak performance for your modelling design experience.


When you have everything working in harmony, you can expect fast and efficient results that won’t break your flow of concentration.


These areas are optimising your modelling techniques, adjusting any necessary computer settings and changing OpenGL settings.

How to optimise modelling techniques for improved performance

As you create more faces and styles etc., SketchUp will continuously render the results. This is the workload pressure that the software is constantly putting on your system and can have big effects on the overall performance.


By keeping models light, you reduce that pressure and help keep things running smoothly and effortlessly.


Here are a few fundamentals that you might want to focus on to strip things back and lighten the load a little.


Use simple styles. Shadows and textures add plenty of weight to a design in terms of processing power. If they aren’t essential, then keep them turned off.


Create components. Turning elements into a component lets you use them many times if necessary. So rather than adding the same thing over and over, make it a component and simply replicate it.


Use .jpeg instead of .tiff. Importing images as a JPEG will result in far less data being transferred as the files are much smaller.


Hide unused geometry. Everything that is visible needs to be rendered. Try grouping certain elements together in layers and turn them on and off as needed.


Purge unused data. SketchUp keeps copies of old styles and components after you remove them just in case they are needed in the future. If you don’t need them again, then you can always remove them to speed things up a little. Go to Window > Model Info. Choose Statistics and Purge Unused.

How to verify the computer meets Sketchup Hardware and Software requirements.

Your hardware setup is one of the biggest factors worth considering when it comes to SketchUp performance. Even with the most organised workstation and light designs, you can’t make things faster if your computer isn’t up to the task.


You’ll need to ensure that you’re using a suitable graphics card, have enough RAM to perform any assigned processes and an adequate processor for the job.


For Windows 10 versions, for example, it’s recommended to have at least a 2GHz processor, 8GB of RAM, AMG or NVIDIA graphics card, 2GB of free disk space and 3D class video card.


Finally, always use any available SketchUp software and operating system updates.

How to adjust OpenGL settings to improve performance.

The Open Graphics Library is the SketchUp API which renders 3D graphics within the program. This along with the Anti-aliasing of jagged edges can cause performance issues for your system. So it’s good to know that it’s possible to adjust the preferences for both if necessary.

OpenGL

Go to Windows > Preferences or SketchUp > Preferences on masOS to begin making adjustments.


Select OpenGL and you’ll have a couple of options.


Use Maximum Texture Size – SketchUp doesn’t render graphics with anything over 1024 x 1024 resolution. This should be the default setting. But if your software feels sluggish, then it’s worth checking that this hasn’t been enabled somewhere along the line.


Use Fast Feedback – This setting can help improve performance, especially when working on larger models. It should be on by default but check that it is still switched on, just in case.

Anti-Aliasing

If you notice issues with the SketchUp performance or the visual appearance of your model, then you might want to check this setting.


Head to Window > Model Info and choose Rendering. Try deselecting the Use Anti-Aliased Textures feature to see if this helps to improve things.

Developing Tools with the Sketchup Ruby API and Console

SketchUp’s Ruby API allows you to create tools and menu items along with a host of other functions. Ruby is an open source programming language that makes it possible to integrate various changes to simplify processes for the user. 


Naturally, you’ll need to be au fait with programming in this scripting language to add to the ongoing development.


The Ruby Console is also available for trying out any additions to see how they function within SketchUp.


SketchUp doesn’t offer any support for this at present. However, the developer’s forum is a great place to start if you have any questions.

How to Create and animate Scenes in SketchUp

What are Scenes in Sketchup?

Creating scenes in SketchUp allows you to generate various views of your work and save them as independent images.


The benefits of doing so include quick access to different angles, seeing parts of your design with various textures or rendering applied, showing your model in parts to break down a presentation, adding additional views to shared models and creating animated sequences.

How to create a scene

Creating scenes is a simple three-step process. However, you should ensure that you set the view exactly how you want it with styles etc. applied for each before you begin.


Step 1. Head up to the Windows tab and select Scenes from the menu.


Step 2. Click on the Add Scene option.


Step 3. A new scene will appear and you can now change the name and add any other details as necessary.

How to manage scene properties

Each new scene comes with various preset properties. You can adjust these by unselecting the options from the Scenes dialog area.


Camera Location. You can adjust the point of view and zoom distances to suit your requirements.


Hidden Geometry. Everything will remain hidden when you load a new scene. Uncheck the box to display hidden elements.


Visible Layers. If you have used layers to control which parts of the document are visible, then you may wish to continue showing these throughout your saved scene.


Active Section planes. As with the visible layers, you may have created various section planes for your model. If you don’t want these to appear in your scene, then simply uncheck this box.


Style and Fog. Any of the scenes that you create will have their own style settings. When you edit these, you can decide whether or not you want to save the changes.


Shadows Settings. Creating Shadow settings for each of your scenes allows you to view shadow aspects at various times of the day. You may or may not want these saved with a newly created scene.


Axes Location. If you do not want the axes display info included in your scene, then you can toggle this off as well.

How to update a scene

To update your scene, select Windows from the menu bar and then click Scenes to open the dialog box.


Select the scene that you wish to work with and make sure you check the Show Details option to double check any of the properties that you want to save.


Finally, click on the Update Scene Button.


How to manage scenes


The scenes window will present all of your scenes in order of their creation time.


But sometimes you may wish to adjust this order and organise them in a way that makes more sense to you.


To do this, context-click on the scenes tab that you would like to move and shift it to the left or right as appropriate. You can also move the tabs up and down by selecting the Move Scene Down option and choosing the appropriate arrow.


How to delete a scene


Over time, it’s possible to build up a lot of scenes associated with your model. And you may not wish to keep all of them in the long term. To delete them, simply select the scene from the dialog and click Remove Scene.


How to customise scene thumbnails


Choosing your scene thumbnails is a matter of personal preference. It is possible to remove them altogether by clicking on the Details icon and unchecking the Use Scene Thumbnails option.


Other options include Small Thumbnails, Large Thumbnails, View Details or a List option that provides just the names of the scenes in a list.

How to view scenes in models imported from the 3D warehouse

Downloaded models from 3D Warehouse into SketchUp arrive in the form of a component. These will not have any scenes attached to them. The solution is to open it as a model by selecting No when asked if you want to load it directly into your SketchUp model.


Next, choose to open the file and use any of the scenes associated with that model.

Animating Scenes

Animating scenes is a fantastic way to show how your creation looks over a period of time. This could be with people coming and going, for example, traffic or perhaps shadows moving across a building throughout the day.


All of this is possible after creating your initial set of scenes and can be played as an animation in SketchUp, exported as an .MP4 or as an image set.

How to animate scenes in SketchUp

You can animate your scenes in the Scenes Manager by selecting the scene and clicking View > Animation > Play. Alternatively, context-click on the scene tab and choose the Play Animation option.


You can also customise the animation by clicking View > Animation > Settings. 

How to export video animations

To export your animations, head up to the main menu and click on File. Select Export, Animation and finally, select Video.


Select or create a new folder, give your creation a name and file extension type.


You can make any final tweaks to the animation via the Options tab and click Export when you’re ready.

How to export image sets

Exporting your scenes as an image set is simple. Follow the path: File > Export > Animation > Image Set and the Export Animation dialog options will appear.


Enter the root name for your images and select an image type from either .jpg, .tif or .bmp.


To make any changes to resolution etc., click on Options. Click OK to finalise the changes and select Export to complete the process. 

Casting Real-World Shadows

Your project comes to life as shadows are cast across the design at various points of the day. Based on the geographical coordinates, orientation and time zone of your model, shadows show you exactly what to expect when a building takes on its constructed form.


How to enable and use the shadows feature


By default, casting real-world shadows is automatically disabled while creating your designs. But to turn them on only takes a couple of clicks. 


Select View > Shadows to turn the feature on. And now you can begin to customise your options.


Make any necessary changes to the following setting as you need:


  • Time Zone 
  • Light intensity
  • Shadow intensity
  • Use the sun to simulate shaded areas regardless of turning shadows on or off
  • Cast shadows on other faces
  • Cast shadows on the ground plane
  • Cast shadows from edges

A transparent face with an opacity of less than 70% doesn’t cast shadows. Increase the opacity to above 70% to reverse this.

Using the Credits Feature

As they say, ‘credit where credit’s due’. And that’s exactly why SketchUp allows designers and those who have contributed to a model to add their names to a project using the Credits feature.


This feature is a basic attribution for those creating components for each model and not does not grant legal ownership for Digital Rights Management Purposes.


You will need a Google account to use this feature.


How to claim credit


Open the desired SketchUp component model file and follow these steps to claim credit on a design.


  1. Click the Sign In Account button
  2. Enter your Google account login details
  3. Now go to Window > Model info > Credits
  4. Click the Claim Credit option and ensure that your username is in the Model Author field
  5. Save the file
  6. Import your component into any other model file and your credit will appear 

Watermarking a Model

Watermarks are fantastic for keeping your designs secure and avoiding unauthorised copies after you share your SketchUp model. And they’re also powerful marketing tools as well.


Company names, logos and other images can appear in front of your images and documents or behind as necessary. And watermarking a model in SketchUp is incredibly easy for whatever purpose you may employ them.


How to add a watermark to a SketchUp model.


To add a watermark, select Window > Styles. The Styles browser will now open. Click Edit and then select the Watermark Settings icon.


You can now head to the saved image that you wish to use as your watermark and open the file. The possible file formats are .jpg, .png, .psd, .tif, .tga and .bmp.


The Creative Watermark dialog will now open and you can enter a name for your watermark. Click on the Background or Overlay buttons to place the image in front of or behind your model.


Go ahead and click on Next and you will now have the option to create a vignette mask and adjust the transparency of your watermark.


Click Next and select the position of your watermark. You can now expand the image to the desired size. You can also uncheck the Lock Aspect Ratio to allow your image to cover the whole screen.


When you are satisfied that the watermark appears exactly as you want it to, click Finish to end the process.


You can use the Edit Watermark Settings icon to make any alterations after you have inserted your image. Alternatively, you can delete it and start again if you wish.

Creating a 3D Model In SketchUp

The SketchUp software package is an incredibly powerful solution for all your 3D and 2D modelling needs. The free download edition has all the tools you need to get started, while the Pro version will take your ideas to a whole new level.


If you’re just getting started with computer-aided design, SketchUp is the ideal environment to develop your skills. Its simple interface keeps the whole process clear and concise throughout. And with the help of our SketchUp 3D modelling tutorial, you’ll be on the way to producing your first creation in next to no time.

This guide will help you get to grips with the basics and includes the following areas:


  • Choosing a style
  • Drawing lines, shapes and 3D objects 
  • Applying colours, photos, materials and textures 
  • Adding premade components and dynamic components
  • Classifying objects
  • Organising a model 
  • Viewing a model
  • Placing movie cameras in a model of a production set


For a little help with some of the other basic elements that we don’t cover today, you can always check out the tutorials page.

Choosing a Sketchup Style

Your style says a lot about you and how you want others to perceive you. And choosing a style in SketchUp helps bring that sense of identity to your designs. 


In essence, styles are a group of display settings that you can quickly and conveniently select from the Styles Palette. They add a feel to your work that sets it apart from the rest with aspects such as hand-rendered lines, coloured faces and background effects.


There is a fantastic range of predefined styles to choose from. And you can also edit and customise them to suit your designs. In addition, Pro users can create their own non-photorealistic styles.

Choosing a style

To take your pick from the standard set of styles on offer, head to the Default tray and choose the Styles panel. You can see the name of the current style at the top.

Go to the Select tab within the Styles panel and choose a collection of style settings from the list. This will produce thumbnails for the options in that collection. There are several to choose from including Sketchy Edges and different colour sets.

To apply the desired style, you just need to click on the thumbnail and it will be applied to your design instantly.

Customising a preset style

Styles have a series of customisable settings to adjust the sky and ground appearance. These include using colours or a photo. There is also a Transparency slider should you require it. Just select the Edit tab to make these changes.

In addition, you may also alter the appearance of faces and edges to personalise your styles further.

Drawing Lines, Shapes and 3D Objects

Lines and faces make up the bulk of your modelling creation. And pulling them out into 3D objects is where the real magic starts to happen.


Lines are the most basic component. And without them, you wouldn’t have any faces to give your model depth. They essentially create the edges that form the faces of your model. So first, let’s take a look at the most fundamental action—drawing a line.

Drawing a line

To add a line to your drawing, select the Line tool from the main toolbar.


Your first step is to click where you wish to begin drawing your line. You can press the Esc key to reset.


Move your mouse around the screen and you’ll see that the line begins to follow you around. When you want to stop drawing, you can simply click once more. And depending on the units set in your template, you’ll see the length of the line in the Measurements box.


The colour of your line will change as it relates to one of the coloured axes (x, y or z). This helps maintain your creation’s perspective as you progress.


If you need to adjust the length of a line, then choose the Move tool and click and drag the end of the line to where you require it.

Creating shapes (faces)

By connecting your lines into a closed shape, you’re effectively producing your first face. 


But this isn’t the only way to create faces for your model. You can also use the various shape tools to instantly create the basic shapes that you require.


You can fill your faces too! Select your shape and then open the Shape Style panel. Here, you can click on the Fill option and choose a colour. 


Drawing a rectangle or square


Let’s take a quick look at some basic shapes; rectangles and squares. When creating a 3D model, these shapes are going to be your bread and butter.


You can draw these basic shapes anywhere on the ground plane, vertical plane and on existing faces too.


On the toolbar, select the Rectangle tool and you’ll see the pencil with a rectangle appear in place of the cursor.


Click where you wish to start drawing and drag the cursor to expand the shape. The Measurements box will show exactly how big the rectangle is. You can now manually change the shape measurements to suit your needs.


Basic 3D objects (pulling a 3D object from a face)


To bring the shapes out of themselves and create a third dimension, you’ll need to select the Push/Pull tool—it’s the one with a square and a small arrow pointing upwards.


Click the shape that you wish to add volume to and the face will now become shaded.


Next, move the cursor away from the face to expand the shape and click a second time to finish. Again, you can use the Measurements box to enter precise figures. To add an identical 3D shape on top of the original, hold the Ctrl button (Windows) or Option (macOS) and double click on the face.

Inspecting an entity

Any line and face in SketchUp is considered an entity. And you can easily bring entities together to form a group that is called a Component Entity.


All of these entities have various characteristics that you can change via the Entity Info panel. To access the panel, go to Window > Default Tray > Entity Info on a Windows machine or Window > Entity Info for macOS.


You’ll find info regarding the entity’s size, layer, type and more.

Applying Colours, Photos, Materials and Textures

Adding effects to your design helps to make faces stand out from each other. They add a realistic touch and make models easier to imagine in their natural surroundings as a finished concept.


You can add basic colours to lines and faces or go a step further and give them a textured feel to show how that element fits with the design. These may be roofs, gardens, walls or windows, for example.


You are able to add these textures by going to Tools > Paint Bucket and click the Select tab. Choose your material from the list and click on the face onto which you wish to apply the texture.


Furthermore, you can use photos to add more textured effects where necessary.  


Material images are usually a tiled photo displayed on an individual face. But it’s also possible to use a single image to create the same result. You might even want to try taking a snippet from a Google Street View image that fits your model. This is a great way to keep your design in keeping with where it will eventually sit in the real world.


To add an image, go to File > Import and choose the file you want to use. You can import the image as a standard image, a texture or a matched photo.


Beware of the image resolution and the effect it may have on SketchUp’s performance. The higher the resolution, the more RAM your system needs to process the job. This can slow things down considerably, depending on your setup.

Wrapping textures

After importing an image file as a texture, you can wrap it around a shape such as a box or cylinder. 


  • Click on the lower-left corner of a face and then the upper-right corner
  • Click on the Paint Bucket tool and hold down the Alt key for Windows users or Command key for macOS
  • You’ll now see the Eyedropper appear
  • Click on the existing texture and release the Alt or Command key
  • Select the adjacent face to apply the wrapped texture

Modelling terrain and other rounded shapes

Modelling a landscape or a terrain for your model to sit on is done through SketchUp’s Sandbox tools. It uses hidden geometry to create a Triangulated Irregular Network (TIN) that you can then sculpt into the form you require.


The easiest way to begin is to import an existing terrain from Google Earth. Alternatively, you can draw a plain flat TIN to start working on.

Adding Premade Components and Dynamic Components

Components such as windows, for example, appear several times on a building. And rather than creating everything yourself and repeating the process, you can simply use a premade component to add to your design.


Components use edges and faces, like all of SketchUp’s geometry. And you need to make sure that each component has a definition and an instance.


The definition tells you how the component appears. It’s basically a description of what it is and how it looks.


And every time you add the same component repeatedly, you’re creating a new instance of it in your design.

Dynamic Components

Dynamic components are like regular ones, except that they can produce more advanced effects.


These will include at least one of the following:


  1. Constrained values. Certain aspects of a component may need to stay the same regardless of the overall size. This could be the width of a fencepost, no matter how tall it is.
  2. Repetitive elements. Subcomponents within a component can multiply as you increase the scale—such as stairs, for example.
  3. Configurable values. Predefined values in a kitchen appliance, or something similar, are useful when adding some components.
  4. Animated features. Animated dynamic components make use of the Interact tool to move them. Windows and doors, for instance, can open and close.

How to insert a component

It’s simple to insert a component through the Components panel. There’s a sampler that shows a number of possibilities. You can use one of these or go for the more complete selection at the SketchUp 3D Warehouse.


Just enter a word into the 3D Warehouse search box and find the best match for your needs. 


It’s also possible to insert your own components from a file on your device. Select File > Import and go to where your component is saved. Click Open.


After downloading or selecting one of SketchUp’s components, click on the area where you would like to enter it into your design.


You can later replace the components if necessary. To do this, go to the Components panel and choose the Model icon to show the components in your model’s collection.


Select the component or components that you want to replace. Now context-click the new component and click Replace Selected.

Editing and developing components.

Developing components and dynamic components is fairly straightforward once they’re inserted. And some of the most commonly used edits include scaling, flipping and rotating.


Scaling a component only affects the individual instance that you select. To do this, use the Scale tool.


Flipping means mirroring the component along an axis. Simply context-click the component and select Flip Along.


Rotating a component utilises the Rotate tool and the Move tool. 


If you want to reload a component from its original file, then this will override any changes. And to create a separate file from any changes, context-click and choose Save As.

About Elmtec

Elmtec have been the UK distribution partner for SketchUp since 2010, and service a network of UK and Irish resellers. We have over 22 years’ experience within the digital design community.

Contact Us

T: 01844 263 750
E: sales@elmtec.co.uk
W: www.elmtec.co.uk/sketchup