What is that weird file extension? It’s the SKP file format. If you’re researching SKP files, this article tells you everything you need to know about the SKP file extension used by SketchUp. By the end of it you’ll understand how to access these files and know exactly what you’re accessing. Read on for your next critical dose of SketchUp wisdom!
What is an SKP File?
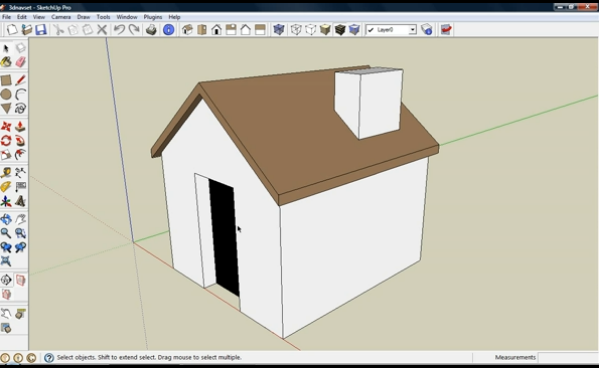
SketchUp is a popular 3D drawing programme that comes with a free version and the choice to opt for SketchUp Pro. An SKP file is the file extension name for the three-dimensional models created in SketchUp. The skp file of a model contains wireframes, shades, edge effects, and textures plus any of the many components that can be included in SketchUp documents.
An SKP file is also called a SketchUp document. SKP files can contain SketchUp components, for example a door, window, or beam. When these components are kept in an SKP file, you can import them easily then re-use them in future designs.
The Windows version of SketchUp makes automatic backups of SKP files, which are saved as SKB files. If your SKP file is corrupted or accidentally deleted it’s easy enough to restore it using the relevant SKB file. On a Mac, SketchUp automatically saves SKP backups using the filename: filename~.skp.
How to Open SKP Files
Because .skp is a proprietary file name belonging to SketchUp, the best way to open and view an SKP file is via Sketchup itself, using the SKP file viewer. Download the popular SKP file opener to view your SKP files without editing them. Other programmes can also open SKP files and convert them into different formats.
Software to Open SKP Files
SKP file converter
Do you need a good SKP file converter? These SKP file reader tools can open and/or convert SKP files:
SketchUp Viewer lets you open a SketchUp (.skp) file to view a model you’ve saved. Choose the file, open it, then go to the place where the file is kept on your hard drive. Simply select the file and click open to see the model in the viewer
With Glovius you can view SketchUp models on an iPhone, iPad, or Android device, a completely free SKP file converter tool. It gives you a portable SketchUp portfolio to showcase your designs, analyse them, and collaborate while on the move
The XnConvert image file converter is powerful and free, working cross-platform as a batch image converter. It lest you automate editing, rotate, convert and compress images, and carry out more than popular 80 actions including resize, crop, and filter. It supports every common image format including SKP
Online SKP File Viewer
What about an SKO file online viewer? There’s a good choice of free online SKP file converters which you simply add your file to and press ‘convert’ to transform it. It converts an SKP file to pdf, obj, fbx, dxf, stl, 3ds and more. These simple online SKP file viewing facilities include one from Filepro , one from Okino, and another from Xuver.
Learn SketchUp
SketchUp is a brilliant 3D drawing tool. It comes with a wealth of excellent learning resources including plenty of really good tutorials. Now you know how to open a SKP file and understand what SKP file software can do for you, what will you learn next?
You want to view SKP files online? SketchUp desktop viewer is a free download designed for viewing models on tech that either doesn’t have or doesn’t need a full version of SketchUp itself. The SKP file viewer is a brilliant way to bring 3D models to sparkling life on Android devices, iOS devices and more. Read on to find out how this cool little tool supports great client communications, essential flexibility, and highly effective working on the go. Welcome to SketchUp viewer online.
Benefits of SketchUp Viewer
SketchUp itself is an intelligent software tool used for drawing applications in the architectural, interior design, landscape architecture, civil and mechanical engineering sectors as well as in movie and game design. SketchUp viewer is a separate app that makes SketchUp 3D models easily available on a multitude of devices. The web-based application is called the SketchUp free viewer, and there’s also a brilliant paid version that comes with loads of extra functionality, SketchUp pro viewer. No wonder it’s known for being the best way to view SketchUp files online.
Thanks to SketchUp viewer you can easily navigate and present your own SketchUp designs and also explore literally millions of free models in 3D Warehouse, at no charge. You can open or download models directly from 3D Warehouse, Trimble Connect and Dropbox, then open them via Android ‘open with’. Because the viewer supports Android’s Storage Access Framework, opening models from Google Drive and other file storage apps is super-easy.
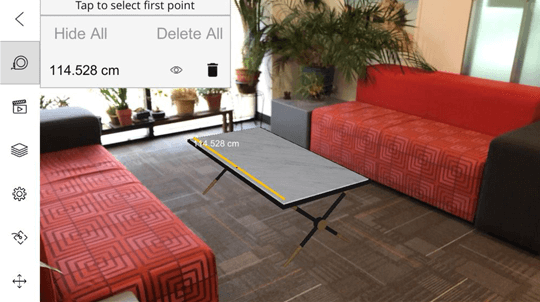
You can tap into SKP viewer Augmented Reality to merge 3D models with the real world to spectacular effect, with AR model viewing for SketchUp Shop, SketchUp Pro and SketchUp Studio subscribers as well as a paid-for option in-app. And the astonishingly good select tool and entity info panels provide insight into lengths, face areas, solids volumes, and the distribution of components and groups.
It’s a dream to navigate with intuitive multi-touch orbiting, panning and zooming. You can look at projects from standard views or scenes created up in SketchUp desktop and web modelers – it supports everything from camera location and properties, hidden geometry, shadow settings, visible layers, active section planes, standard edge styles, face styles and background/sky/ground style settings to watermarks and axis location. And it’s easy to swap between perspective and orthographic cameras when creating drawings for production and architecture.
Taking measurements using the tape measure tool, amending your unit preferences to see measurements, dimension strings and entity information, it’s all simple to achieve. As is turning layers on and off, adjusting edge and face styles including x-ray mode, plus toggling to control hidden geometry, section planes, section cuts, axes, and watermarks.
Work anywhere
Work doesn’t happen exclusively at the office anymore. Sign off on changes, collaborate with remote colleagues, and get work done in today’s world.
Orbit anywhere
Get work done on the go. You can open .SKP files from anywhere — wherever you are. Present conversational details of your models when you show scenes, layers and views — right on your mobile device.
Get to know your projects
You’ve drawn the building. But have you seen it from every angle? Step inside your creation with AR/VR Viewer apps and solve problems before you ever break ground.
Present your projects
Visual projects deserve visual explanations. Show your stakeholders your ideas, and the challenges, and get feedback on desktop, mobile, or in mixed reality.
Getting Started with Sketchup Viewer
SketchUp viewer is available for desktops via the SketchUp desktop viewer and available for mobile devices, with a SketchUp viewer Android version as well as one for iOS. To get started with Sketchup viewer you simply need to download SKP file viewer online. Here’s the official link.
Sketchup Desktop Viewer
Thanks to the SketchUp viewer for Desktop, people who don’t use SketchUp can join in. This makes it an exceptionally powerful collaboration tool for creating feature-rich documents, adding real-life location details, shadows and aerial images to wow stakeholders, colleagues and clients. You can harness the amazing V-Ray rendering tool to visualise everything in photorealistic, real-time detail and accurately model designs by turning your point clouds into 3D models.
The key benefits supported by the free desktop SketchUp viewer app include the ability to review designs in 3D, whether the file comes your way via email or as a download from a shared online location. You can enjoy seeing your designs in beautiful, accurate 3D with orbiting, panning, animations and more, and the viewer is a lot easier to use than SketchUp itself when you’re not experienced in 3D modeling.
Because SketchUp Desktop Viewer doesn’t come with editing capabilities your model can’t be accidentally changed. People will always view the model the way it was supposed to be viewed. It’s really easy to open files, navigate around and print out the content, too.
Sketchup Viewer Mobile Apps
Sketchup viewer is perfect for Android and IOS. The user interface is a pleasure to handle, simple and intuitive. So how is Sketchup viewer used on mobile devices? SketchUp Viewer for Mobile lets you explore and test out demo models as well as models of your own. It provides AR model viewing as long as your device is enabled for ARKit (iOS) or ARCore (Android).
To view your own models in AR, an active SketchUp Shop, SketchUp Pro or SketchUp Studio subscription is essential. Or you can test-drive the AR model viewing features with your own models using a free 7 day trial of SketchUp Studio, which includes trial access to every Mobile, AR and VR Viewer app.
The mobile hardware and software requirements? All the devices involved must be compatible with OpenGL ES 3.0 and have at least 1024MB RAM. For iOS you need the iOS 10 operating system or later, and phones must be iPhone 5 or later. Tablets must be Retina iPads. Android Devices need an operating system that’s Android 6.0.1 (Marshmallow) or later, with phones and tablets requiring at least a 4 inch screen with an MDPI, HDPI, XHDPI or XXHDPI resolution.
SketchUp Viewer Download
How to view 3D models using AR? Your iOS Devices must have an Operating System iOS 11 or later. You’ll need an iPhone 6 or later, an iPad Pro, 2017 iPad or later, and there’s an official list of ARKit devices to check. For Android you’ll need an Operating System Android 7.0 (Nougat) or later and there’s an official list of ARCore devices to check.
If you have already subscribed to a SketchUp Shop, SketchUp Pro or SketchUp Studio bundle, premium AR model viewing is unlocked and ready to go once you launch the app. As a SketchUp Free subscriber, you can buy your way into AR Model viewing features with a simple in-app subscription. Just open any non-sample model then pick the AR icon to get a subscription prompt.
Sketchup Viewer Online
Sketchup for Web free online is a free version that runs in your browser. The simple interface lets you draw 3D models of anything you can imagine. The online SketchUp viewer is accessible from a broad range of devices and hardware isn’t an issue. It’s version-less, your operating system won’t limit you, there are no updates to worry about and you will always run the latest version. The viewer saves models to the web by default, with 10MB free storage included. You can even tap into Trimble Connect to keep things up to date across multiple devices and XR software.
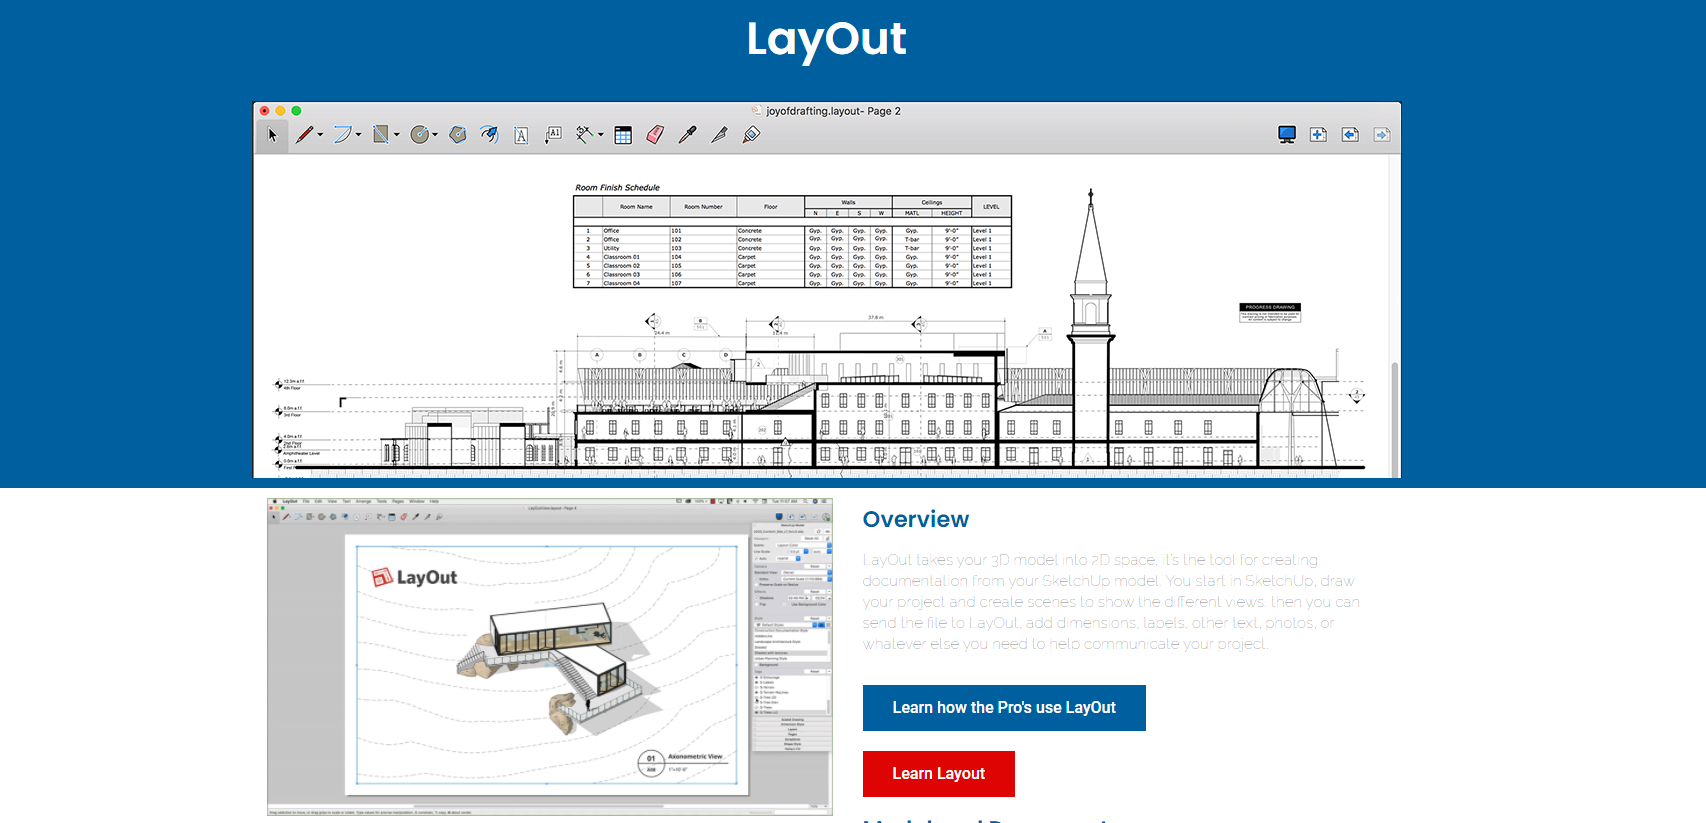
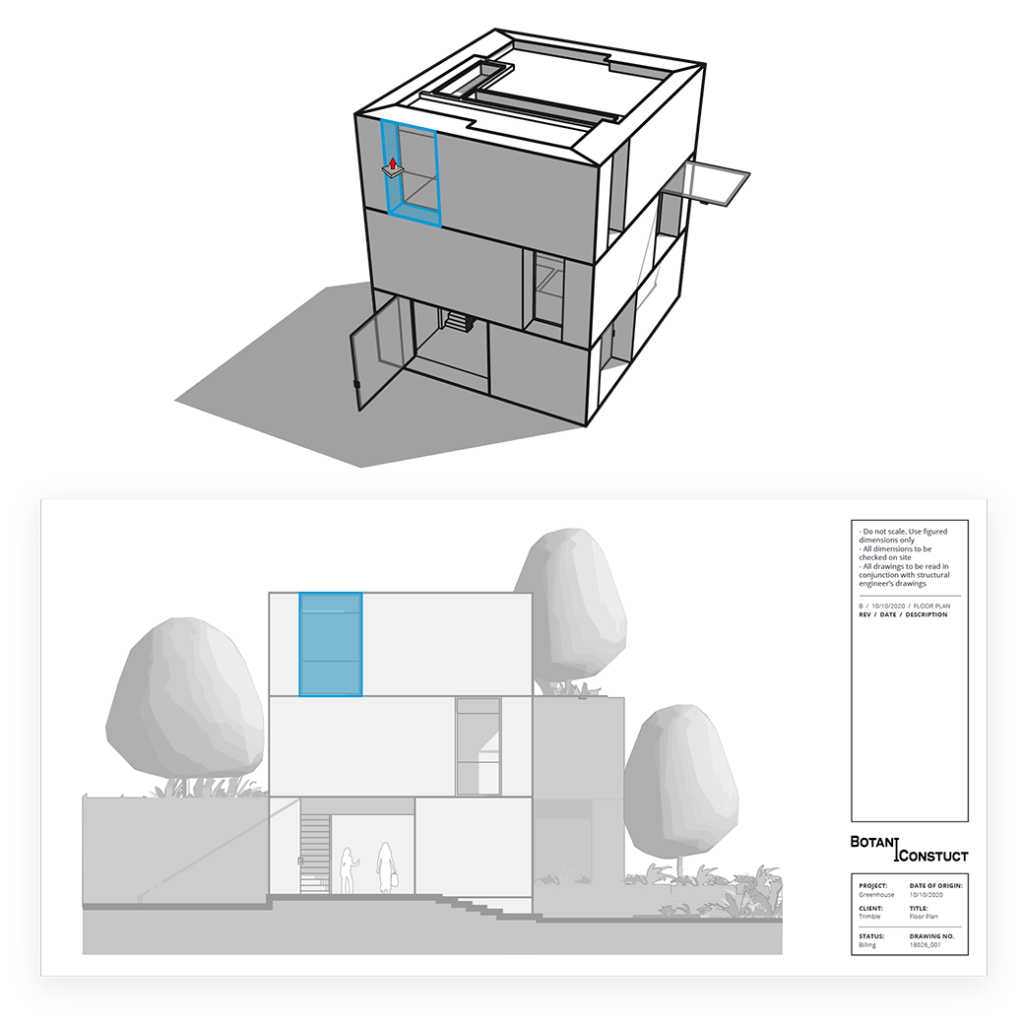
It’s one thing creating a fantastic design. It’s another thing to have the collateral you need to wow your client at a presentation. SketchUp LayOut is a brilliant SketchUp tool designed to create detailed 2D Architectural documents from your 3D SketchUp models. It quickly, accurately makes beautiful layout documentation from your SketchUp models.
This is how it works. You begin your project in SketchUp, drawing it and creating different scenes to reveal alternative views. You send your file to LayOut, adding extras like the dimensions, labels, text and photos. Then LayOut cleverly exports a beautiful PDF file for you to send to a client or use to wow your audience at an on-screen presentation.
LayOut and SketchUp Pro are a match made in heaven, built to collaborate, enhance your SketchUp workflow and boost productivity. And it’s so flexible. When you want to update your original SketchUp model, you can do so in LayOut and it syncs all the details automatically, saving you time and effort.
What’s the Difference Between SketchUp and LayOut
LayOut is a fantastic tool for creating accurate documentation from SketchUp models. It’s only available via the SketchUp Pro package, not as a stand-alone app. While SketchUp itself is a genius at 3D modelling, LayOut is its 2D partner. Can you imagine being able to quickly, easily transform the 3D models you’ve created in SketchUp into professional-looking 2D drawings? It makes such a difference to your client-facing responsibilities.
Can you use LayOut without SketchUp? The answer is no. They’re a team, and like all great teams, they’re only effective when they’re working together. You’ll need Sketchup Pro to access LayOut.
Creating 2D Designs with LayOut
It’s genuinely easy to create 2D drawings using LayOut. Here’s how to section a model, for example, a model of a house, create a ‘plan’, access the ‘plan’ scene in LayOut, and create a floor plan view ready for annotation.
Set your view to ‘parallel Projection’ in the Camera menu to create a straight-on view for the plan
Go to ‘Window’ and pick the Scenes console – you can hide the Section Plane in your LayOut document by opening the window in SketchUp then editing the scene’s default style
Click the ‘+’ button to create a scene called ‘Plan’
Access your SketchUp model in LayOut using File > Insert
Right-click on the SketchUp window and choose ‘Scenes: PLAN’
Right-click and go to Scale = 1mm:50mm
Your LayOut scaled plan is ready for dimensioning and annotating
Creating Floor Plans with LayOut
Sketchup and LayOut create fabulous 2D floor plans, too. Here’s how to create a room layout:
Create a top view of your model
Centre it on your screen
You’ll need to use the parallel projection view to avoid perspective distortions. Adjust the camera settings so you’re in parallel projection and it removes perspective from your drawing
Click ‘add’ to create a scene showing the view you’ve set up
Rename it, for example ‘floor plan’
Take a section cut through the building so you can see the doors and windows – go to the large tool set or the tools section plane then add a section plane
SketchUp LayOut Tutorials
You’re never left to figure things out on your own with SketchUp. There are all sorts of top class SketchUp tutorials and LayOut tutorials available on YouTube, and more to enjoy at SketchUcation as well as in the excellent SketchUp tutorials library.
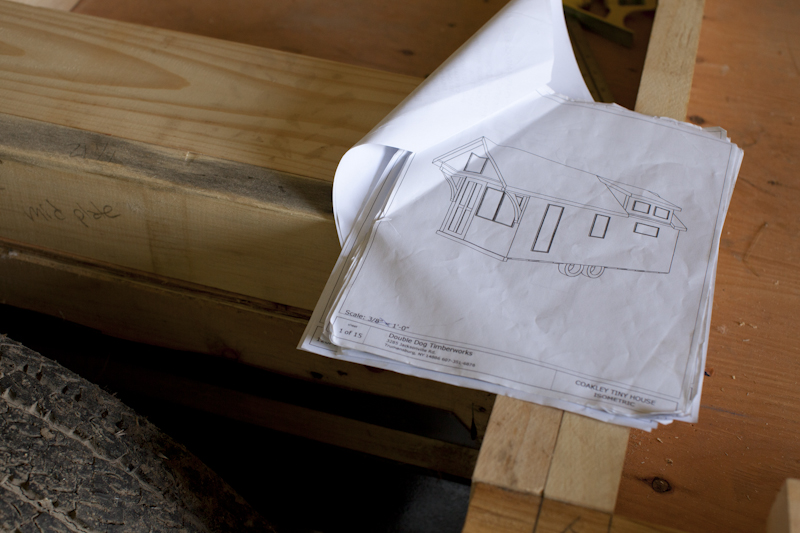
Are you researching woodworking software? If so, have you come across SketchUp Pro yet? It’s widely used for carpentry design and creating drawings from 3D designs, it comes with a wealth of fantastic features and functionality, and there’s a free version as well as a Pro version. If you want to test-drive woodworking design software, it’s ideal. You’ll love the sheer power of the tool with its complex design capabilities, brilliant exploded dimensional views and more. Here’s what you need to know about SketchUp’s incredibly popular woodwork modelling software.
What is Woodworking Design Software?
So why do you need woodworking design software? Great woodworking begins with exceptional design, and great designs create the blueprint for a woodworker to follow. Whether you’re a wood crafter, carpenter or cabinet maker, woodworking CAD is what you need to transform ideas to 3D models, then to plans, then to real life.
This woodworking modelling software makes life so much easier! You create drawings in no time, intuitively, with ease. Editing your designs is super-simple as well as fast. Amazing visualisation features mean there’s no need for time-consuming, costly prototypes. And you can easily deal with potential issues before they become problems. It can even act as an accurate inventory of exactly what quantities of materials needed to actually bring your design to reality.
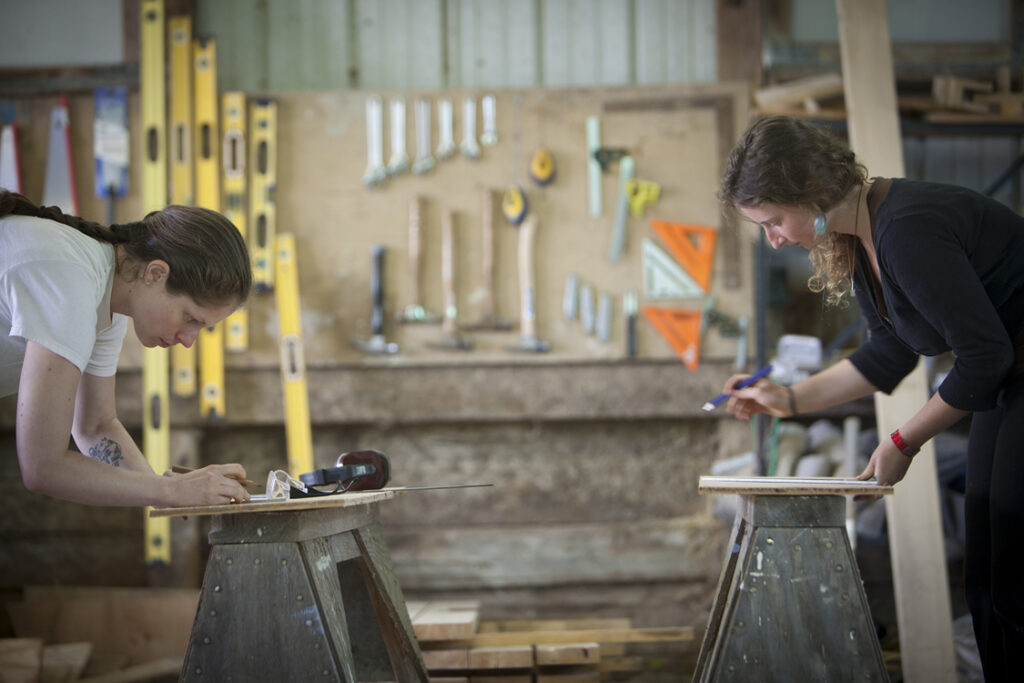
Sketchup for Woodworkers and Carpenters
A good woodworking design app lets you think through and pre-build items on your computer before creating them in real life, and that comes with numerous valuable benefits for woodworkers and carpenters.
Woodworking design software comes with great productivity built in. When you want to get things done quickly it’s perfect. Learn the basics of the programme you’ve chosen and you’ll soon become fluid and fast. It costs a lot less to model via CAD than it does to test-drive different designs in the real world. And it makes testing ideas so much easier, which in turn drives better levels of creativity.
Measurement becomes simpler, too. Accurate modelling lets you make 3D cutlists before you go anywhere near a piece of wood, and you can model projects with as much or little precision as you like. It takes no time to create sectional views and it’s an easy task. Complex design capabilities are yours and exploded dimensional views provide every fine detail you could possibly want, from every angle, revealing the individual parts or the assembly order of an object as an easy-to-understand diagram. The simple, effective and accurate dimensioning you get means it’s easy to achieve accurate design modelling.
Fully-dimensioned shop drawings, cut lists and photorealistic renderings are all available at the click of a mouse. It’s easy to switch between parallel projections and perspective views. The X-ray view creates a line drawing that you can attach geometry to inside intersections, making essential connections to parts you can’t easily reach.
SketchUp comes with a friendly, dedicated community whose members happily generate free, downloadable plugins for all sorts of interesting purposes. There’s a huge warehouse full of extensions where you can also access thousands of SketchUp models. You can even contribute your own.
The end result of all this magic is software that lets you work in a way that feels natural. If you’re used to using other CAD tools you’ll find SketchUp faster and easier to use, as well as a dream to learn thanks to its famously intuitive interface.
Access Furniture Designs from 3D Warehouse
SketchUp’s carpentry design software includes access to the popular 3D Warehouse. Some of the woodworking focused resources you can tap into includes a custom bookcase, a child’s Adirondack chair, woodworking benches, a Japanese garden bench and a window seat, all ready for you to use, amend, play with, and create your own unique versions of.
Realistic Materials, Colours and Finishes
One of the most exciting features is the way you can apply materials to your design models in SketchUp, and it’s also a simple matter. Imagine being able to show a client a fully-textured and coloured image of the project, designed to make the decision process so much easier. You can swap the materials, colours and finishes instantly for different effects, create brand new materials of your own, and accurately calculate exactly how much of those materials you’ll need to complete the job.
Materials are defined as paints with a colour and an optional texture. If you want to show your client a roof made of tiles, you can do that. If they want to know how your design looks with a metal roof, you can create an image of it in no time. Because the colour and texture options are kept separate, you can change one while leaving the other as it is. You can even change a material’s opacity.
It’s a simple matter to apply materials to your model. Just choose a face or multiple faces, pick the materials you want, and apply them using the paint bucket tool.
Create 2D Woodworking Designs with LayOut
Another great benefit of this exceptional woodworking software is the LayOut function. It lets you transform 3D models into beautiful 2D drawings including all the dimensions and annotations. All you do is place your SketchUp model into a LayOut document, then you’re free to design the document so it highlights the best features of the 3D version. To change the original SketchUp model, simply update the model in LayOut and every detail is automatically synced. Amazing!
SketchUp Woodworking Extensions
SketchUp’s Extension Warehouse is a popular resource. There’s an inspiring collection of brilliant carpentry extensions to download at the warehouse itself. You can find them here and they’re available for both Windows and Mac. And there’s more at Smustard, the Ruby Library Depot, and SketchUcation.
The OpenCutList extension, for example, creates cut lists and cutting diagrams for woodworking. First, it examines the components and material properties, then it automatically creates a list of parts plus cutting diagrams based on the material’s properties. It looks at the type of material, the grain direction, trimming sizes and saw kerf width, part oversizes, standard panel sizes and so much more. It makes your life easy by allowing you to highlight parts of your model, reveal the grain direction and make the components’ orientation crystal clear. You can print out part lists and cutting diagrams or export them as a regular CSV file as well as importing CSV files.
SketchUp Woodworking Tutorials
How do you learn best? Whatever your learning style is, there’s an exciting abundance of SketchUp Pro tutorials on every topic and many take the form of easy-to-digest video tutorials on YouTube. Here’s a link to lots of brilliant ‘getting started’ tutorials. SketchUp’s legendary woodworking software could be the best decision you ever make!
What does it look like made bigger? How about smaller, or stretched? Stretching and resizing objects and components in SketchUp is a common requirement for designers from all sorts of sectors, and once you know how to do it, it’s a fast and easy process. If you’re wondering how to scale in SketchUp, boost your design capabilities, improve productivity, enhance your creativity and make designs that delight your clients, read on about how to use the Sketchup scale facility.
The SketchUp Scale Tool
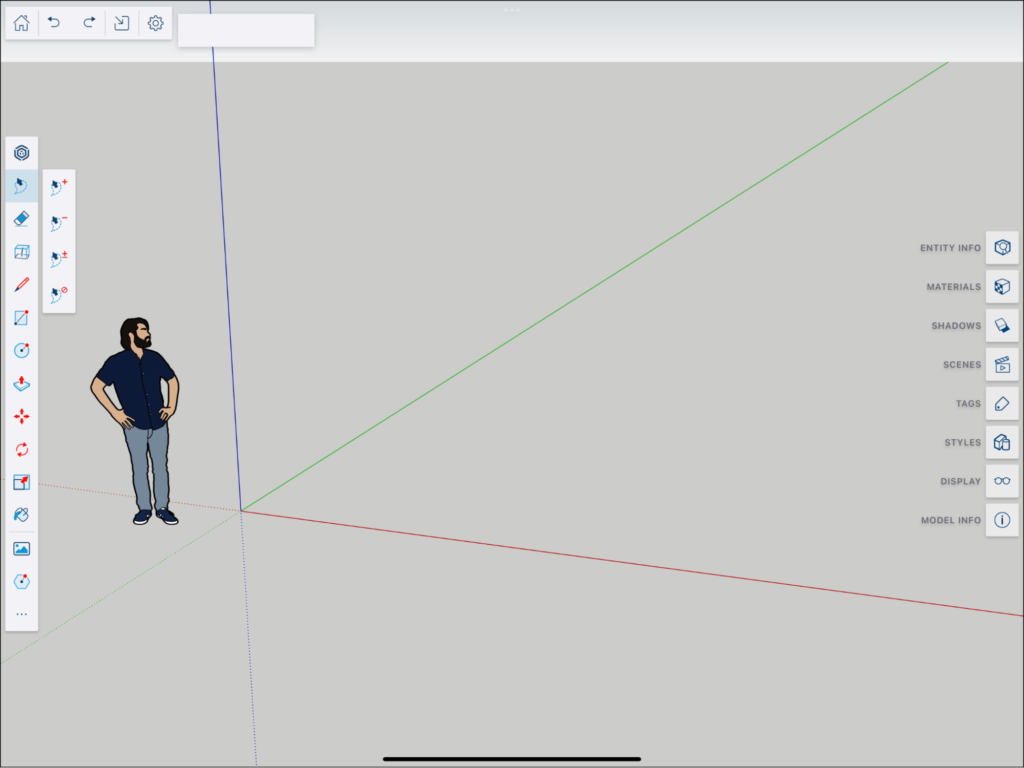
The SketchUp scale tool is an excellent way to modify two-dimensional and three-dimensional objects inside SketchUp. Take a look at the top toolbar and you’ll see it, a red square with a brown box in the left hand corner and a red arrow pointing off towards the right hand corner.
Maybe you want to scale a single face of an object. In which case you simply choose the face you want to edit by clicking on it. To scale multiple objects at the same time you use the select cursor then draw a box around everything you want to change. Once you’ve made your selection, you can either click on the scale tool icon or type in an ‘S’ keyboard shortcut, which activates the tool.
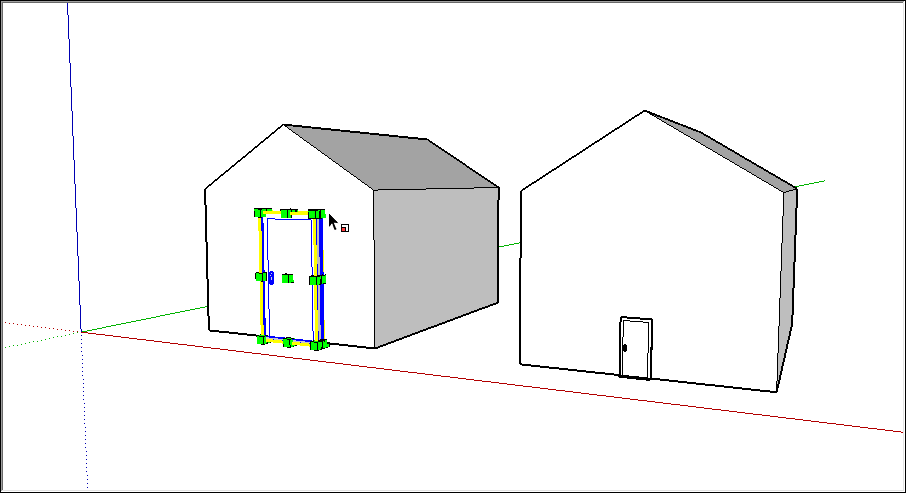
The SketchUp resize object function lets you scale an object very precisely. The programme draws a border around your object including eight green boxes. These are your scaling grips. Click one of them and drag the cursor to see the object you’ve chosen being resized.
Scaling something with the edge grips – as opposed to the grips at the corners – scales the object without keeping the original proportions. It fixes on a point opposite your chosen grip, moving the point closer or further away from the fixed point to resize the rest of your object accordingly. This is perfect when you just want to resize something quickly and precision isn’t really an issue.
For precise resizing, draw a selection box around your object then choose the scale tool and click one of your corner grips once. You can also use the ‘S’ keyboard shortcut. Now add the decimal value you need to scale to and press enter. When you enter 0.5, for example, you halve the size of the object, and when you enter 2 the size of it doubles.
Scaling to a Specific Size in Sketchup
How to scale to an exact size? It’s actually really easy to scale to a specific size, and you won’t need to struggle with maths to do it.
First, triple click on one of the faces of your object to choose the whole thing. Pick the tape measure tool then use it to measure the edge you want to change the dimensions of. Click once on the starting point and once again at the end. Then all you do is type the exact dimensions you want into the ‘length’ box, which you can see to the bottom right. You can see how resizing happens according to changes in the object’s defined dimensions.
To resize, press ‘enter’ for a message asking if you want to re-size. If there’s just the one object to resize, there’s no risk of accidentally re-sizing anything else. Click ‘yes’. If there are other objects it’ll go ahead and re-size everything. But that’s easy to avoid. The trick is to create a group.
How to resize a component without rescaling everything? Right click on an object and choose ‘make group’. Choose an object outside of the group and resize it from there, and you’ll see everything in the model gets scaled. But when you double click on the object to resize so you’re inside the group, you can use the tape measure tool to choose the size you want, then hit ‘enter’ and it’s done. The scaling is only applied to the active group or component you’ve chosen.
Tips for Scaling in SketchUp
You can scale the whole model using the Tape Measure tool. You can resize objects while keeping their proportions using the Tape Measure tool or Scale tool. It’s easy to stretch or reduce an entity to scale using the Scale tool, and you can either scale just one component or every component in a model.
Here are some handy tips for scaling in Sketchup:
Use ‘S’ as a keyboard shortcut to activate the scale tool
Grab your object from a corner to scale uniformly
Grab your object from the centre to scale across a certain axis
When you select by dragging from left to right, make sure you fully encompass the object you want to resize
When you select right to left everything inside the box gets selected
Use the scale handle and hold down ‘control’ on the keyboard to scale evenly from the centre
To scale a circle and you know the diameter, double click and grab a corner handle, hold down control and scale it up or down
To select parts of a model to be scaled while not scaling others, open the group and create a selection around the thing you want to scale then scale it directly
To scale without stretching the material open the component, select the individual faces then scale them to scroll the material
To scale something that’s right next to another object, hover over where you think the handle should be to scale it as needed
SketchUp’s excellent 3D modelling functionality makes it enormously popular in a wealth of circumstances where accurate, intuitive drawing is the name of the game. Whether it’s architectural drawings or drawings for interior design, landscaping, construction and engineering, even game design, it helps talented people create perfect working drawings.
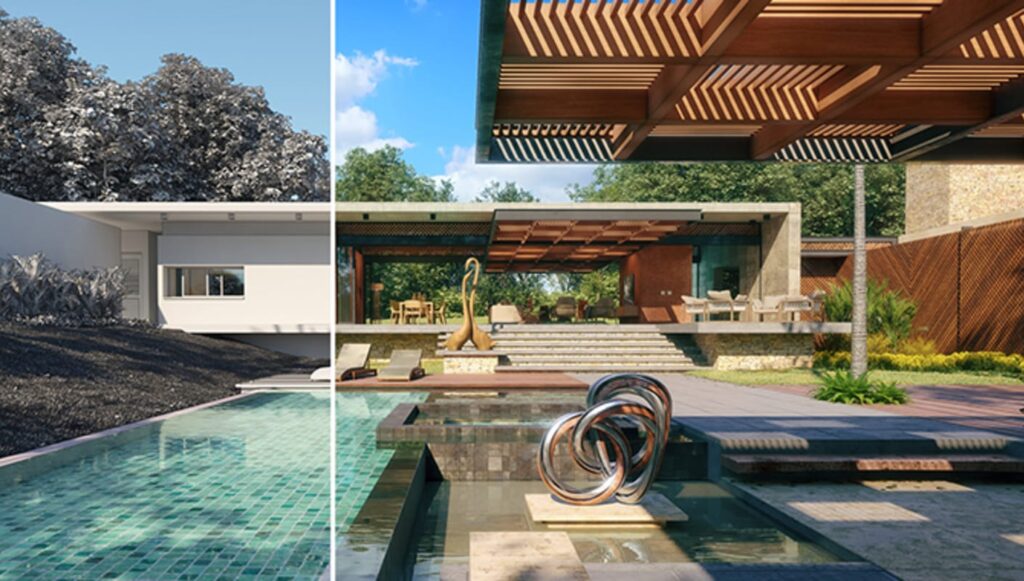
3D models designed in SketchUp appear in a simple rendered output. They beautifully showcase shadows, colours and textures, but they don’t process reflections or light sources. When you want to see your model as a high-resolution photo-realistic image, you need rendering. So how do you render in SketchUp? You use rendering extensions. Did you know that rendering software for SketchUp is easy to use and delivers brilliant results? Welcome to the amazing world of SketchUp render plugins.
Creating Photo Realistic Renders with Sketchup
Designs in SketchUp don’t process reflections, light from electric lights or sunlight. But designers want to create clear, accurate, photorealistic renderings of their designs including exterior lighting and interior lighting, simply because light is often such a fundamental part of the way designs work. Get the light wrong and your design might not fit the bill.
You need a SketchUp Extension to achieve the desired rendered results, revealing how light falls on surfaces and changes the ambience and appearance of a design. SketchUp rendering solutions are your best friend, and there’s an extensive collection of rendering solutions for SketchUp specially created for adding realistic materials, adding lights and reflections, all perfect for creating atmosphere in your designs.
Basic SketchUp offers a choice of different rendering plugins, including:
So what is the best rendering software for SketchUp? Some of the most popular are Su Podium, V-ray for SketchUp, Twilight Render and Enscape for SketchUp, all widely-used SketchUp rendering extensions. And V-ray is amongst the most popular rendering extensions for SketchUp of all.
V-ray for SketchUp is one of the most popular rendering plugins in the digital modelling sector, used to deliver SketchUp’s full potential in all its glory. It comes with an incredible choice of textures thanks to the powerful material editor. There’s an equally powerful render engine and the V-ray UI is nice and easy to handle. Together all this makes creating photorealistic renders faster. Would you like to take advantage of a generous free trial of the SketchUp V-ray render extension?
Su Podium is another seriously useful rendering extension for SketchUp. It lets you make beautiful photorealistic models including hyper-real looking materials, sun effects and sky effects, and it also does a fantastic job of portraying artificial lights. It has a simple, efficient UI and is built to deliver high quality images quickly. The plugin’s brilliant panorama rendering is special, called Podium Panoramas and viewable in virtual reality thanks to a clever spherical environment.
SketchUp Rendering with V-Ray
V-ray for SketchUp provides a choice of toolbar facilities: the V-Ray for SketchUp toolbar, the V-Ray lights toolbar, and the V-Ray objects toolbar. The settings available under the V-Ray for SketchUp toolbar menu include exciting functions like asset editing and material settings, plus realistic environment settings like sunlight. It offers model geometry settings and general render settings too, for a great range of render styles. This is where you’ll find the tools that let you edit your rendering, plus the render buttons themselves.
V-ray provides a large library of realistic materials. The V-ray lights tab comes with all sorts of settings for the different lights within the 3D model, and it works seamlessly in conjunction with the V-ray lights toolbar. This means you can add many different kinds of light, for example, rectangle lights, sphere lights, spotlights, IES lights, interior lights and exterior lights, each with its own unique effects.
You have two different types of renderings to choose from. Rendering with V-ray delivers a simple static rendering in your render window. But when you render with V-ray interactive you get an interactive render that changes as the camera moves. Both of these incredibly realistic rendering capabilities create the atmosphere you need to drum up the right level of enthusiasm in your clients, helping them to see and understand a space or a design in a way that simply isn’t possible without rendering.
While SketchUp is a complete all-in-one 3D modelling solution, you will need to make a few tweaks here and there to help it run perfectly to suit your needs.
We all work in slightly different ways. And thanks to this software’s adaptable features, it’s possible to configure many aspects to fit with your style. Everything from software settings to performance—you are in control.
And after reading our guide to customising SketchUp, you’ll feel confident to head off and start making the necessary adjustments to increase your own performance and create the very best 3D models possible.
In this section, we’ll cover the following customisable areas:
Setting software and file preferences
Customising your keyboard and mouse
Customising your workspace
Setting up templates
Improving performance
Developing tools with the SketchUp Ruby API and console
Setting Software and File Preferences
In SketchUp, you can set a few preferences for how the software works overall and how files are saved.
SketchUp file preferences and software adjustments help keep everything running exactly how you want them to from the outset. Preparation is key, and that’s certainly true when it comes to getting the most out of your 3D modelling with SketchUp.
Setting software and file preferences can be done via Window > Preferences for Windows users. And SketchUp > Preferences for macOS.
How to set file recovery preferences
The main preferences for file recovery are creating auto backups of your work and auto-saving your designs as you go along.
Lorem ipsum dolor sit amet, consectetur adipiscing elit. Ut elit tellus, luctus nec ullamcorper mattis, pulvinar dapibus leo.
Creating backups
Backups are created by default with SketchUp. And this is great news as it means your work is stored in the event of a system failure or you need to revert to an earlier version. The backup version and the latest file that you’ve saved will have the same file name. Moreover, it will live in the same folder so you don’t have to go off in search of it when you need it.
Your model files are .skp and the backup is a .skb file.
Auto-saving
We’ve all been there. After working on something for what seems like an eternity, something happens and all your hard work disappears forever. Not with SketchUp’s default auto-save feature.
It will save your latest version every 5 minutes. But you can adjust this if you like.
How to automatically check models for problems - and provide notifications
You can check for any problems with a model through the General Preference pane. SketchUp will automatically check for issues when you save your work and fix them accordingly. Click on the notification box to receive an alert when this happens.
How to be warned of style changes when creating scenes
Editing styles and adding scenes results in SketchUp prompting you to decide if you would like to save the changes as a new style, update the style or neither.
You can turn off these prompts if desired.
How Sketchup is configured to check for software updates.
SketchUp will automatically check for software updates unless you tell it not to via the General Preferences.
How to define the default location for files
You can change the default file location for your model files easily on both macOS and Windows. Create your location file first and then you can begin to change your preferences.
Windows users need to head to Window > Preferences and select Files and then Change File Location Preference. Select your new folder and you’re done.
For macOS users, open the current folder by clicking the open folder icon. Next, you can change the preferences for the location for the following files:
Models
Components
Materials
Styles
Texture images
Watermarks
Export models
Classifications
Templates
How to change Sketchup’s language
SketchUp is available in many languages. You can download your copy in English, French, Spanish, Japanese, Italian, Portuguese, Polish, Russian, German, Korean, Brazilian, Chinese and Simplified Chinese. The language will revert to your OS language if it is different.
How to turn off the welcome screen – if desired
It’s advisable to leave the Welcome Window on as it is where your recovered files go if there is an issue. However, you can go to Window > Preferences > General and uncheck the box if you want to turn it off.
Customising Your Keyboard and Mouse
Creating your models means getting your mouse and keyboard working in harmony. You’ll often be moving around the screen and inputting various commands and adjustments along the way.
Customising your keyboard and mouse is the best way to make the whole experience as seamless and smooth as possible.
How to create keyboard shortcuts
Customising SketchUp using shortcuts turns your keyboard into a control station that is configured to suit the way you work. Click on Window > Preferences > Shortcuts to start adding your personalised keystroke combos.
Use the function list to select the commands you want to use and which keys to assign those functions. If your keyboard ever gets too cluttered, you can simply remove the commands individually or use the Reset All option.
Remember that you can’t start a shortcut with a number, use modifier keys or those locked by the operating system.
How to invert the mouse scroll wheel
The mouse scroll wheel lets you zoom in and out of your image instantly. By default, going up zooms in and down zooms out.
But some users may prefer to invert that function.
Go to Window > Preferences > Compatibility and look for the Mouse Wheel Style. Click on Invert and then OK to save the change.
How to change the mouse buttons in SketchUp
Remapping your mouse can be done through your computer’s settings. Left and right click can take on different commands if you need them to. And this is particularly useful for those who use the mouse with their left hand, for example.
The SketchUp design process relies on the keystroke and mouse click combos. And changing how your mouse buttons work can have an effect on the outcome.
Making standard changes to your mouse through the system options on your computer shouldn’t have any detrimental effects. But using a mouse mapping tool to create additional functions could create problems.
How to customise the way the Line tool cursor responds to mouse clicks.
In the Drawing Preferences area, you can decide how the Line tool cursor reacts to your mouse clicks.
The Auto Detect option is set by default and it lets you click-drag-release or click-move-click as you prefer.
The Click-Move-Click option tells the Line tool to start drawing when you click to create the start point, then move the mouse to increase the line and click to end the line.
Click-Drag-Release sets the Line tool to draw only when you click and hold the mouse to find the start point. Then you can drag to draw the line. Finally, release the mouse button to stop drawing.
Continue Line Drawing is set by default whenever you have selected Auto Detect or Click-Move-Click. When Continue Line Drawing is on, the Line tool starts a new line when you finish the previous one without having to click again.
Customising Your Workspace
Your SketchUp workspace is where you’ll be spending your working day while perfecting your models. Much like the rest of your office, you need everything laid out just as you like it to make everything as comfortable as possible.
Customising your workspace is possible in a variety of ways.
How to run Sketchup from multiple displays
Your SketchUp workspace can be shown on multiple displays to let you focus on separate aspects of the design. It’s how many designers choose to work and makes the creative process much smoother.
While it is perfectly possible to achieve this multi-screen setup, you must bear in mind that SketchUp doesn’t officially support this function. Furthermore, Trimble doesn’t provide assistance if you have an issue.
How to set workspace preferences in Sketchup
Your first step is to head to Window > Preferences for Windows users and SketchUp > Preferences on macOS. Then select the preferences you need.
Here are the options you’ll have for customising SketchUp using workspace preferences.
Set the Default Image editor through the Applications panel to show which image to open when editing a texture
Display crosshairs via the Drawing panel
Auto-activate the Paint Tool through the Drawing panel to open the Paint Bucket when you select a swatch
Use the Pre-pick on the Push/Pull tool in the Drawing panel to click on a face and push/pull when it isn’t in view
Display a component bounding box and edges in various colours through the Compatibility panel
Change toolbar button size in the Workspace panel
Select cascading windows on macOS with the Workspace panel
See toolbars and panels after closing through the Workspace panel
How to import and export Sketchup preferences
Exporting your preference from one computer to another lets you move between 2 computers and maintain the same settings.
Windows users can export file location and shortcut settings. While macOS can export only the shortcuts settings.
To export file location preference select Windows > Preferences > Files > Export. Find the folder where you’re saving the preferences file. Preferences.dat is the default file. Click Export to save the new file location.
To import your preferences, go to Windows > Preferences > Files > Import. Go to the place where you saved the file and click Import.
How to set up SketchUpo custom toolbars
For Windows users, it is possible to organise the toolbars that show on your SketchUp workspace.
Click View > Toolbars to choose the toolbars you wish to view.
For macOS, there’s a main toolbar and various tool palettes. You can edit the main toolbar to show how the icons should appear and which tools you wish to include. You can also show and hide certain toolbars.
Click View > Tool Palettes to make your adjustments.
For Pro users working in SketchUp, customise the toolbar with extra options including solid tools, advanced camera tools and dynamic components.
How to arrange dialog boxes (macOS and Windows)
You’ll usually have several dialog boxes open at the same time when working on your models. This allows you to easily access them when you need them as they’re relevant to what you’ve been working on.
However, you can move them out of the way quickly.
There are several ways to arrange these modeless dialog boxes. This includes stacking them, shrinking, snap them to the outer edge and shuffling.
Arranging the dialog boxes in a tray is also simple. Try the Expand or Open setting, Collapse or Close, Add/Remove and Shuffle or Move.
To arrange your dialog boxes within the trays, head to Window > New Tray. You can now keep everything in a place that’s easy for you to find later.
How to change the colours of onscreen aids (e.g. selected items, guides etc.)
SketchUp custom colours let you change the colour of selected items. This is particularly useful when working on items that appear very similar to you.
These are the items you can change:
The Selected item
Any locked geometry
Guides
Section cuts & fills
Inactive and active section planes
To customise these items, go to the Styles dialog box. Choose Edit and then Modelling Settings. Now you can select the colours you require for the various items mentioned above.
Elmtec – SketchUp (A trading division of Man and Machine) understands that your privacy is important to you and that you care about how your personal data is used and shared online. We respect and value the privacy of everyone who visits this website, New tab (elmtec-sketchup.co.uk) (“Our Site”)
This Cookie Policy explains the use of cookies, as defined below, on Our Site. Please refer to our main Data Protection Policy for full details on how we collect and process other personal data.
1. Definitions of Cookie
A “Cookie” means a small text file placed on your computer or device by Our Site when you visit certain parts of Our Site and/or when you use certain features of Our Site. This automatically recognizes your PC the next time you visit the site, and could be used to allow a website to be tailored to your interests, or give us data on website usage for example.
2. Our Use of Cookies
2.1 Our Site may place and access certain first party Cookies on your computer or device. First party Cookies are those placed directly by Us and are used only by Us. We use Cookies to facilitate and improve your experience of Our Site.
2.2 By using Our Site, you may also receive certain third-party Cookies on your computer or device. Third party Cookies are those placed by websites, services, and/or parties other than Us. Third party Cookies are used by services embedded in Our Site including YouTube, and our online shop facility for example.
2.3 In addition, Our Site uses analytics services such as Google Analytics which also use Cookies. Such services use cookies to collect and analyse usage statistics, enabling Us to better understand how people use Our Site.
3. Acceptance
Your acceptance of this Cookie Policy is deemed to occur upon your first use of Our Site. If you do not accept and agree with this Cookie Policy, you must stop using Our Site immediately. Alternatively, you could disable Cookies in your browser, although this may impact the performance of certain features on our website.
4. Changes to Our Privacy Policy
We may change this Privacy Policy from time to time (for example, if the law changes). Any changes will be immediately posted on Our Site and you will be deemed to have accepted the terms of the Privacy Policy on your first use of Our Site following the alterations. We recommend that you check this page regularly to keep up-to-date.
Gorecki Alumni Center at the University of North Dakota, Grand Forks, ND, is the first LEED Platinum project in North Dakota
Fifteen of the twenty largest global Architecture and Engineering (A/E) firms, responsible for over $100 billion in construction annually, have now adopted and implemented the 2030 Challenge. According to a recent poll of design industry leaders by the Design Futures Council, approximately forty percent (40%) of all U.S. architecture firms have adopted the challenge. For firms to incorporate sustainability into every project, their leaders need to actively champion and enable the change. Research shows that by delivering sustainable designs, building owners enjoy financial and non-financial business benefits, such as lower operating costs and significantly better occupant satisfaction, which influences productivity. Plus the financial benefits do not always come at the expense of higher first costs.
Argyle building design by JLG Architects, Grandforks, ND
Delivering these multi-stakeholder benefits on high-value projects inevitably leads to repeat business for design firms. These outcomes illustrate that sustainable design is good for business.
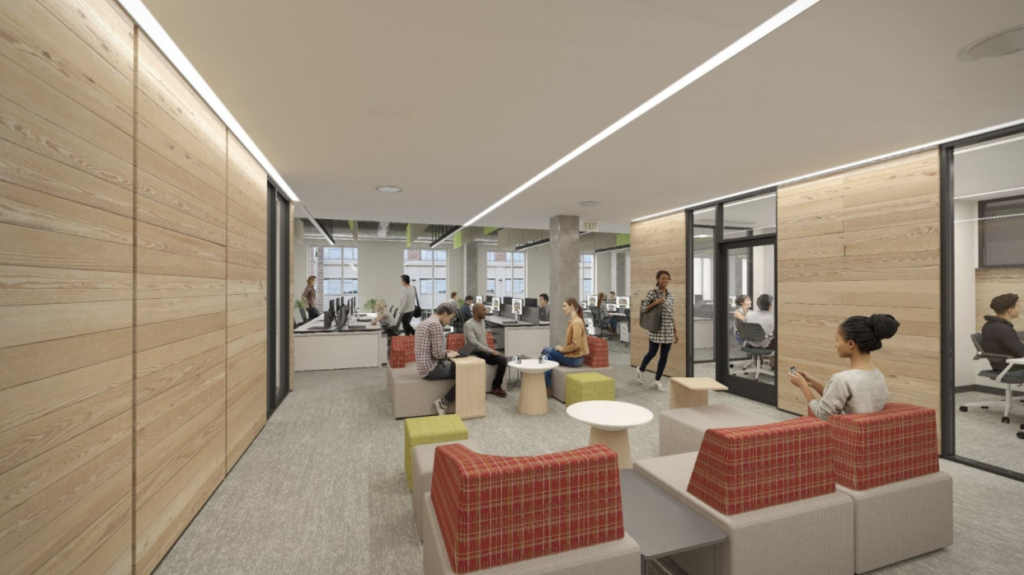
JLG Architects Office, Grand Forks, ND. Collaboration zone and huddle rooms looking onto the work station area. Shows an active design facilitated by Sefaira.
JLG Architects was established in 1989, is owned by its 150 employees, and has 13 North American offices. JLG Architects has received many AIA awards for projects ranging from healthcare centers, corporate offices, airport terminals, and education facilities to sports venues. It has achieved ambitious certifications such as the first LEED Platinum building in North Dakota, and LEED Gold and Silver for projects ranging from research centers to residential developments. It is currently pursuing Living Building Challenge Full Certification, Fitwell, LEED Platinum, the AIA Framework for Design Excellence and exceptional energy performance for its own office in Grand Forks (shown above).
JLG Architects Minneapolis Office, Minneapolis, MN. Collaboration zone overlooking St. Anthony Falls with free address workstations to the left.
The excellence that permeates JLG’s work comes from pursuing its vision and core values in combination with impactful leadership. We sat down with Patrick Thibaudeau, long-time sustainability champion and Principal Sustainability Officer at JLG, to discuss how the firm successfully translated its vision and values to each team member’s design process. Read on for five tips for successfully embedding sustainability into practice and process. All images are courtesy of JLG Architects.
Find the ‘why’: Why sustainability matters
At JLG, our vision is “Design for Life,” which means using design thinking and skills to help individuals and communities thrive. This vision is supported by five core values: design, community, relationships, stewardship, and integrity. JLG lives these values by working to elevate the human experience by positively impacting occupant health, wellness, equity, and resilience for persons and place; by designing for positive performance: energy, carbon, water; and responsibly using resources to achieve financial prosperity for communities, organizations, and individuals.
These goals have always been present throughout the firm’s 30-year history. They were embodied by its founders and are now written and passed down so that each team member embraces the vision, values, and approach, and understands the actionable steps they need to pursue on every project to make life better for all stakeholders.
Implementing sustainability in daily practice
To live our vision and values, we asked ourselves, “what do these aspirations look like on each person’s desk?” The values must translate into daily practice for each person and every project.
As part of this effort, JLG signed the Architecture 2030 commitment. Rather than only submit a report once a year, we’ve accelerated the integration of that commitment into our project process. We decided to take a game-changing leap by creating energy models on all 2030 reportable projects and completed an AIA framework for Design Excellence (FDE-10) spreadsheet for every project. We deployed Sefaira firmwide in June of 2020, and by the end of September, every project had an FDE-10 spreadsheet, and every 2030 reportable project had an energy model with performance targets established. All our staff received Sefaira training, and more than 100 energy models were prepared in approximately 90 days. We now have approximately 200 energy models.
Today, every project starts with an FDE-10 high-performance plan and an energy model; and each model has a net-zero design option.
Instead of targeting incremental improvements or focusing only on isolated projects, we went all in and performed analyses on every single project. Every project has a designated team member responsible for performance analysis. All ten topics in the AIA framework are addressed with high-performance targets that bring valuable options for clients to consider. As a result of this concerted effort, our 2020 report achieved a 55% energy reduction compared to the 2030 baseline.
Additionally, every team member is engaged in delivering design excellence. A staff quiz in the fall of 2020 showed 100% of respondents knew what EUI stands for (Energy Use Intensity). [Read about the six metrics every designer should know.] They understand the key factors for optimizing the energy performance of a building’s envelope. Each person knows the target EUI for typical projects and has access to the zero baseline tool, and Sefaira energy and daylight simulation plugins on their desktop. JLG wrote a custom script to launch the Sefaira plug-in for SketchUp so that it is always on as design starts and continues.
JLG has a process to capture lessons learned so that they can be applied to future projects and help identify financial ROI. “We have produced nearly 200 energy models in less than a year, and we have seen the benefits, including improved design and positive financial return. One example has a projected ROI of over $200,000 of net positive revenue after 30 years of equipment life. Using Sefaira, we find that performance informs form. As we conduct design analysis, the performance simulation gives useful information that designers can leverage when determining building form.”
A weekly communal lunch + internal design presentation in progress.
Our fifty-person team is made up of talented professionals with competencies across architectural design, interiors, modeling, visuals, sustainability, planning, and compliance. As such, we are able to leverage each team member’s strength to fine-tune every aspect of each project and carry through our architectural ideas.
How does this translate to your client conversations?
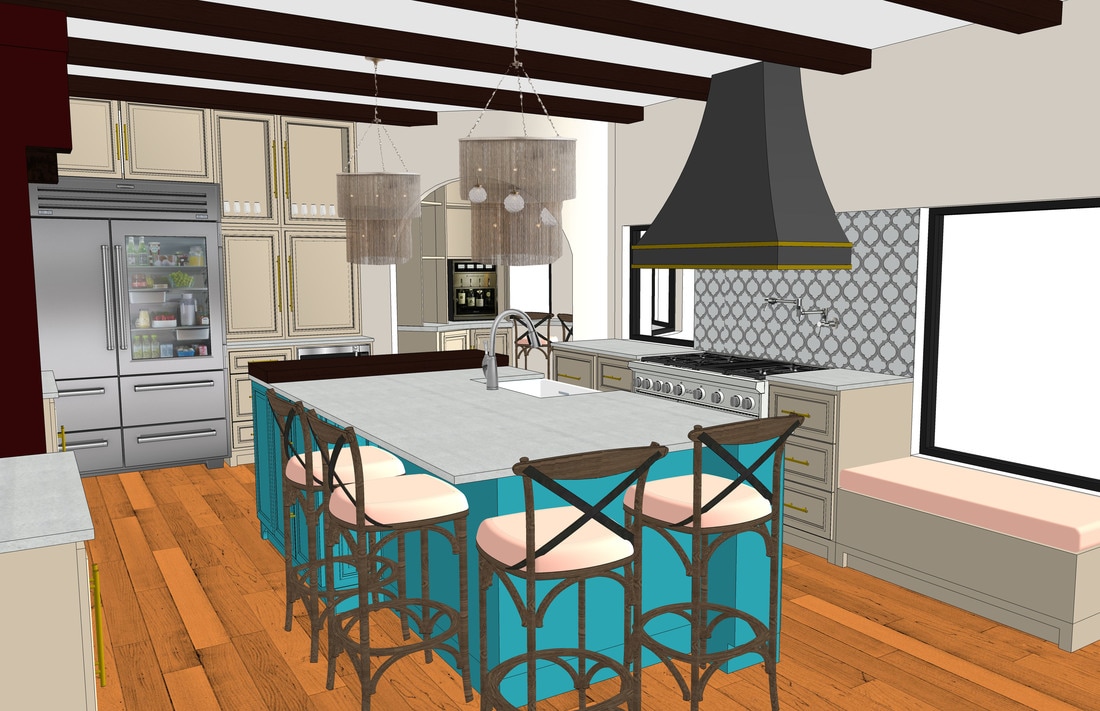
We recognize that it’s not always that easy to look at a plan and understand the spatial qualities of the proposal, especially to clients who typically aren’t architects. Our clients range from corporate businesses, restaurateurs, to government bodies, and our 3D models are the focal point for client meetings. We find it is easier to communicate our design intent by live clicking through SketchUp Scenes. Alternatively, clients can navigate around the model themselves, if desired. This gets them excited about the finished ‘product’ before it’s delivered.
Preparing for success
Energy modeling specialists charge architects between $7,500 – $40,000 to complete a detailed energy model that typically lags behind the design, delaying progress, and has limited value. JLG does not approach building performance as an add-on; it’s simply part of the way they work.
“Instead of designing a building like a stack of pancakes and then pouring sustainability syrup on after the fact, we’re mixing sustainability into the design ‘batter’ from the beginning on every project. We have ended the syrup syndrome.”
JLG is driven to find affordable design excellence for every client. This makes it vital for us to keep design analysis fast, iterative, and affordable because it saves both time and costs for the team. We consider sustainability as inseparable from design excellence.”
It takes only one to four hours to set up an early phase concept model and to establish a predicted Energy Use Intensity (EUI) target. JLG typically spends an additional two to eight hours per design phase to optimize the design, which is much less than the old style of energy modeling that can take 100 to 200 hours over several weeks.
JLG has defined a starter file that contains presets such as the building code baseline and best practices for optimization, learned from its extensive database of energy models. They study different massing types — long and narrow versus deep floor plates — and various orientation options. This allows them to know which sensitive factors to watch out for early on.
Next, JLG tackles envelope specifications, lighting power density, and investigates the impact of HVAC solutions that can contribute to net-zero energy options. With this information, JLG can have an informed conversation with the client about the opportunities and the value of net-zero goals and financial payback that often show a net positive total cost of ownership. Presenting options and value makes for better conversations with clients.
Sustainable design is more than just a checklist
Sustainability has often devolved into a checklist approach. JLG raises the bar by focusing on the outcome and applying an iterative, integrated approach that yields better results. JLG defines project aspirations first, then creates stretch goals that are actively pursued.
For technology to survive and become ubiquitous, it has to be fast and relatively inexpensive, or it won’t be used consistently.
SketchUp and Sefaira are both fast, relatively inexpensive, and flexible enough to allow us to push the envelope.
When we ask ourselves, “How far can we go with this tool?”, SketchUp allows us to go from ideation to development and daylight optimization. We leverage our SketchUp model deeper in the design process by exporting an IDF file or by using our SketchUp file as a linked file in Revit during construction documentation. By leveraging agile, adaptable skills, building owners get better value.
Overcoming industry challenges
In architecture, the way we think about sustainability is a big hurdle to implementing sustainable design. Patrick Thibaudeau and the JLG team aim to make high-performance design excellence and net-zero buildings the norm rather than the exception. “We need to understand and believe that it can be done rather than thinking it can’t. If we believe we can push the design boundaries for better, more sustainable outcomes, we do better.”
Five tips for successfully embedding sustainability in practice.
Mountrail Williams Electric Cooperative office, Williston, ND
Doing is Knowing Too often, having information doesn’t translate into action. For decades the profession has focused on listening to speakers, which creates the illusion of learning. JLG has accelerated progress by focusing on a “doing is knowing” approach to learning. The act of doing breaks the barrier of understanding and accelerates learning.
Always onJLG is making performance analysis to be like breathing. It just happens. “We expect products we use to reinforce the right behavior.” For example, JLG has a custom script that launches Sefaira when SketchUp launches, so the energy and daylight plug-in is on automatically. This ensures that analysis is always top of mind and accessible when design work is being done.
Real-time design analytics Rather than a team of specialists doing the performance simulation, JLG has each team prepare a SketchUp model and run Sefaira analysis supported by a team of specialists. These models are kept up to date to match project development, and they are reviewed each month and at the end of each design phase.
Embed best practices and standardize repeat tasksJLG has developed starter models in the Sefaira web app for each primary building type, making it easy for everyone to hit the ground running without starting from scratch. Best practice parameters are included in the starter files as pre-sets.
Normalize pushing the boundariesWe encourage teams to test ideas. We permit our teams to and even encourage testing extreme limits in the models to “learn by doing and see what happens.” Through these tests, the designer can learn and understand both the importance and sensitivities of different building factors such as R-value, daylight, massing, orientation, air infiltration, and glass performance.
There is no set script to plug and play for every project, but parts of the process are repeated and are built into the day-to-day workflow. With the right mindset and approach, tools and knowledge, all designers can achieve well above minimum baselines for the benefit of stakeholders. By simply starting with an aspirational outcome in mind, you can deliver owners great buildings for the best value and lower total cost of ownership as well as positive impact on the community.
Project Spotlight: JLG Head Office, Grand Forks, North Dakota
JLG Architects Office, Grand Forks, ND. Future of the workplace design with free address flexible work stations featuring abundant daylight designed and refined using Sefaira daylight simulation.
Key design goals
90% or higher occupant satisfaction
Net Zero Energy: makes more energy than consumed
Net positive carbon
Water balance: 40% less water use than a baseline office building. No irrigation.
Zero waste for construction waste diversion
Zero Red List Toxins from materials
Net Positive Revenue
Performance goals
LEED CI Platinum
Fitwell 2 stars
Living Building Challenge full certification
AIA Framework for Design Excellence High Performance
Did you meet your performance goals?
The project is under construction and on target to achieve the goals
Using SketchUp and Sefaira helped us achieve:
Time savings – much faster in design analytics
Capital cost savings
Operating cost savings – Projected $232,000 positive revenue after 30 years
High building quality at 3% less capital cost than a comparable office building
About JLG Architects
JLG Architects was established in 1989, is owned by its 150 employees, and has thirteen North American offices. JLG Architects has received many AIA awards for projects ranging from healthcare centers, corporate offices, airport terminals, and education facilities to sports venues. It is ranked as one of BD+C’s top 150 Architecture giants, and one of the Architectural Record’s Top 300 Architecture Firms in the United States. To top it off, JLG has high marks for employee satisfaction. Inc. Magazine shortlisted JLG as one of the Best 50 Places to Work in America, and the AIA recognized it with an Outstanding Firm Award for its Intern Development Program.
We use cookies for ads personalisation and to ensure we give you the best experience on our website. If you continue to use our site we will assume that you are happy with it.