
Axonometric drawing, an important aspect of architecture and design, has a long and rich history. Since its arrival in the early 20th century, it has provided perspectives allowing the precise representation of spatial relationships. The incremental improvement of axonometric drawing has occurred in tandem with advancements in architectural visualisation, transforming the industry’s visual language.
Axonometric drawings interpret 3D objects in a manner that can be represented on a 2D plain. It’s crucial in industries that need to communicate concepts and plans visually. Their capacity to retain spatial precision facilitates effective communication of concepts in a variety of industries including architecture and design, improving visual representation and therefore the understanding of complex structures.
Mastering axonometric drawing in software suites such as SketchUp is useful for professionals and novices alike. Adeptness in these skills facilitates effective communication, and design conceptualisation, and negates confusion between stakeholders.
Understanding Axonometric Drawing SketchUp (Axonometric vs Isometric)
It is impossible to accurately represent a 3D object on a 2D plain, without distortion between any 3 points of reference. Axonometric drawings conserve parallel lines and uniform scale in all directions, while isometric drawings retain precise angles, however it’s required to vary the scale. Axonometric drawings work perfectly for architectural designs and technical drawings, whereas isometric projections are better suited for applications such as gaming, and presenting visually dynamic perspectives.
Two iterations of axonometry include dimetric and trimetric projections. They both offer different perspectives by changing the scale along the different axes. Dimetric balances two scales, whereas trimetric incorporates three. Designers opt for one or the other depending on the specific application, such as displaying asymmetrical objects or highlighting specific dimensions, improving their flexibility in illustrating various spatial complexities within a variety of designs.
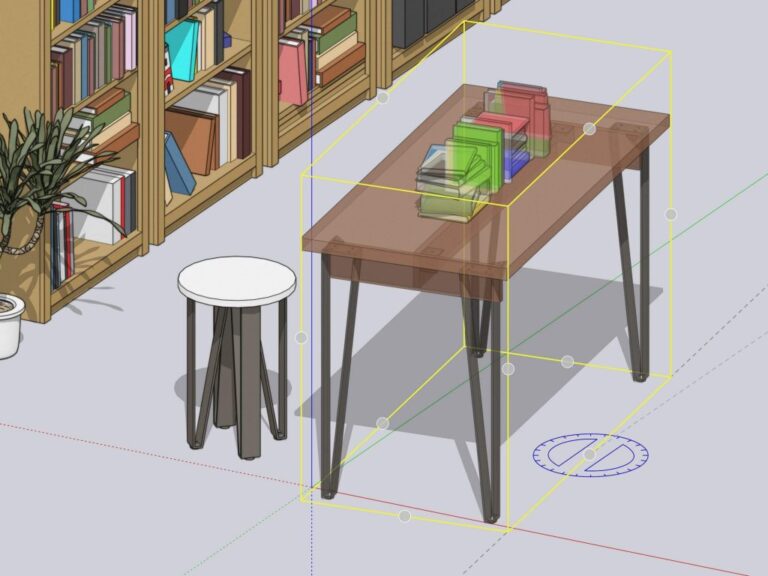
Getting Started with Axonometric Drawing in SketchUp
The few simple steps, outlined below demonstrate how to set axonometric view in SketchUp;
- Select the “Camera” menu.
- Select “Parallel Projection.”
- Adjust the camera angle with the Orbit tool for isometric or manually adjust for dimetric/trimetric.
- Fine-tune the view with either the Zoom or Pan tools.
Leveraging SketchUp tools to create axonometric drawings demands the mastering of the Line and Rectangle tools for foundational shapes, thereafter designers should utilise the Push/Pull tool to create depth. The Offset tool helps represent complex shapes, while the Tape Measure guarantees accurate measurements. For precise intersections, designers can select the guidelines and inferencing system.
Any change that needs to be made, or a mistake erased, can be remedied with the employment of the Eraser tool to refine details.
Advanced Techniques and Plugins
Eneroth Axonometric Projection is a SketchUp plugin designed for axonometric drawings. It is supported by SketchUp 14, SketchUp 15, as well as later versions. This Plugin can be used to deform a component, in addition to its obvious purpose in producing axonometric views.
For help with precision, designers can use grid snapping for exact placement. You can align components carefully, as well as lock inferences. This application is imperative in architectural designs and engineering diagrams for precise specifications.
Creating Realistic Axonometric Drawing SketchUp
Designers and architects can further improve upon their SketchUp designs by implementing advanced texture mapping. Advanced texture mapping can include UV mapping and seamless application. An extra element of professionalism can be demonstrated through comprehension of texture scale and consistent lighting for life-like axonometric drawings. Visual representation is improved through the quality of textures and life-like materials. Attention to detail is key.
The mastery of advanced lighting includes ambient occlusion and realistic shadows. The added layer of complexity attributed to realistic lighting conditions adds to the interest and understanding of your axonometric drawings. Well thought, intricate lighting conditions offer a comprehension of how light interacts and diffuses throughout spaces.
Tips for Troubleshooting and Common Mistakes
Although there might be pitfalls and niggles associated with axonometric drawings, they are typically easily remedied after conducting a little research.
Common problems might include;
- Inaccurate or distorted proportions.
The solution to such is more of a workflow adaptation than a technical one. Make sure to scrutinise scaling adjustments, paying attention to be as accurate as possible. Once an inaccuracy is identified, incremental scaling adjustments can be made, or original measurements can be referred to.
- Misaligned axes.
Misaligned axes should be precisely aligned, relative to the isometric grid.
- Inconsistent perspectives.
Inconsistent perspectives can be dealt with by maintaining a uniform viewpoint.
More examples of common problems encountered while using SketchUp can be found in Elmtec blogs, case studies and tutorials. Here you can find comprehensive troubleshooting guides for you to fix your errors and fine-tune your skills.
Regarding axonometric drawings specifically; in understanding the importance of accuracy, axes and perspective you will establish a solid foundation for aesthetic and impactful designs.
There is an abundance of plugins available to address other common problems associated with axonometric drawings;
- Utilise the “Solid Inspector” plugin to find and fix issues within intricate 3D models, ensuring precise geometry.
- Download the “CleanUp3” plugin to eradicate redundant entities, enhancing model efficiency.
- Manage complicated structural headaches with the “JointPushPull” plugin, permitting precise manipulation of connected surfaces.
Practising these tools allows designers to handle complexities with ease, promoting a higher level of precision in axonometric drawings.
Conclusion: Mastering Axonometric Drawing in SketchUp
Elmtec hopes that this blog has been informative and has satisfied at least a few of your curiosities.
Mastering axonometric drawings is a required skill in the field of architecture and related industries. It facilitates effective communication of concepts.
We hope that through the techniques explained, along with the troubleshooting tips shared you feel comfortable in adding an extra layer of precision to your designs.
Take a moment to browse other Elmtec blog posts and case studies, to see how architects and designers are leveraging SketchUp to their advantage.
If you are completely new to SketchUp, Elmtec is now offering a free trial.
If you have any thoughts or queries that you want to discuss, please feel free to reach out to one of Elmtec’s helpful advisors on 01844 263 750.

