MY Wood Designs are a bespoke joinery and carpentry company based just outside of Cardiff, Wales. Due to the specialist carpentry services they offer, SketchUp has been instrumental in helping their clients feel part of the process, offering quick and easy visualisation of their end projects. We spoke with Mike about the design process and how he marries the functional with the creative.
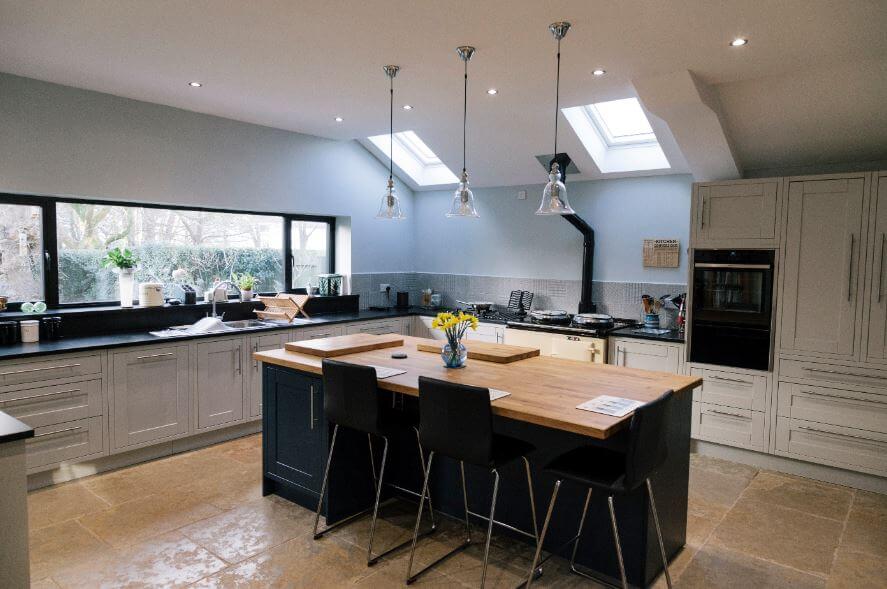
Bespoke Kitchen for a client in Cardiff
Can you introduce yourself and
your team to the SketchUp community?
Hi, I’m Mike Yorke
and I’m the director of MY Wood Designs Ltd. We are a small, family run
business specialising in bespoke kitchens, wardrobes, alcoves, media units and
other types of storage solutions. My office manager Emily has recently
joined the company to help manage our customer experience and improve the
business presence and brand.
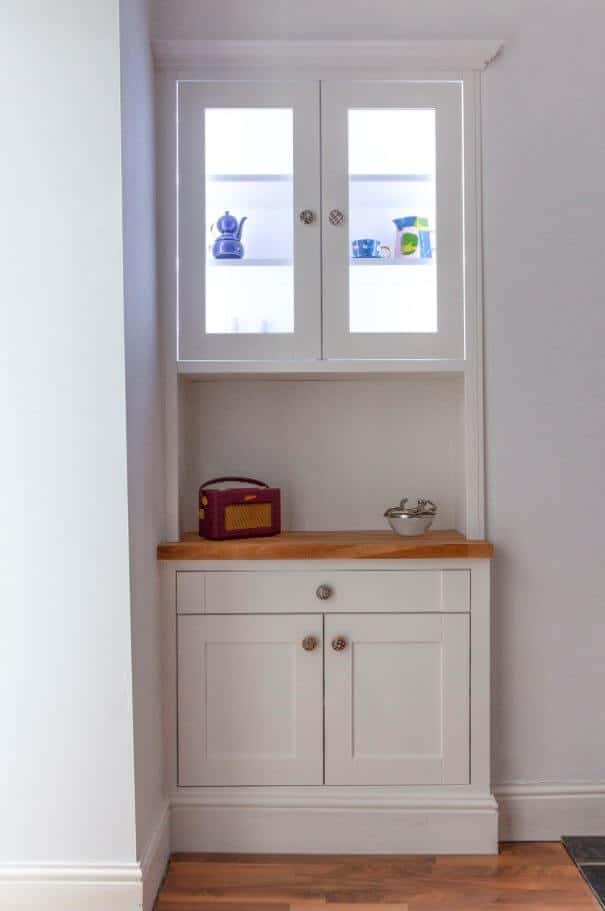
Designing an alcove in SketchUp The finished alcove
How did
you and the team get going with SketchUp –
and why SketchUp?
We started using SketchUp about a year ago. We wanted to bring the designs to life for clients, making it easier for them to visualise the finished product. SketchUp helps enormously with that – it’s so quick and easy so we can play around with design, colours and textures to help a client decide on the final finish and look.
SketchUp was also the obvious choice with so many other cabinet makers raving about it. Being able to use the basic programme for free gave us a great opportunity to see if it worked for the business before having to pay to use it. For a small business, that’s invaluable.
How
important are plug-ins and extensions in your work?
We’re still learning lots of little tricks within SketchUp and we’re taking our time to choose which ones will work best for us long-term. However, so far, it’s the simple things like uploading specific colours and objects from the 3D warehouse which is just so fantastic.
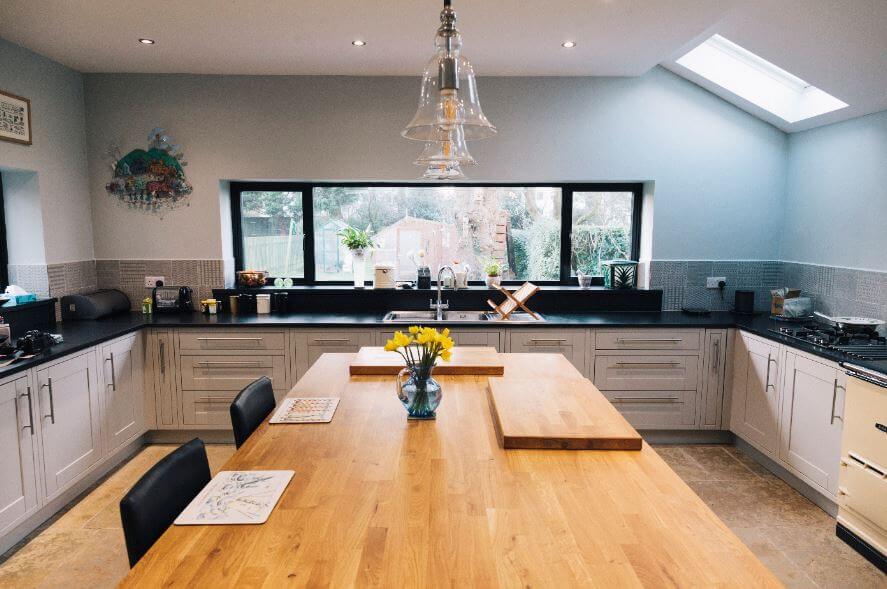
Using SketchUp to create a bespoke layout and design of a kitchen for a client in Cardiff A SketchUp design come to lifeDifferent angle, same SketchUp designed kitchen
What does
your typical design workflow look like?
This starts with understanding
exactly what the client wants from the space. We work very hard to ask as many
questions as possible whilst making notes of what we see in and around the
property and how the project can help better their living space and how they
work around it.
We then measure up the space as
accurately as possible then start to draw up a basic outline sketch of their
ideas. This occurs during the
first time we visit a client. They are always amazed at the speed we can
produce a drawing and how easy it is to alter the image.
Once a quote is produced and accepted, we then work on a much more
accurate sketch. This allows us to produce cutlists, saving on manufacturing
time and increasing accuracy. The sketch is then shown to the client with any
changes made easily in front of them.
We produce a short video and take screen shots which are provided to
the client to discuss for a few days. Once we finalise the design, we can start
ordering materials and then the build commences.
Besides
kitchen and general carpentry, you seem to excel in providing clients with
innovative storage solutions, maximising spaces in alcoves etc. Is it more
satisfying to work imaginatively with certain constrictions?
Working in properties in and around
Cardiff and the Vale of Glamorgan always has its challenges. Walls and ceilings
are never straight and alcoves are always odd sizes to squeeze every bit of
storage in to. Each house is different in its own way and we always like to
find out exactly how our clients want to use their space. We find out what
they’d like to store specifically or exhibit in a particular space and build on
those ideas. Its great to see a clients’ reaction when we start drawing up
their ideas with a quick sketch.
Inventive use of space for library alcoves
Is there
a particular job or piece of work you’re most proud of?
Our most recent bespoke kitchen build and installation. It’s our biggest commission to date and the client had some specific ideas they wanted to incorporate in to the design. We managed to fulfil the brief and added in some extra little design features from pull-out oak chopping boards to hidden LED lighting. Our clients were very happy.
SketchUp has allowed MY Wood Designs to quickly convey to clients how space, texture and colour will influence the final productThe final design
To see more of MY Wood Designs work visit their website, or follow them on Instagram and Twitter.
This month, we’re taking a trip around the world to celebrate all the places your projects are taking shape. From Barcelona to Bangalore (and everywhere in between) SketchUp users create noteworthy designs, often influenced by their unique surroundings.
We want you to share how your surroundings inspire your designs using #SketchUp_Global on social media for a chance to be featured. Here’s a round-up of our favourites.
First up, Diyar Aydoğan imagines a tranquil escape from the bustle of London, UK.Credit: Diyar Aydoğan Soaking in the southern hospitality. Ten Over Studio creates this 3D animation to capture a unique meaning of “home” in Myrtle Beach, South Carolina, USA. OPM Render Studio shares a glimpse of this snowy scene. Step into this forest house, hidden away in the pristine hillsides of Peru. By Alets Alvarado. Credit: Alets Alvarado
Doig Architecture takes us to Melbourne, Australia with this design featuring gorgeous views out to Port Phillip Bay. Credit: Doig Architecture Credit: Doig Architecture Onxy Design Collective has us daydreaming with this mountain getaway in Park City, Utah, USA. An oasis in the city. Maria Alarcon designs a rooftop in the heart of Barcelona, Spain where the hardness of stone and wood blend with the freely growing greenery. This southern California, USA home truly has no bad angles. Architect Steve Giannetti combines a worn, antique look with natural materials to create a timeless and fresh space. Animation by Voxl.Vision. Nad Design transports us to this lush getaway on the coast of Indonesia.Credit: Nad Design Now that’s an office! We love this interior by Tacata Arts in Bangalore, India. Up next: we’re highlighting Doddy Setiawan’s tropical home featuring gorgeous green accents, inside and out. Credit: Doddy Setiawan Credit: Doddy Setiawan We’re wrapping up in Brazil with a bucket list kind of view from Marco Corrêa.
Thanks for joining our trip around the world! Remember to get involved using #SketchUp_Global.
We are excited to share some of our favourite features and improvements in the latest product update to SketchUp Pro 2019 and LayOut.
This release has made SketchUp more intuitive and fun to use with focus on improvements to imagery exports, usability, and a seamless LayOut connection. Get ready — your professional workflow will greatly benefit!
New in SketchUp
Professional output enhancements
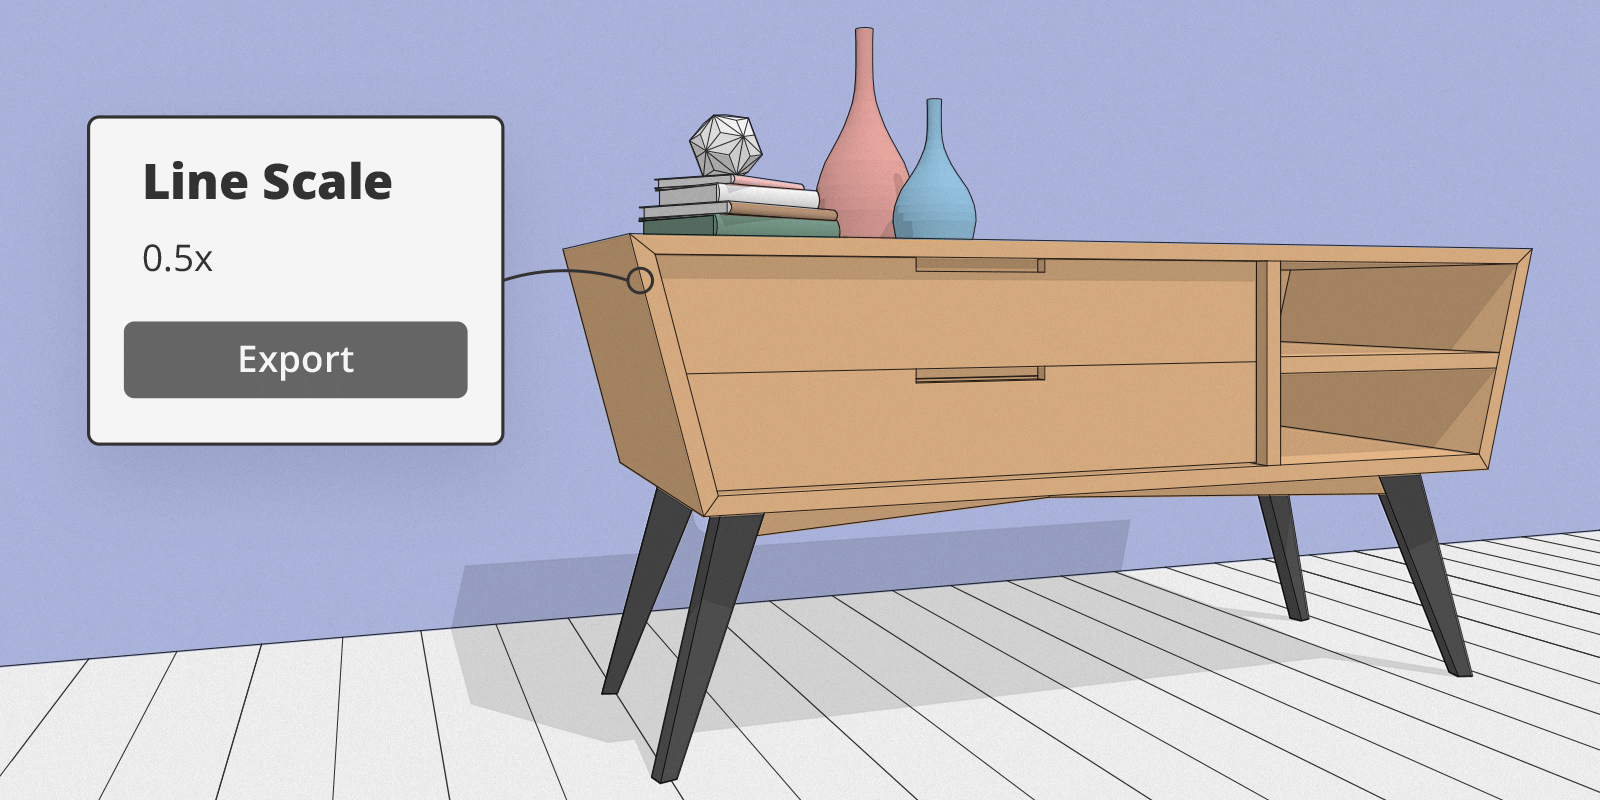
Exporting images
Exporting 2D graphics, raster files, and animations just got better. You can now control the overall line thicknesses of exported images with our new line scale multiplier, found in the export options dialogs.
Before this change, line weights stayed the same as the viewport which would make the line weight too small or too large. So, if you are experiencing line weights that are too thick, you can make those line weights thinner. Also, .png images now export with its transparency so you can see what is behind the material while compositing.
Customisable unit settings
Have you ever needed to use different unit measurements for a model? Now your model can be customised to show different unit measurements for area and volume. For example, in a model of a room, you can use millimetres for the wall and meters for volume. Available unit types: millimetres, centimetres, meters, inches and feet.
Workflow improvements
Invert Selection
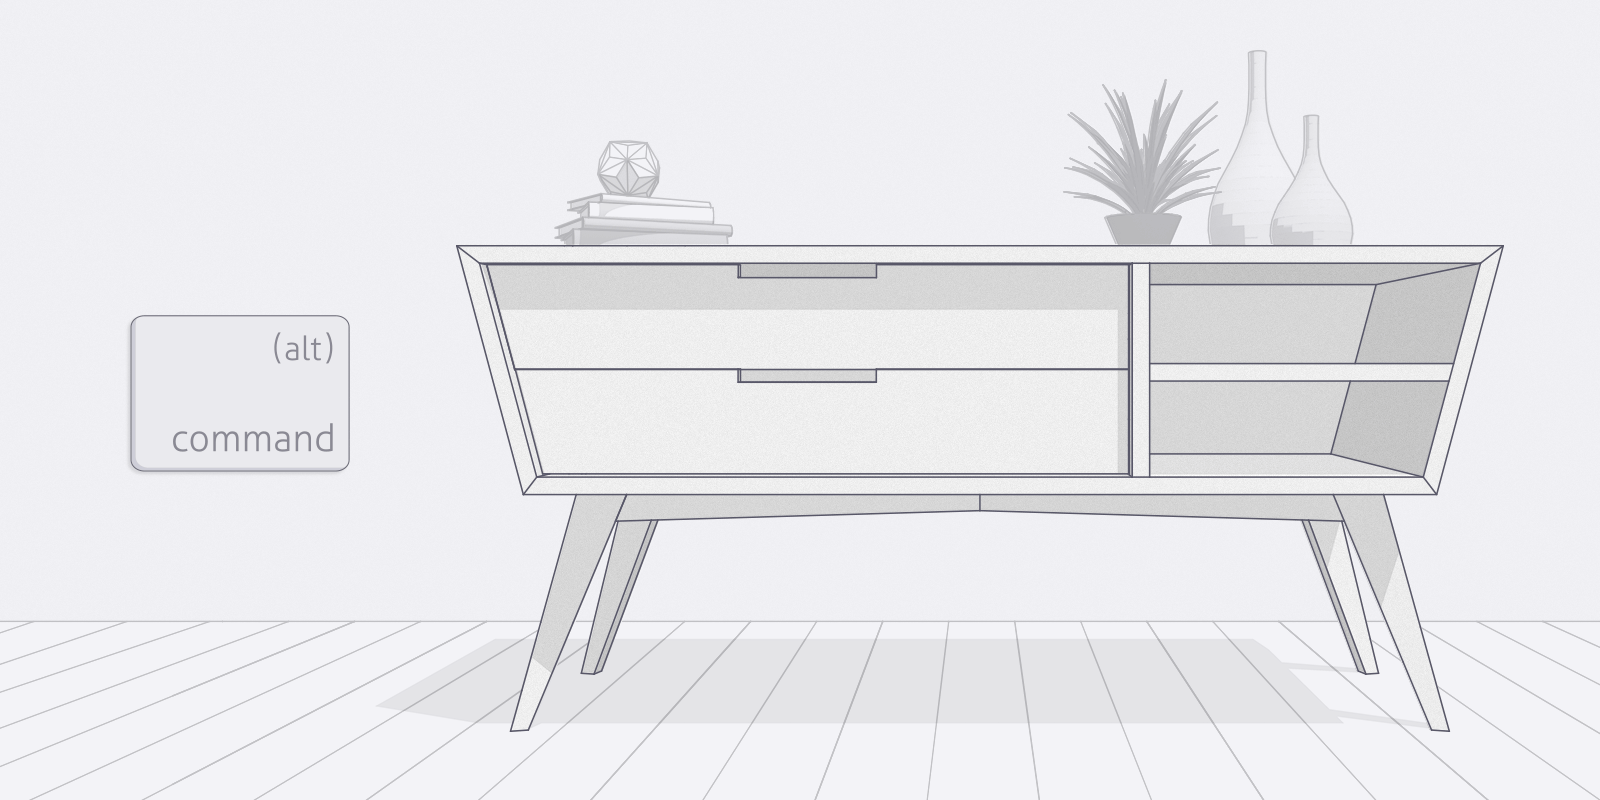
It really is the small things that help your workflow. This new feature will allow you to select anything, then invert the selection of objects. This makes it simple to select items and then perform actions on their inverse. The keyboard shortcut for this will be: CTRL + SHIFT + I (Windows) or CMD + SHIFT + I (Mac).
Importing files
The days of picking out your import file format from a long list are over. You can now drag and drop ALL supported file types directly into your modelling window. By default, you’ll now see all supported file types available for import. Additionally, the DWG and DXF importers now bring in fewer duplicate and messy edges.
Eraser Tool
Have you ever accidentally erased too much in your model? To make your detailing workflow a little smoother and seamless, we added alt & cmd as modifier keys to remove any unnecessarily highlighted lines that you may have accidentally captured during your modelling efforts.
Section Planes
Cutting a model along a plane so that you can peer inside the model? We just made this way smoother. Section planes now ask the user to name them before placing them in the model. Simply place, then name.
Send to LayOut
You can now send your models directly to LayOut from the large toolset in the left-hand toolbar.If you haven’t used LayOut for 2D drawings before, start taking advantage of it now!
Large Area Imports for Add Location
You can now easily import large sites at full resolution. How can you take advantage of this new feature? Simply zoom out a bit, then select the level from which you want to import. Note that misusing this feature can adversely affect performance in your SketchUp model. Check out the help centre to be sure you’re aware of how to best handle lots of data in your models.
New in LayOut
Professional output enhancements
Isometric dimensioning
It is now possible to make linear dimensions align with an isometric viewpoint. This one is huge! Since an isometric drawing is a primary type of drawing in LayOut, we wanted to make it smoother and more straightforward. You can now control extension lines, gap distance, and align dimensions with isometric angles.
Auto-text
Similar to “smart labels”, you can now add text to dimensions without breaking the automatic measurement. For example, let’s say you create a wall dimension. You can dimension a wall, add the word “wall”, and the dimension measurement will still update if the wall’s measurement changes. Pro tip: make sure your string has <> in it. For example, ‘Width <>’ will turn into ‘Wall 1.42m’.
Workflow enhancements
Rotating dimensions
Now, when you rotate your object, the bounding box is also rotated with so you can continue to scale in the right orientation.
Quicker editing
Staying consistent with SketchUp usability, in LayOut you can now hit the return key to edit model views, groups, dimensions, or labels! Just select, press return, and start typing!
We spoke to Jason Li, Associate and Charles Corley, Director of Organisational Development at M Moser Associates about how virtual design and construction complements an integrated project design and delivery approach.
Over the past fifteen years, M Moser, a global AEC firm with an extensive track record in workplace design and construction, has used SketchUp and LayOut not only for design and conceptualization but as a vital communication tool throughout the project delivery process.
What does the term “VDC” mean to M Moser?
Charles: It’s Virtual Design and Construction and by that we mean an entirely constructible 3D modelling workflow that empowers any stakeholder to understand and participate in a project. We can create a working virtual environment that makes everything clear to all project participants regardless of training or experience. Rather than relying on a highly coded or flat and disassembled, abstract set of documents, a visual reference is universal. A desk looks like a desk; a wall looks like a wall. You don’t need an expert interpreter of construction documents in order to understand fully and collaborate.
M Moser prefers to own as much of the responsibility on a project as possible. The best case scenario is we’re the designer, engineer, purchaser, and contractor. The deliverable, if you will, is the completed project. Throughout all of our offices worldwide, we use virtual design and construction out of a need to have everybody understand each other. We have an array of cultures, understandings, and backgrounds in construction. We want people to engage meaningfully and get the best out of each other’s contribution and expertise by constructing a project in SketchUp well before reaching the site. VDC is a communication tool that gets everybody on the path to the right result.
What types of projects do you focus on as a business?
Charles: We design and build workplaces. Not only corporate offices but corporate campuses, laboratories, private hospitals, private education facilities, and workplaces of all types. You name it, we’ve done it.
Using a nimble tool like SketchUp is also extremely important as these types of projects can be ever-changing. With more traditional building projects you have to nail down things well before construction for many reasons such as permitting, structural calculations, and ordering materials. But workplaces, even extremely large ones, can remain fluid in design. Even the size of the premises could change considerably. Departments can move around. Mergers and acquisitions could change the whole landscape of the office. The flexibility of SketchUp allows the entire team, including clients, specialists, and contractors to keep up.
Virtual construction starts to become tangible. Render; not just a pretty facade, the engineering can be equally eye-catching.
What is unique about the way you operate?
Charles: In some ways, we’re sort of the enfant terrible. We’re radical about change and are constantly evolving the way we think about construction information. Where many firms are steeped in more traditional documentation, we’re trying to make any record of construction information a by-product of the real collaboration and 3D work.
We don’t want to send out stacks of documents to people who have never seen it before and say, “Go read this and get back to us with a price.” We’d rather have them involved from the very beginning. This means, all the trades, contractors, suppliers, and the client working together in 3D, from concept to completion.
We’re trying to shake the tree where a lot of people don’t want to change. Jason and I have a lot of war stories about how people are incredibly stubborn to change and don’t wish to consider alternatives. We’ve broken down a lot of assumptions like, “You can’t use SketchUp for official documents to send to the government,” or “It’s not accurate enough,” or “We can’t collaborate with consultants using other programs.” These arguments have melted and fallen by the wayside.
Jason: M Moser could be considered quite unique in the industry because our focus is not just on the design. We have to consider the contractors and the build. For many companies, their role ends when they hand over the designs and completed documents, whereas we handover a complete result. And even beyond that, our role sometimes continues into operation and maintenance.
Construction detailing in LayOut can be templated for all projects in a region.
Your designers are charged with producing constructible models. Can they do this on the first pass?
Charles: Not every designer has the experience to really understand construction. They tend to draw the design intent, then they have to work with others to discover what’s possible.
As an example, just recently we had a team discussing an intricate reception counter. The contractor in the room pointed out: “If the table were four inches shorter, we could use off-the-shelf components and wouldn’t have to manufacture any custom pieces.” The designer made the change right then, rationalizing that it wouldn’t really impact the overall look but offered a significant reduction in cost and lead-time. Thousands of collaborative discussions like this occur constantly, many of which wouldn’t be possible in 2D.
Jason: We collaborate on a daily basis; it’s not really like a factory where I do my job and pass to someone else, or “Here’s a stack of drawings, you go and do it.” Projects are realized through discussion and brainstorming. People have different backgrounds and this way we can truly avoid misinterpretations on what the designer intended.
Virtual construction sequencing can save months onsite
People will always have differing opinions, so does it always go as planned?
Charles: What you would see in our meetings would be a group of people from very different professions, looking at a model being rotated on a large screen. The person leading the meeting is not coming up with all the answers, they’re the “chief question-asker.” The team answers the issues together, marking the live model and taking screen captures. They talk about what needs to change and sometimes even make these changes on-the-fly. It’s very much a team activity.
The notion of success mostly comes from the client but often there are multiple opinions. One might say, “I want to make sure I have the correct amount of meeting rooms;” another person says, “I want to make sure we finish on time;” another, “I want to make sure my boss coming from overseas is happy,” and so on. Those objectives blend together and form the definition of a successful project.
Jason: We’re using VDC as a methodology to ensure designers, engineers, professionals, specialists, and the client can communicate on an equal platform. Our goal is that everybody understands the project objectives to achieve results.
Collaboration throughout a project makes for a smooth delivery. A slick reception area before, during, and after the build.
Building constructible 3D models looks to be a time-consuming exercise. Is it more efficient than it seems?
Charles: Many would say that you can do something in AutoCAD faster or easier than you can in SketchUp. We have found that is not the case if you use it intelligently. There is often a false understanding of time efficiency. Hand a project to a couple or draftsmen and they may spend hundreds of hours doing the drawings, not taking the time to understand construction. A senior stakeholder would then have to go through each page of the drawings to check them, applying the required 20 years of experience to effectively decipher it. Then there are the perspectives. Visualizers can spend an inordinate amount of time setting up beautiful—but only a limited number of—renders. All those hours really add up.
Jason: VDC forces the people who are doing the drawings to think about what they’re building, they can’t just draw lines. With our methodology, the modeler creates everything in SketchUp.
Then they split the model into different viewports in LayOut to see right away if something’s not working. The key difference is, any changes are immediately echoed through the entire set. Everybody’s job is faster and easier. The whole workflow is compressed and more evident to everybody at a glance. Errors are glaring, “Oh, look, this wall is not meeting the mullion correctly.” We can see where buildability is correct and where it is failing, and we can catch it early. There’s also less time spent on visualisations. We can use an extension to quickly do perspectives from any position in minutes instead of hours.
Finding a clash here, is one step closer to eliminating onsite issues. Get everyone on the same page with exploded 3D fly-through animations.
What perspectives can your clients expect to see in the early design stages?
Jason: We do aim to deliver spectacular visuals to help convey our idea. At one time, we had a team of visualization specialists dedicated to rendering, but it became a bottleneck because time had to be booked with the few 3D visualizers trained in that software.
We now have established ways to do as much as we can in SketchUp, which is the fastest way. There isn’t a steep learning curve. Everybody can have it and everybody can use it to develop gorgeous renderings with extensions. We don’t need so many specialists. In Shanghai and Singapore, we use renderers such as Enscape. In India, we lean more toward CPU-based renderers, including SU Podium.
Charles: We also had a problem with third-party drawn perspectives. A designer would freestyle to make something look better. In this process, they might have a detailed understanding of what the interior would look like, but would often leave out the air vents, access panels, joint lines, and sprinklers because they thought they were ugly. Even worse, they would enlarge or shrink objects to give a false impression of what one would experience.
By transitioning to the VDC methodology, we ensure that perspectives remain true to life. We can also deliver beautiful renders instantly, so you can quickly look at things from a different point of view. There’s a nimbleness that is lost when creating perspectives with other workflows where the same limited views are updated over and over again.
Render; a visually stunning workplace is a productive workplace.
Does your methodology transverse regions?
Charles: We developed our approach because we work with contractors trained in very different ways and to some extent that continues today. However, we think that the constructability aspect of VDC is applicable anywhere. There’s a great deal of value in being able to do virtual mock-ups and say, “Are you sure this is what you want? Because look here, this could be improved.”
Constructible models eliminate wasted resources and materials and allow for an unprecedented attention to detail before reaching the site. If you think of everything in a project as separate systems that must come together, there’s a huge amount of coordination required in what was traditionally called the design development stage. We now choose to call this integrated development because we are essentially combining the power, lighting, partition, and furniture systems. The integrated development stage is where much of the change occurs and decisions are made. Documentation for the record is memorialising what we had agreed during all this collaborative effort. Documents may be still necessary for now but they record what was already worked out and understood by all and don’t serve to gain that agreement. That was done through a highly constructible model—a virtual construction.
Photograph; the finished product, a clean and crisp space featuring natural materials.
About M Moser Associates
M Moser Associates has specialized in the design and delivery of workplace environments since 1981, with clients from the corporate, private healthcare, and education sectors. With over 900 staff in 16 offices on three continents, the company provides a holistic approach to physical and digital workplace environments of all scales.
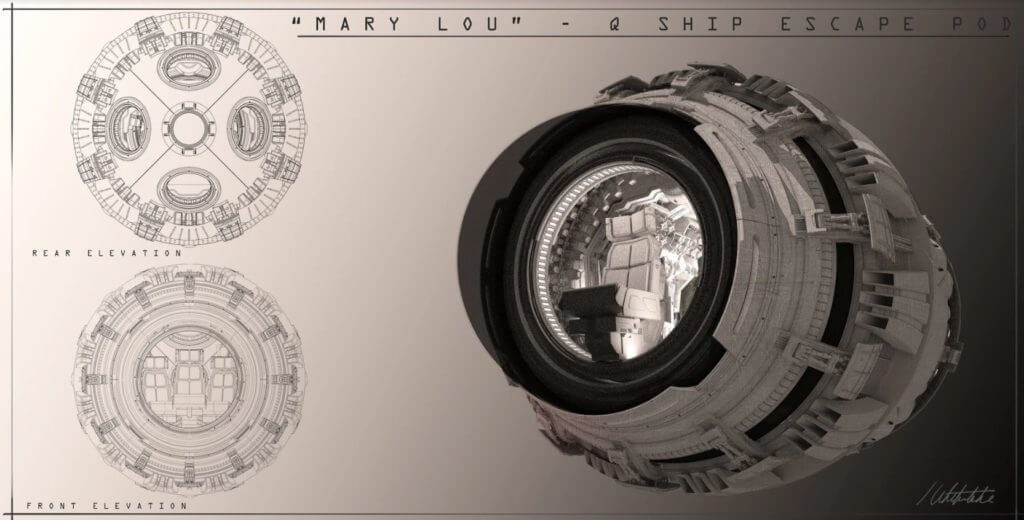
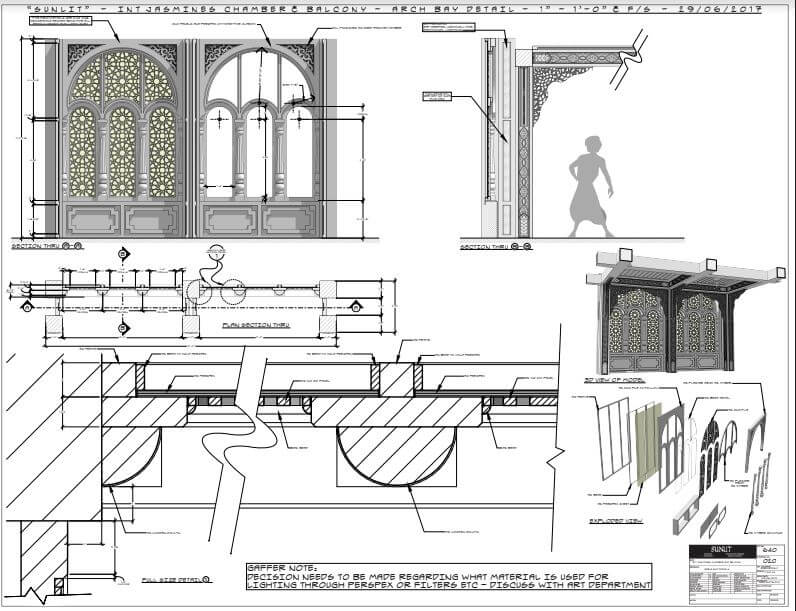
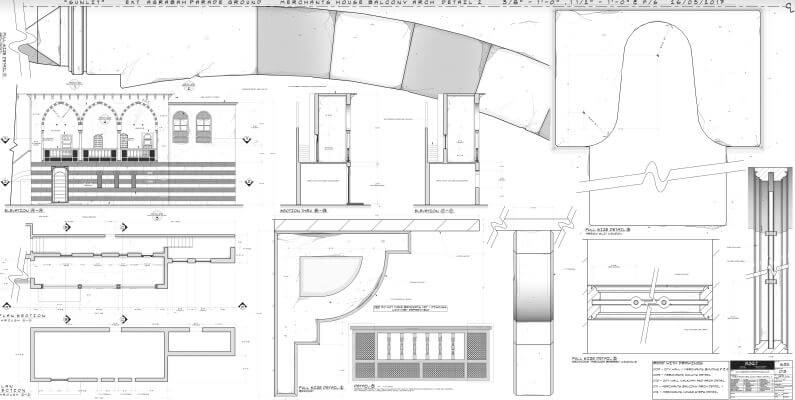
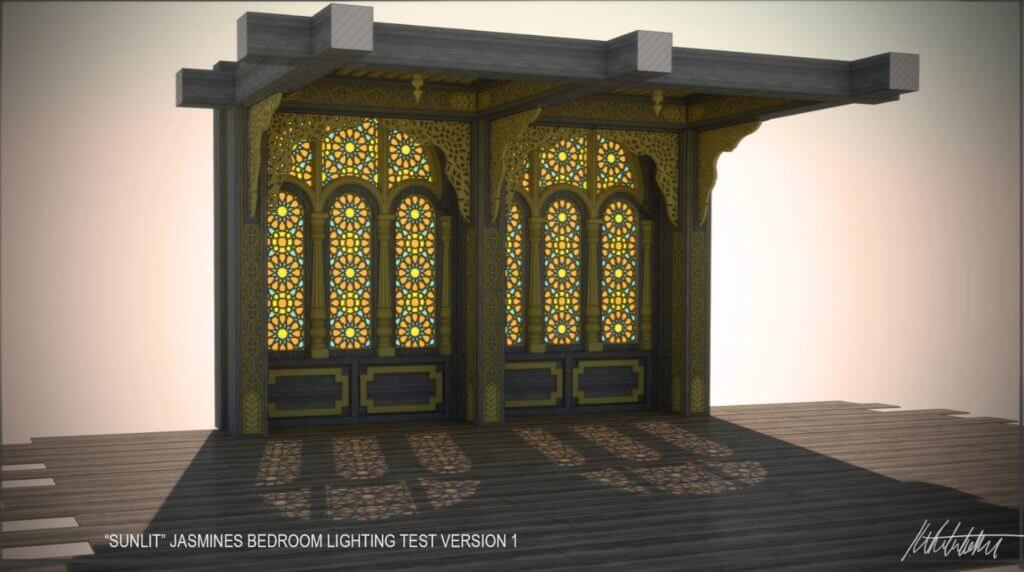
Luke Whitelock is a feature film Art Director who has worked on movies for clients as diverse as Marvel, Universal, and Disney for over 14 years. With a back catalogue including huge feature films such as “Aladdin,” “Avengers: End Game and Infinity War,” “Dr Strange,” “Beauty and the Beast,” “Guardians of the Galaxy” and “Inception” – he’s tasked with a major brief – bringing movies to life and realising the finished sets.
Luke has used SketchUp in his work for over 10 years. In the last 5 years, he made a transition from 2D board drawing to using only SketchUp and Layout – producing not only creative designs, but incredibly technical ones too. With a super hectic work schedule, we were happy Luke carved out some time to tell us about his methods and processes.
Hi Luke, how does SketchUp help with your creative process?
SketchUp really is key to my design method. I hardly ever work things out on paper anymore.
I start with massing the shapes of a set – width and height of a set is established fairly early on as we are limited to stage sizes. So I’ll start by massing the walls and the different floors if there are any. Everything just goes onto Layer 0 to start with and this enables me to work quickly and freely. Sometimes a design will come together really quickly and sometimes it takes a while. It’s like sculpture in a way; I start with these 3D blocks, gradually chip away at it and break it down into components and groups. The way I work in SketchUp will often inform the design as I go along.
How did you get started in the industry?
I always knew I wanted to work in film from a very young age. I visited Universal Studios when I was very young and I just knew that I wanted to work in film some how.
I was lucky to have a very kind and encouraging graphics teacher at school. He was one of the first people to notice my ability and helped guide me towards a more artistic route. It’s because of him and my art teachers encouragement that I decided to go to art school. I studied at Bournemouth Arts Institute- first on an arts foundation course, then onto an audio visual diploma, then finally settling on a Film degree. I learnt a lot but always knew if I wanted to do this for a living I would have to move to London.
The opportunity came soon after graduating in 2004 when a friend offered me a spare room in a house share he was setting up in South London. I moved out with no belongings apart from a stereo and some records and moved in October 2004. I knew nobody in the film industry apart from a couple of TV art directors who had done some visiting lectures at the Arts Institute. I pestered them until one relented and gave me a start on a small channel 4 show called Sugar Rush. I did a few TV jobs before getting my film features break on “Elizabeth: The Golden Age”. It was whilst on this project in 2005 that I started Drafting by hand. I knew the basics of drafting and basically learnt on the job. It was around this time I first became aware of SketchUp. I used it but never really worked out how to incorporate it into my workflow.
What was your 'Aha!' moment working in SketchUp?
A few years later, features work had dried up in the UK. The writers strike had caused all productions to either shut down or move to Prague. For about 6 months I was completely out of work. I used this time to teach myself SketchUp. When the phone rang one day and a designer asked if I was free to do a commercial and could I use SketchUp, I lied and said ‘yeah!’
It was a baptism of fire working from home and teaching myself the program along with Layout which is a fantastic drafting package but I’m really glad I did it. Although I would still draft by hand most of the time, I found as the years went by I was using SketchUp and LayOut more and more – at the point on “Thor 2: The Dark World” in 2012, I did my last hand drawing and have been exclusively using SketchUp and LayOut ever since.
What kind of projects interest of excite you the most?
I love all kinds of projects. I suppose sci-fi is most fitting with SketchUp, but I have used the program to design ancient castles, Georgian houses, rococo ballrooms – and even my own garden!
I’ll block everything out (massing model) in SketchUp and set up my sectional views very early on.
I’ll also set up the drawing in LayOut very early on, as the LayOut and SketchUp file are dynamically linked so setting up the viewports early means the drawing basically takes care of itself.
I’ll use a trick of exporting the sections and overlaying them on my section cuts and then I’ll maybe do a few renders using V-Ray. I’m still learning that since moving from SU Podium last year.
Advanced Attributes and ‘Group By” aggregation in Generate Report
Instance Names
Let’s take a look at how you can combine Advanced Attributes and ‘Group By” aggregation in Generate Report to create door and window schedules.
To generate a schedule, we’ll start by adding a few attributes to the door and window components in my model. Specifically, we’ll add a Size using the new Advanced Attributes (access these through the “More” button in the Entity Info window). In addition to Size, there is a new attribute for Price, URL, Owner, and Status. These fields allow you to add information to any component, and they can also be called upon by LayOut labels (we’ll look at those a few paragraphs on)!
These attributes can be used to add data to components without creating Dynamic Components.
In addition to defining a Size for all components, we also want to make sure all components have an instance name. Instance Names are also defined in the Entity Info window, and are the data object we’ll use to create an aggregated schedule for our doors and windows.
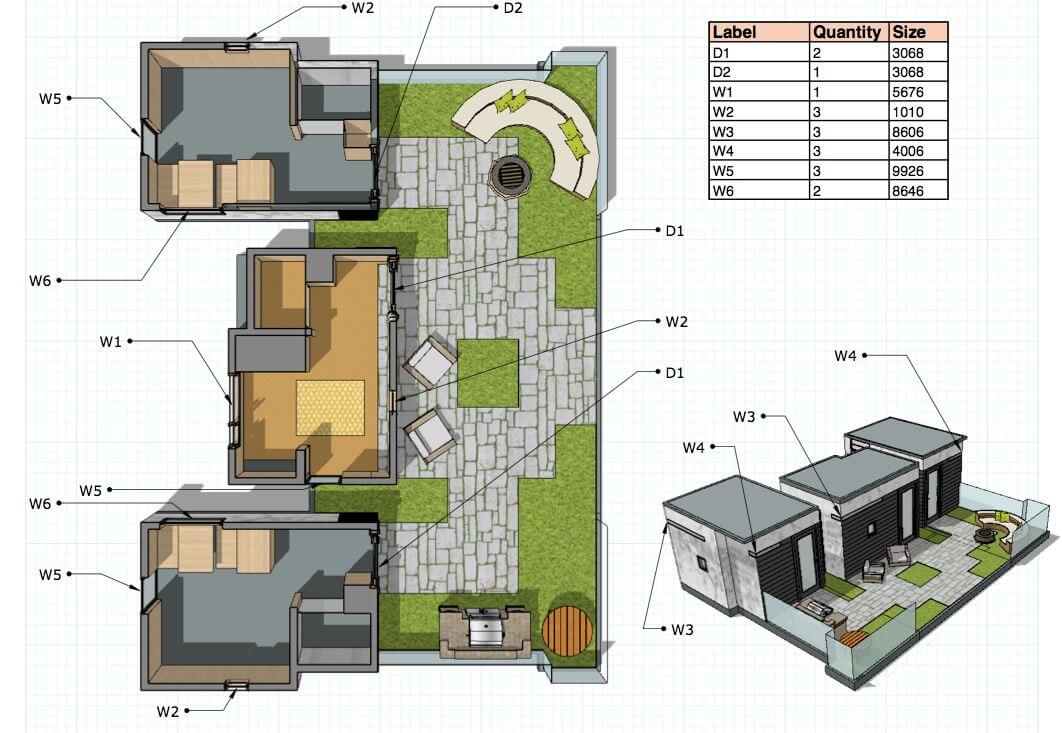
In most cases, all instances of a door or window will have the same Instance Name, but in some cases (such as a door which can swing either left or right) a single component may end up having more than one Instance Name. In this example, we had one door component. Two of these doors swung left and were labelled D1. The third, a right swing, was labelled D2. Same component, but different real world thing: each real world thing should have a unique Instance Name!
The Instance Names will populate the labels once the model is in LayOut
Generate a report
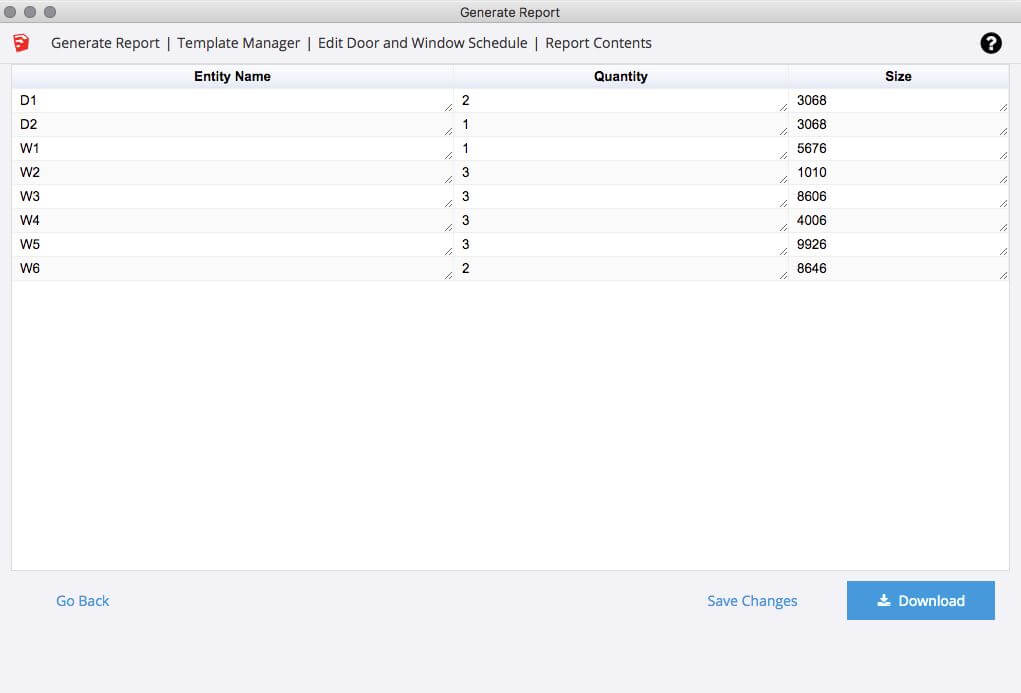
Once the data is all set in the model, it’s time to run a report! In Generate Report, we’ll create a brand new template. Make sure to give your new template a name and save it (The guy who made the video below forgot this important step!).
The first step in creating the new report is to choose where the information will come from. In this example, we want to report upon the entire model and choose to report upon a specific nesting level. In this case, Level 3.
“What the heck is a nesting level?” you ask? Level 1 is the model, Level 2 is the buildings and loose components. Level 3 is the door and window components inside the buildings.
Group by value
Now, we’ll set the Group By value. This is the attribute by which Generate Report will aggregate components. In this case, we want all components with the same name to get consolidated together, so we will drag Instance Name into the Group By field. Finally, we can add any additional attributes that we would want on the schedule. In this example, we’ll add Quantity and Size to the Report Attributes list.
Saving a template allows you to run the same report on other jobs in the future.
Now we’ll Save and run the report. Once I run the report, it looks like a door and window schedule. Success! The final step in SketchUp is to export the report, so that we can load a .CSV into LayOut as a Table.
All the data you want, and nothing you don’t need!
Layout
Over in LayOut, the report comes in as a Table, which means it can be edited and styled (so we can change the column heading from Instance Name to Label). Even better, we can use the Label tool to add call-outs to the Model Window for the Instance Name of each door and window. Since the Instance Name was a standard attribute from SketchUp, we’ll simply choose it as an automatic label from the label dropdown (we could also use the Size or Component Name, if we wanted).
It’s just that simple!
There you have it: A little bit of pre-work in naming and organising components while modelling, and then you’re off to the races when it’s time to turn your model into a project. Happy sketching!
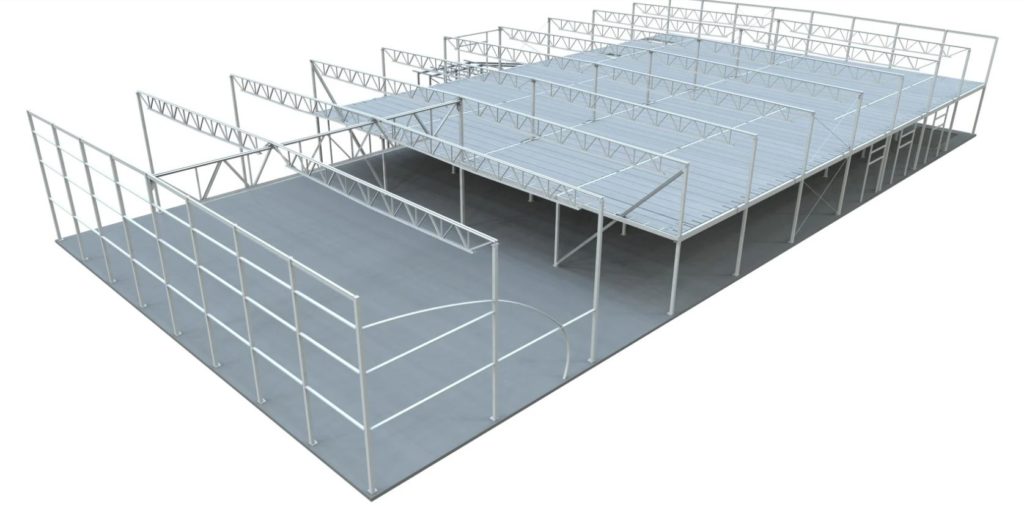
Northpower Stålhallar is a construction company based in Stockholm, Sweden that specializes in warehouse construction. They build industrial warehouses using SketchUp from concept design all the way to the construction phase, including LayOut for construction documentation.
Tell us about Northpower Stålhallar. What do you do?
Northpower Stålhallar was started in 2006 by two brothers from the northern part of Sweden. We were something completely different from the company you see today. Our founders were sitting in a small office by themselves. Since then, the company has grown to almost fifty employees. Fifteen people work in the office, five people weld in our manufacturing department, and the rest are on our work sites building the projects.
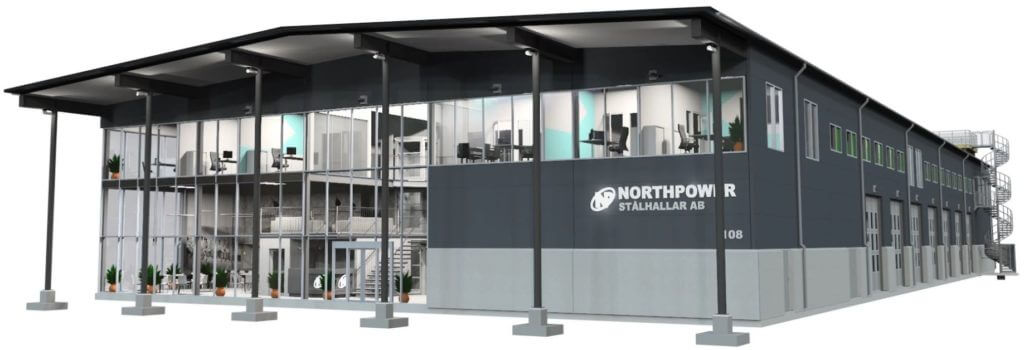
Northpower Stålhallar’s office building. This includes a manufacturing unit, where many SketchUp designs come to life.
What was the company’s first experience with SketchUp. When did you first use it and why?
In the beginning, the two brothers were looking at other construction companies working in 2D and thought, “We don’t want to use 2D, we want to use 3D because you can visualize designs so much better”. They started to look around to understand what types of tools were on the market.
A company delivered a staircase to them for a project and one of the founders noticed it was drawn in SketchUp. He thought, “If they can do it, I can do it.” So he downloaded SketchUp and tried it. He found it to be fantastic. The cost is much lower than some of the other programs, so that was great too!
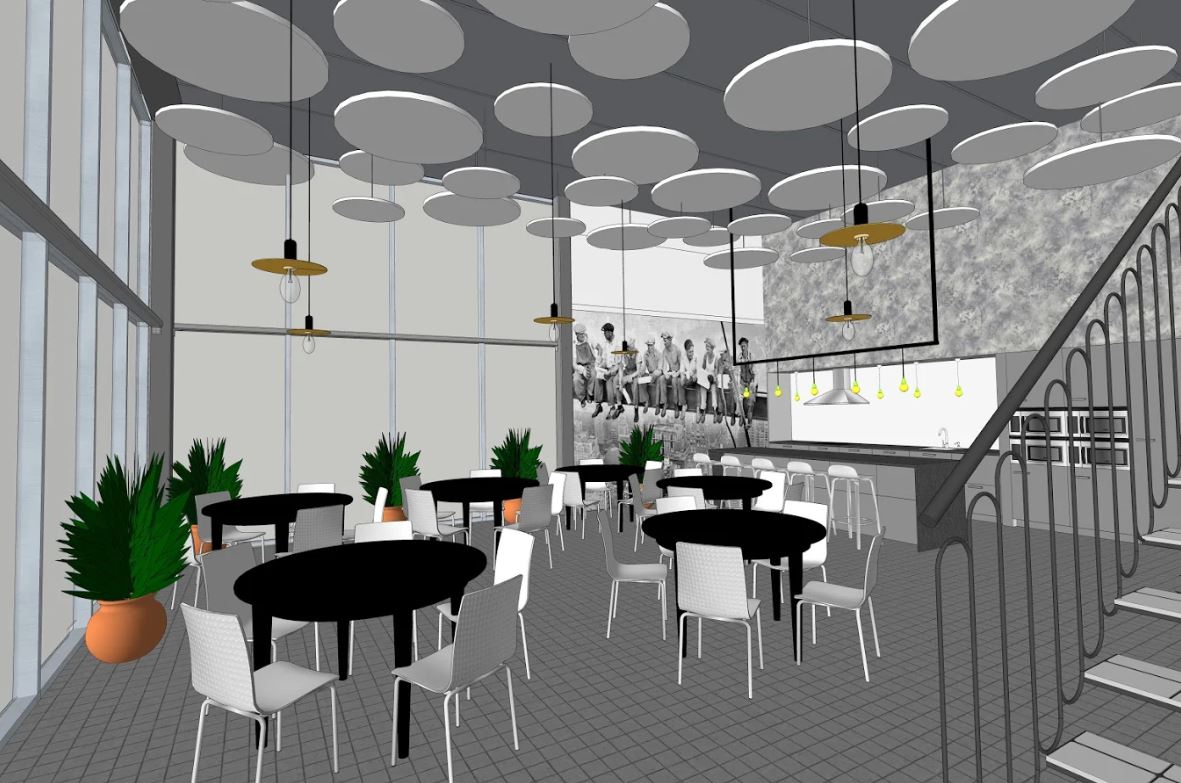
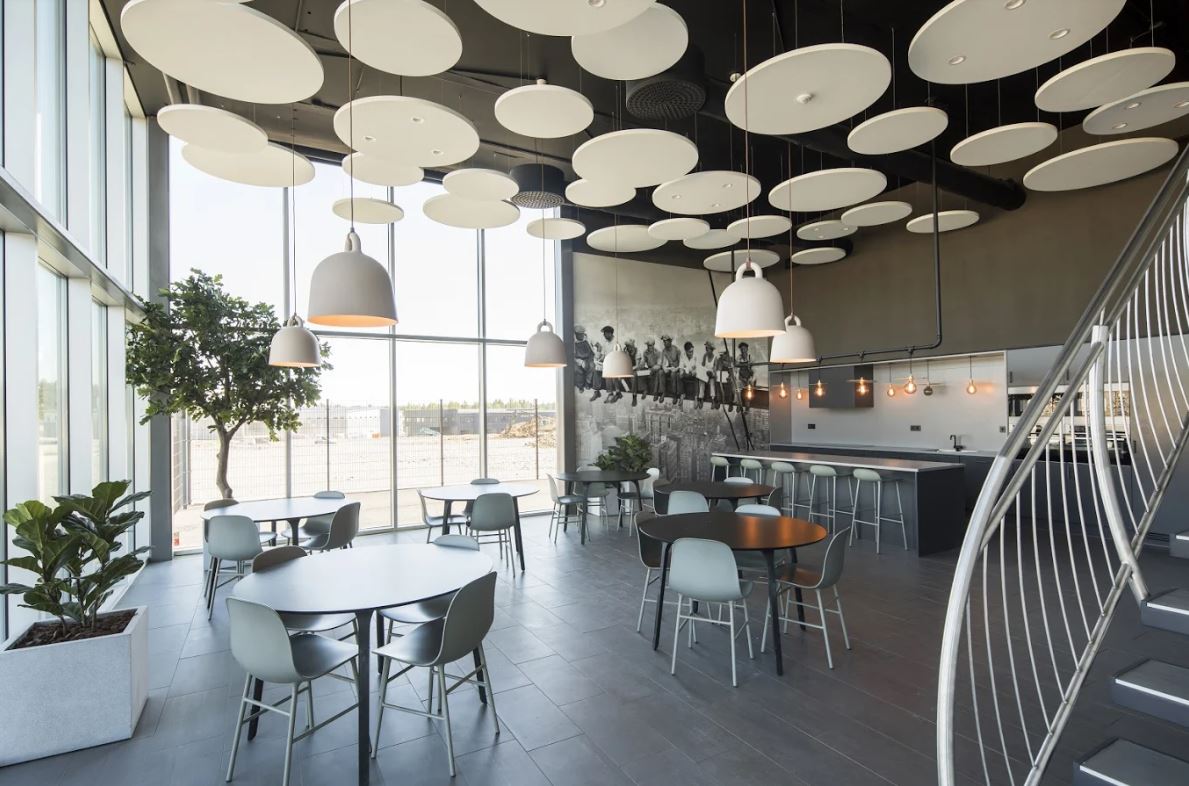
Can you talk about the space you are sitting in and its design in SketchUp? We’d love to take a virtual tour.
When you walk through the entrance, you have a view of our manufacturing unit. Everything made there is designed in SketchUp. You can see the steel being welded together. Northpower Stålhallar builds steels halls so our building is, of course, built with a steel frame.
Steel hall designs are a signature from Northpower Stålhallar
From the lobby, you can access the saunas (it’s a must in Sweden). There’s also a lunchroom, where we all sit and have lunch together. You can take the elevator up and that’s where we have our offices. When you come up, you’ll see a big open lounge area with sofas and TVs where you can sit and relax while waiting for a meeting. We also have table tennis, billiards, and an exercise room.
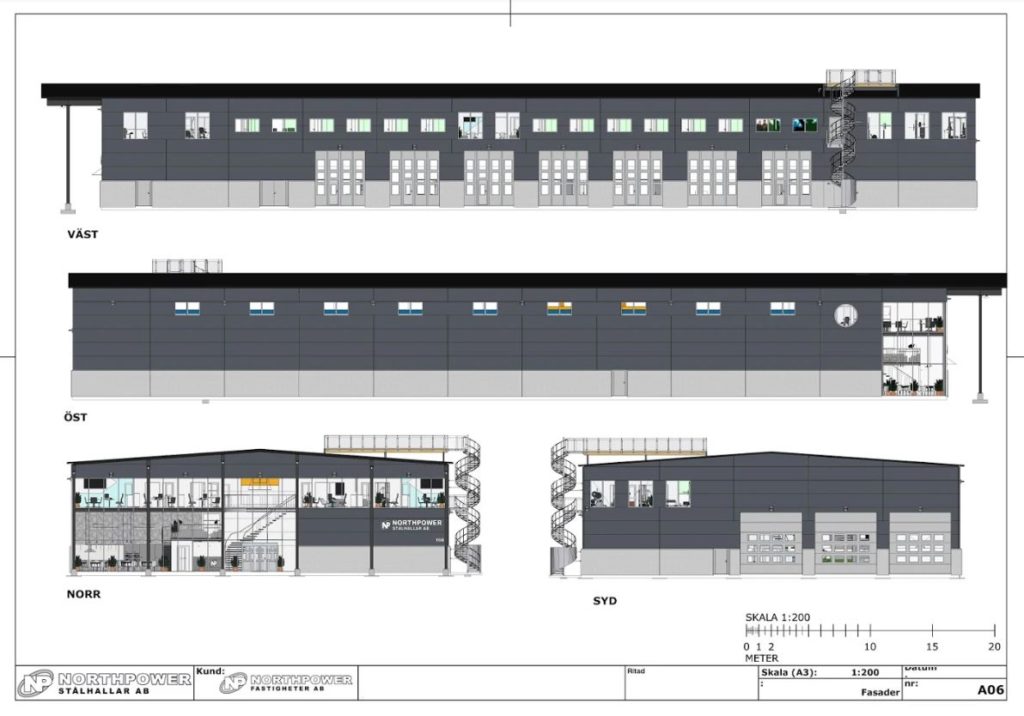
We modelled the whole thing in SketchUp. The painters were painting the designs exactly from the model. All of the furniture is inside the model too. This office is exact to the millimetre of its SketchUp model.
There’s more to SketchUp than 3D modelling. But you know that, right?
For presenting work to clients, planning boards, contractors — whomever — we still use 2D drawings to convey design and detail. That’s pretty clear.
And if you read this blog you’ve seen that SketchUp LayOut is the most efficient way to turn SketchUp models into diagrams, drawings, CD sets, presentations, or even just scaled prints.
We have to say it… if you aren’t using LayOut, you’re missing out! Page courtesy of Dan Tyree
SketchUp Pro and LayOut are designed together to help you make phenomenal drawings. So why not take the next step and learn LayOut? We think you should.
Of course, you’re welcome to download SketchUp Pro 2019 to give LayOut a try. But if you are already working in LayOut, we invite you to read on and learn how to make even better drawings.
Create Scaled Drawings
A SketchUp model is not the only entity that has a scale in LayOut. LayOut’s tools to draw to scale in 2D. Sketch a detail from scratch or add scaled linework over your SketchUp models — directly in LayOut. Gone are the days when you’d have to go back into SketchUp to create a 2D drawing or eyeball the position of a dashed line to show an overhead cabinet.
Once you’ve created a scaled drawing, you’re free to re-set scales as you wish; your work will resize as necessary. And as you would expect, your scaled drawings are fully supported by LayOut’s Dimension tool.
Complement or sketch over SketchUp viewports with linework that can be drawn (and dimensioned) at scale.
For all the ways you draw…
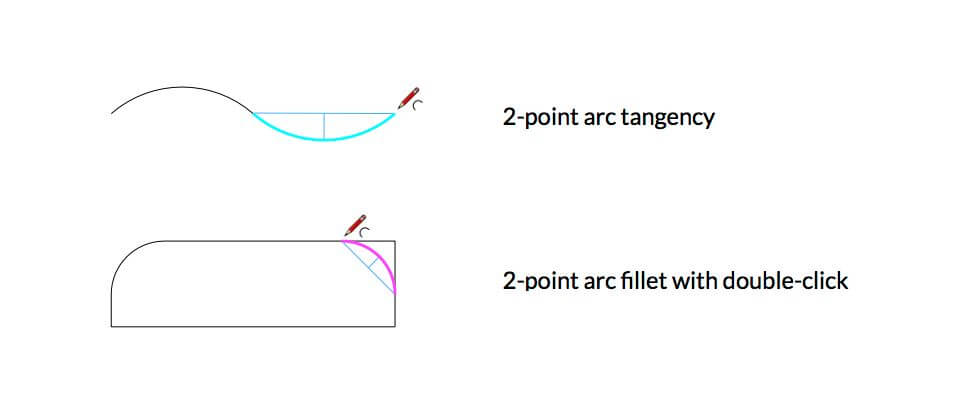
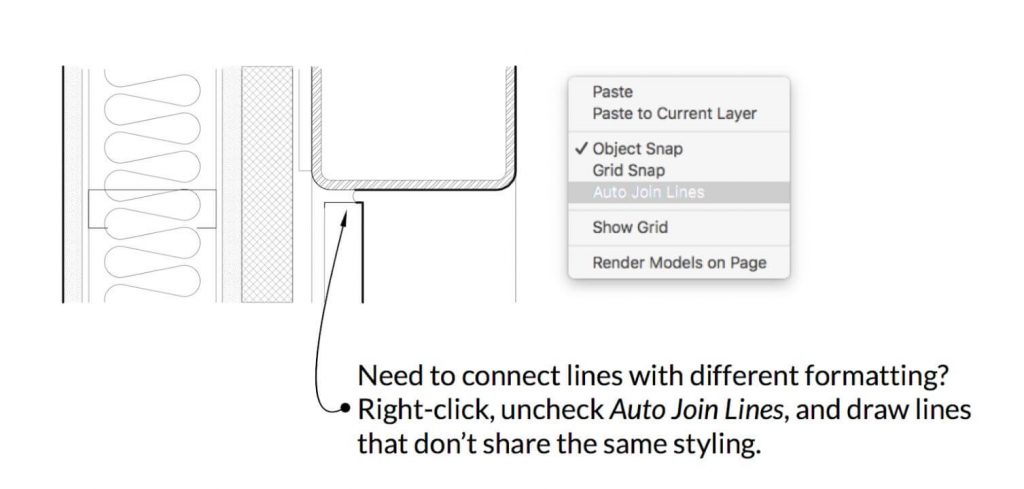
Drawing heuristics are what we do. LayOut’s tool-set makes drawing details easier. Here are three of our favourites:
Use the 2 Point Arc tool to find tangent inferences. You can also use it to create chamfers and fillets with a specified radius.
When editing a line, you can select multiple segments and points while adding and subtracting entities to your selection.
Don’t want LayOut to automatically join new line segments with existing ones while you’re drawing? There’s a right-click menu item to toggle that off.
Group Edit and Entity Locking
To support scaled drawings, editing grouped entities in LayOut works just like it does in SketchUp. That means it’s way easier to modify grouped entities and thus, it’s much easier to keep your documents well organised. Bonus: you can also control “rest of document” visibility while editing groups.
Similar to group editing, locking entities is fundamental to how many people organise and navigate projects (both models and documents). In addition to locking layers, you can easily lock individual LayOut entities to cut down on accidental selections — just like in SketchUp.
Draw to the .000001”
Accurate dimensions are an obvious requirement for any drawing set. LayOut displays dimensions as precisely as SketchUp dimension tool can model: up to 0.000001 centimetres.
By happy coincidence, this precision also allows you this dimension tip across distinct SketchUp viewports in order to create an excellent section detail like this…
Two SketchUp viewports with clipping masks; one accurate dimension string.
LayOut: A+, plays well with others
Finally, we understand that not everyone works in LayOut. Your colleagues may use other CAD applications. You may use other CAD applications. So we introduced a DWG/DXF importer to LayOut. You can import files from your colleagues and your own existing CAD content — title blocks, blocks, pages, and geometry — all to a scale that fits within your LayOut paper size.
Because however you work — in and out of SketchUp — LayOut is here to help you make great drawings.
For more information about SketchUp and LayOut a SketchUp LayOut tutorial, contact sales@elmtec.co.uk
Tom Kaneko is an architectural designer and SketchUp ninja specializing in bespoke residential retrofits and extensions in the United Kingdom. In this conversation, we delve into his workflow and how he uses SketchUp to deliver value to his clients within the constraints of a tight budget. For Tom, ‘SketchUp makes the means of design & communication, with client and contractor, one and the same’.
Tell us about your background as an architect and how this influences your approach to design.
I’m drawn to the technical aspects of the profession and the site. Luckily I had a very hands-on experience at the University of Edinburgh that has served me well in practice. As a designer, you have to know your craft… knowledge gaps become apparent when you transition from design to construction, particularly when engaging in conversations with builders and subcontractors.
What was the “Aha!” moment for you with SketchUp?
It came in 2011 when I was working on Jemima’s House, an extension to a terraced Victorian house with big ambitions and a tight budget.
SketchUp model and photo of completed project showing view from dining area into garden at Jemima’s House, London.
To manage the budget, keep my fees down and still deliver value to my client, I had to be very efficient with my time. We wanted to create an interesting and functional space, using inexpensive materials in a considered way. This meant I had to rapidly iterate to test and discuss ideas with Jemima. Modelling the concept in SketchUp helped immensely during our conversations as I could quickly communicate my intent in 3D and also reflect changes easily.
For the retrofit and extension projects that I’ve specialized in, minute details like insulation thickness can affect the final usable floor area. Communicating these details clearly to builders is very important so that the client gets the most value.
In SketchUp, I create all the detail drawings we need, and virtually construct the entire building before we go on site. By doing this, I’m able to spot every mistake. Once I saw that I could go from concept design to construction details in SketchUp on this project, I stopped exporting my sections or details to other CAD software. Now I know that what I’ve drawn is what the builders will have.
3D details of extension frame construction.
The smooth transition from concept to the site is crucial for a successful building – How do you ensure this and how does SketchUp support your workflow?
I start every concept with hand drawn sketches. I focus on getting the flow of the plan right, whilst incorporating the client’s requirements and desires within the limitations of a typical London terrace.
Hand drawn early concept plan
At the schematic design stage, I get a survey of the existing building done, and turn that into a SketchUp model. In terms of my model structure, each floor is its own component, walls and floors are separate, and furniture and people are on individual layers. Having a well organised model makes it easy for me to make changes or remove elements. I also set up all my key scenes and sheets early on in SketchUp Pro and LayOut… floor plans, sections, main elevations and perspective views of the main spaces.
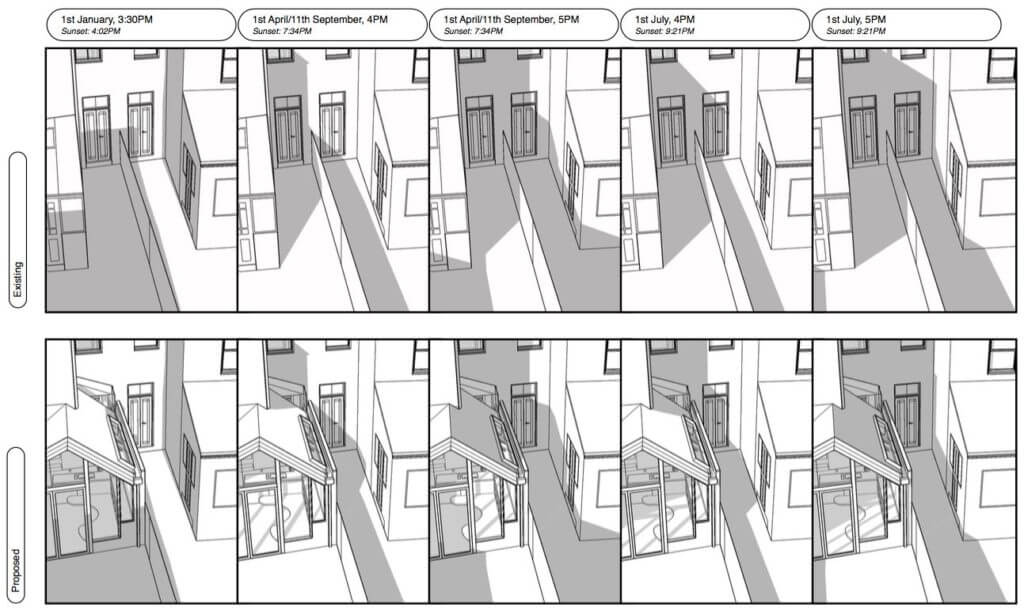
One typical design challenge I have is to achieve a great sense of space in the interior with a higher roof line, whilst considering the shadows cast on neighbours. At this point, testing out ideas in section and 3D helps me arrive at a unique, contextually appropriate response.
Early concept model showing 3D image & sectional test of context responsive roof pitch.
The output from the model can be used for sunlight studies which might be submitted as part of the planning application documents.
Early sunlight studies showing the positive impact of a context responsive roof pitch. Shadows cast by the proposal do not negatively impact the neighbouring building
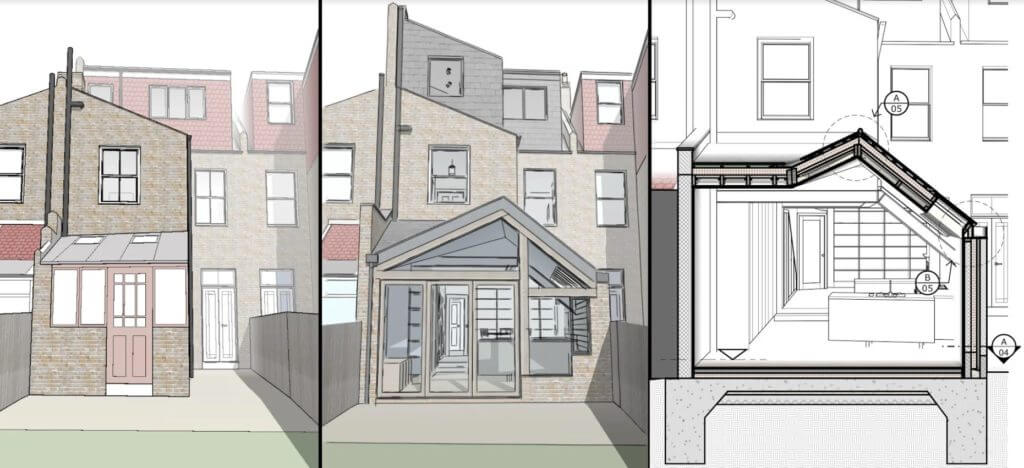
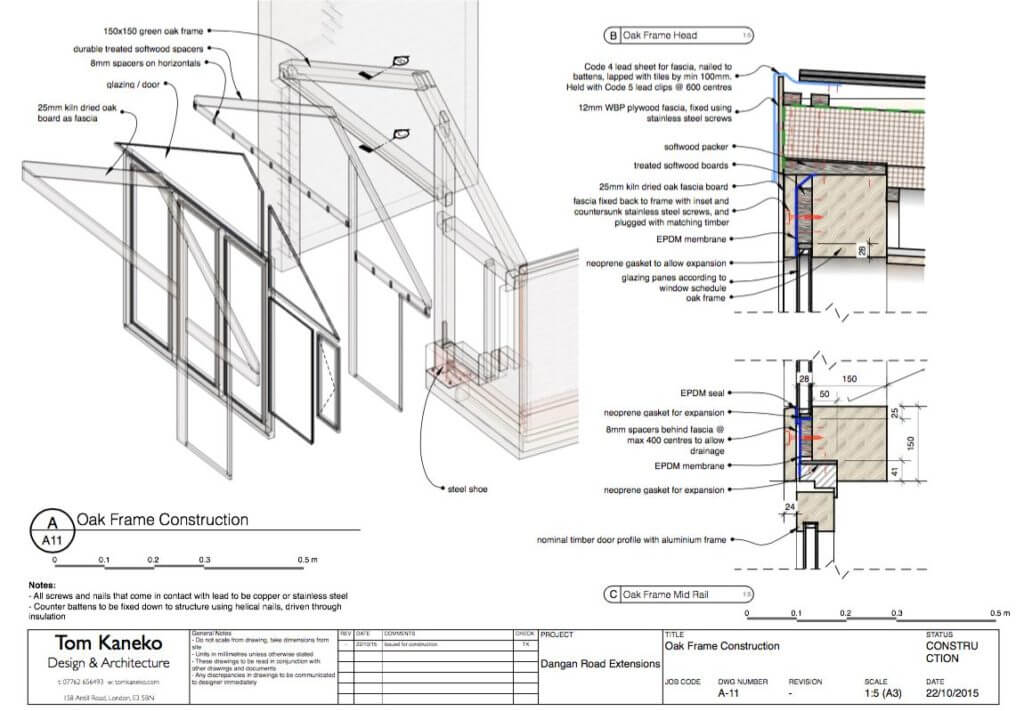
Once the plans and sections are agreed, I create a separate construction model to really drill down into the details. Some of the angles in the roofline mean we have very bespoke junctions and I have to be able to clearly communicate the construction and design intent to the builders.
Construction drawing sheet created in SketchUp’s LayOut showing an exploded perspective of a bespoke oak frame end wall and details of key junctions.
As the design progresses, I usually create a separate model for each key stage. A simple schematic model will have several iterations… changes can take five minutes or forty minutes depending on how big a leap we’re making. A big win is that I can quickly update the section views using Skalp for SketchUp, and LayOut automatically picks up the changes. The final proposal from LayOut is what I use for the planning application.
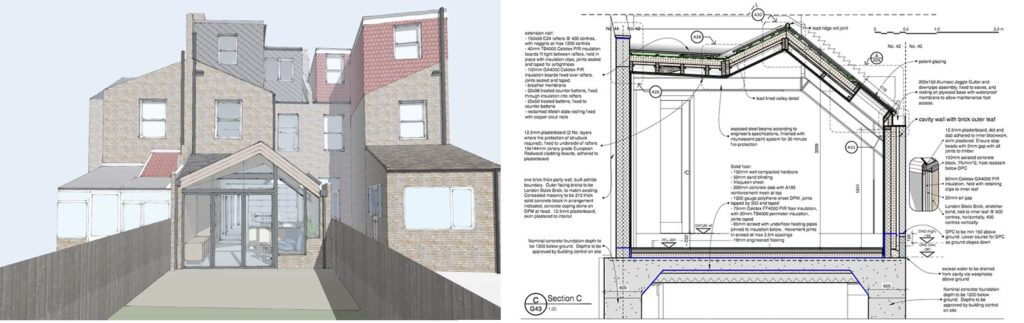
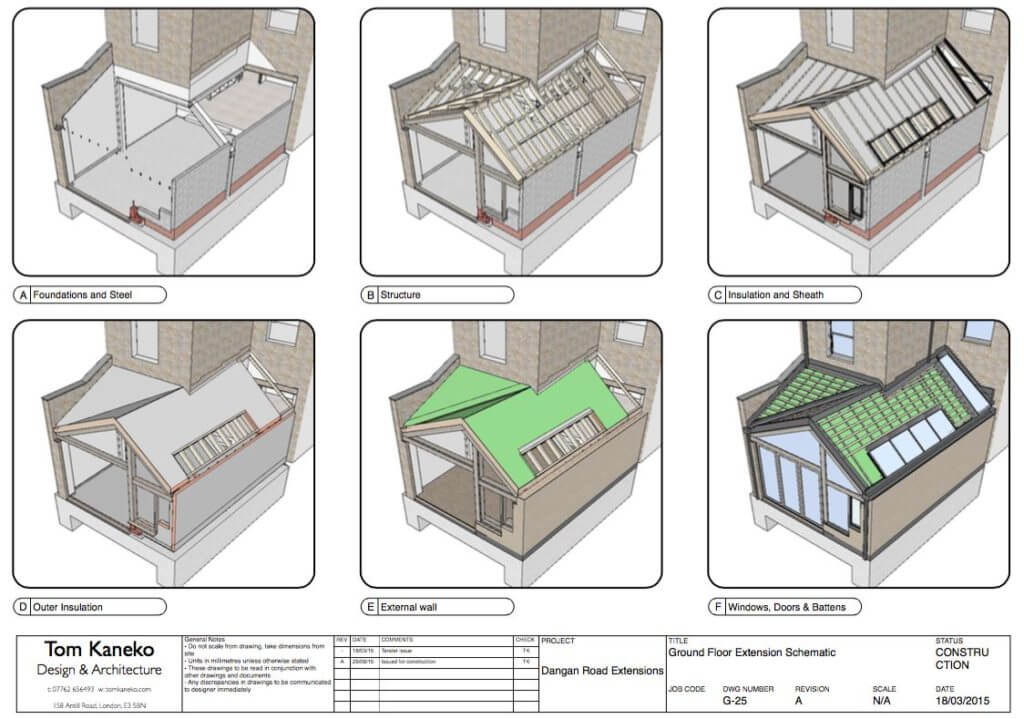
Next, I create a detailed construction model that takes us on-site. Instead of hollow walls, the technical construction model articulates wall and roof details.
I’ve found that showing builders assemblies and perspectives in 3D helps them really get behind the design intent. They have a clear understanding of what you’re trying to achieve and why. In my experience, clear information leads to great relationships on the building site. Some really experienced builders on previous projects have told me my construction drawings from LayOut are some of the best details they’ve ever seen!
Image showing construction sequence. Dangan Road Project by Tom Kaneko Design.
What drawing standards and style templates do you use most in SketchUp and why?
My LayOut template is very pared back and simple. I usually place drawings on an A3 sheet, as it’s a good size to view things on the computer and in print. I use the font Helvetica for annotations and keep all sheets simple, legible and scalable. Over time I’ve developed my own set of revision clouds and drawing title blocks but my principle is to keep the graphics minimal so that the design can take centre stage.
What is your approach to rendering and visualizations?
I use Thea for renderings because it’s simple and embedded in SketchUp. It’s also a great design tool for lighting.
What keyboard shortcut could you not live without?
Hide rest of model without a doubt! “Ctrl + H” allows me to edit a tiny component within a vast space. Ed. note: Ctrl + H is a custom shortcut set by Tom. Make your own custom shortcuts, too!
Adam O’Neill has worked as an art director on a range of films including ‘Troy’, ‘Snowden’, and ‘Prometheus’ and as supervising art director on film and television productions including ‘Billy Elliot’ and ‘Penny Dreadful’. He’s received Art Directors Guild nominations for art direction for five productions and won an ADG award for ‘Gladiator’ as assistant art director. His most recent projects include work on Netflix’s ‘Nightflyers’ as senior art director and as supervising art director on ‘Pennyworth’.
Adam is also Chairman of the British Film Designers Guild (BFDG), which was founded in 1946, for the betterment of Design in British Films. Out of this society grew the Guild of Film Art Directors, and the present British Film Designers Guild, who now include in their membership all the various branches of the Art Department. Earlier this year, SketchUp UK sponsored the 2018 BFDG Awards ceremony and we caught up with Adam to find out how SketchUp has helped inform his work.
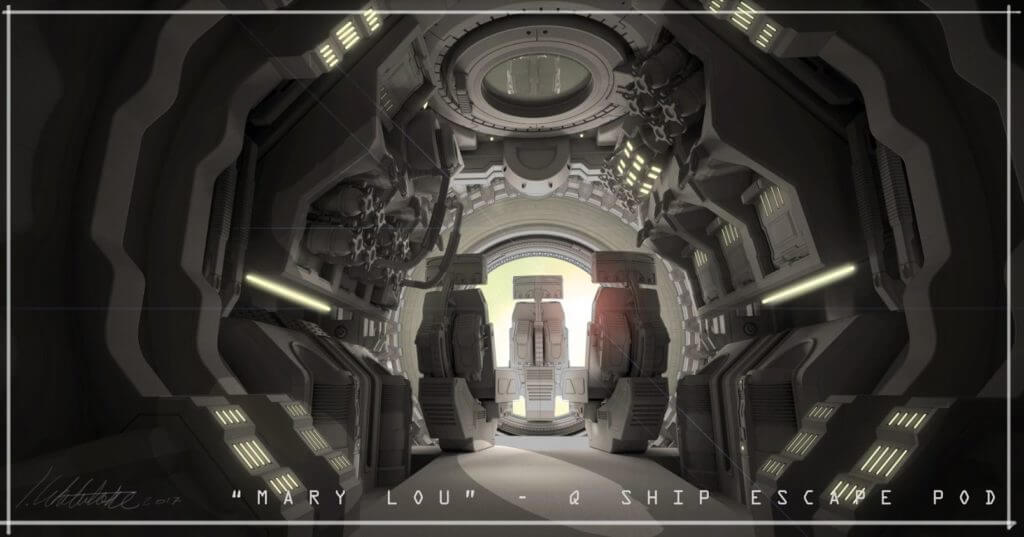
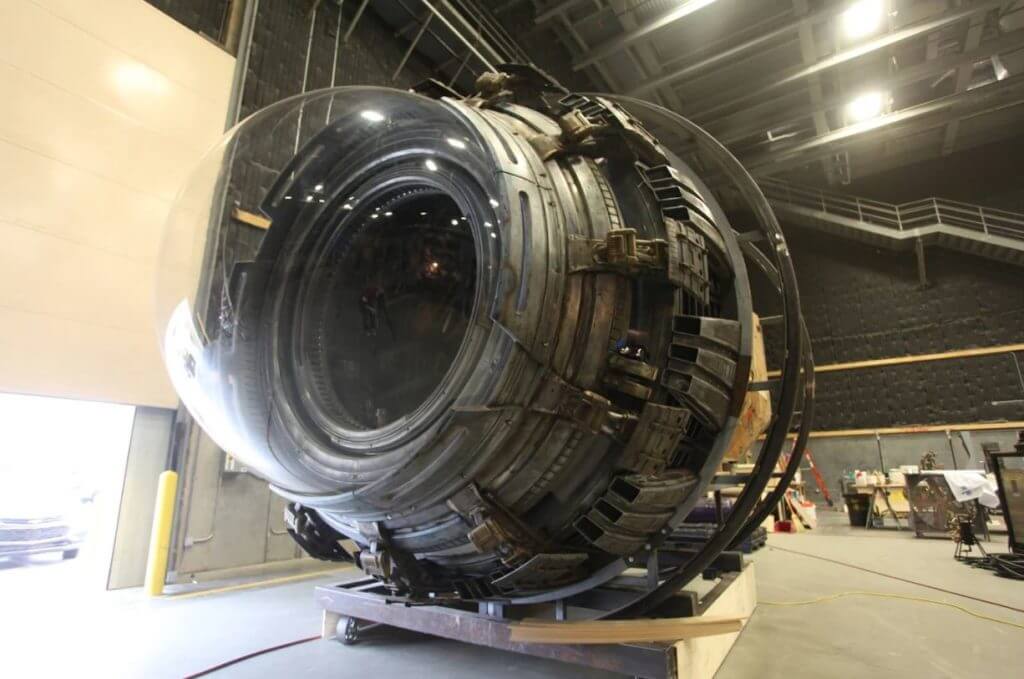
‘Nightflyers’: Int Cargo Bay Credit: Syfy/Netflix‘Nightflyers’: Int Cargo Bay Credit: Syfy/Netflix
So, how did you get started in the industry?
I started as an art department assistant for production designer Stuart Craig. Since then I became a draughtsman, then assistant art director, and now I alternate between supervising art director and art director.
How does SketchUp help with your design process?
Sketchup is great for fast conceptual models, quick visualisation of 3D spaces, and for blocking out design details. It’s also fantastic for quick animations to illustrate sequences, or to explore 3D spaces, with a minimum build time. The very best tools for film and TV art direction are those that are fastest.
You started your career in the early 90’s. How have changes in technology since then shaped and defined your role as an Art Director in Film and Television?
I started when we all used drawing boards and T squares. Hand drawing still has a useful place in the art department, but these days it is absolutely essential to use all the tools available, 2D, 3D and the emerging technologies such as AR. Although the technology enables faster design work, the design process is largely the same. It involves finding the best way to communicate an idea to a designer or director, often simple, sketchy unpolished artwork is more useful than final detailed images which are sometimes more useful to show to a studio than as a tool to find the final design for a film set.
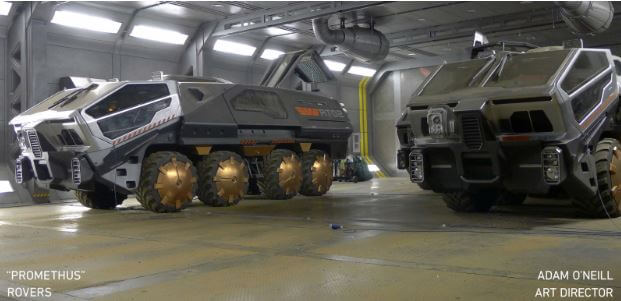
‘Prometheus’ Rovers Credit: Twentieth Century Fox / Scott Free Productions
What’s the one functionality you’re glad SketchUp has?
The ability to do a fast output to Layout for a quick plan and elevation or section.
This is such a valuable tool for passing on orthographic views of the design to an art director or draughtsman to finalise the working drawings. The ability to quickly create in 3D and then generate these plans and elevations is incredibly useful.
Possibly a foolish question – do you ever have anything like a ‘typical’ work day?
It depends on the project, whether I would be looking at budgets, schedules, visiting the stages to see the set construction or maybe I’ll get the chance to draw and model all day if I’m art directing. Mostly it’s a mix of all of these.
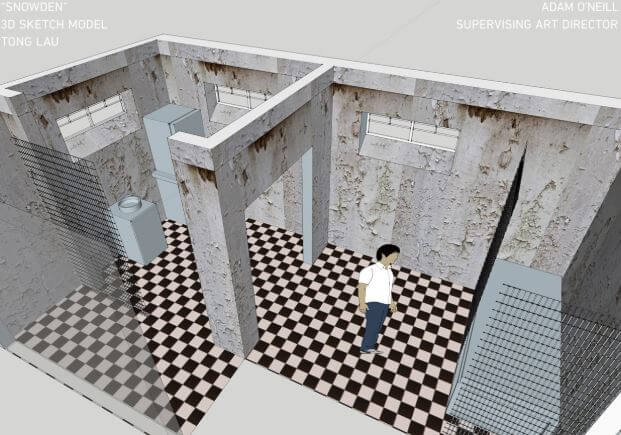
Rough concept sketch for Oliver Stone’s film, ‘Snowden’
What kind of projects interest or excite you the most?
Anything that involves an element of exaggerated reality, a period film or TV show, or sci-fi. Basically anything that lets my imagination run free. I’m not so keen on a straight take on contemporary reality, but it all depends on the script and who is involved, so nothing is ruled out.
I was lucky enough to start my professional career with production designer Stuart Craig, and he still inspires me today. He’s someone who does beautiful detailed sketches, and then can draw his sketch as a scale working drawing. He also knows the value of getting the right team around him to expand on his ideas and contribute their own, but always under his direction.
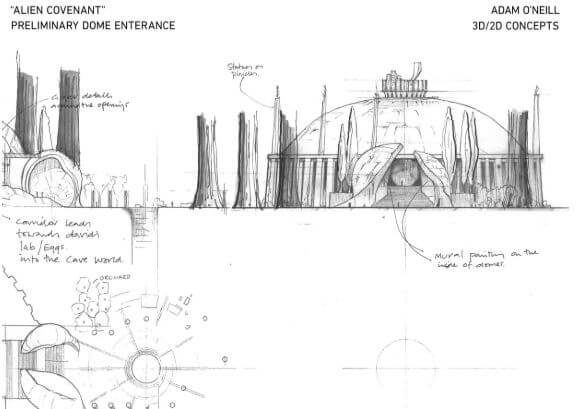
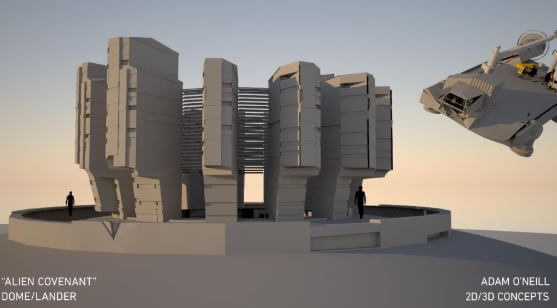
Working on Ridley Scott’s films are also always an event, and have been highlights of my career because Ridley is so visually minded – he can draw better than most designers! On the early days of Alien covenant, I worked with designer Chris Seagers on the initial ideas for the sets and spaceship interiors, just for a few weeks, but we generated a lot of ideas that Chris then developed for the film during production in Sydney.
‘Alien Covenant’ Concept Credit: Twentieth Century Fox / Scott Free Productions‘Alien Covenant’ Concepts Credit: Twentieth Century Fox / Scott Free Productions
Do you use any essential plugin or extensions with SketchUp to help with your work?
What’s been your proudest work so far/career highlight?
I enjoyed working on Gladiator very much – it was the first time in my career that I had big sets to draw up and manage the build. I looked after the Imperial Palace and the Roman Streets which were built in Malta. The palace set itself was over 200ft long, with flights of stone steps to the Roman streets. I also really enjoyed working on seasons 2 and 3 of ‘The Borgias’ for Showtime. We got an Emmy nomination for season 3 – it would be remiss of me to not mention that a visit to Los Angeles for any awards ceremony is always great fun and a lovely part of the job!
We use cookies for ads personalisation and to ensure we give you the best experience on our website. If you continue to use our site we will assume that you are happy with it.


 Tell us about your background as an architect and how this influences your approach to design.
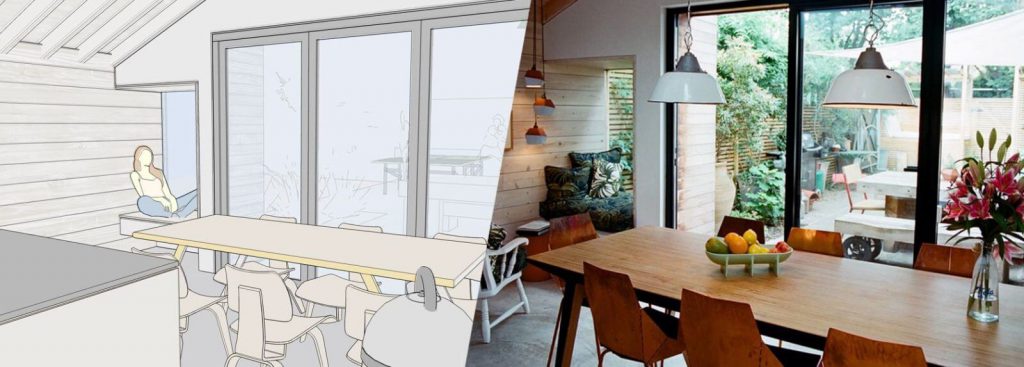


