If your workflow involves existing buildings, refurbishment projects or complex site conditions, you already know how time-consuming it can be to manage disconnected data, inaccurate measurements and inefficient model coordination.
For architecture, construction and design professionals, speed and accuracy matter more than ever.
That is why connected workflows between SketchUp, point cloud data and Autodesk Revit are becoming essential for modern project delivery.
Join Elmtec and industry expert Martin Cox for a live webinar exploring how to streamline your workflows, reduce site visits and improve project efficiency using integrated SketchUp workflows.
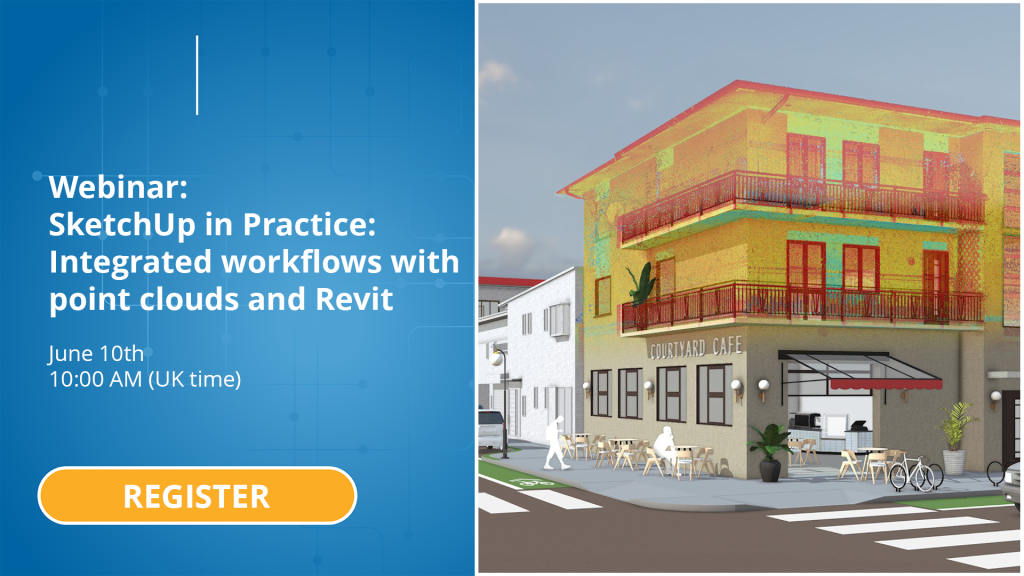
SketchUp in Practice: Integrated Workflows with Point Clouds and Revit
📅 Tuesday 10th June
🕙 10:00am – 11:00am BST
🎥 Live Webinar
This practical webinar is designed for architects, designers, BIM professionals and AEC teams looking to improve the way they handle scan-to-CAD workflows and interoperability between platforms.
Rather than focusing on theory alone, this session will showcase real-world workflows and practical techniques that professionals can apply immediately within live projects.
Why Connected Workflows Matter
As projects become more data-driven, disconnected workflows create unnecessary delays and inefficiencies.
Moving between point cloud data, CAD environments and BIM platforms can often lead to:
- Lost time
- Duplicate work
- Accuracy issues
- Coordination challenges
- Increased project costs
Integrated workflows help eliminate these problems by enabling teams to move more efficiently from site capture through to modelling, design development and project delivery.
This webinar will demonstrate how connected workflows inside SketchUp can help simplify that entire process.

Accelerate Scan-to-CAD Workflows
Capturing existing conditions accurately is critical, especially for refurbishment, retrofit and renovation projects.
During the webinar, you will see how Scan Essentials can help reduce the number of site visits required while improving the speed and accuracy of capturing as-built conditions in 3D.
For many teams, point cloud workflows still feel complex or difficult to integrate into existing processes. This session will break down practical ways to work more effectively with scan data inside SketchUp.
Attendees will gain insight into:
- Faster processing of point cloud data
- Improved modelling accuracy
- Reduced manual rework
- More efficient site capture workflows
- Better collaboration between teams

Seamless Revit Interoperability
Interoperability between software platforms remains one of the biggest challenges across AEC workflows.
This webinar will also explore how the Revit Importer allows users to easily translate RVT files into detailed SketchUp models, helping teams work more collaboratively across disciplines.
Whether you are coordinating with BIM teams, reviewing models or developing concepts from existing Revit projects, smoother interoperability can significantly improve project efficiency.
You will learn how to:
- Import Revit models into SketchUp more effectively
- Preserve important model detail
- Improve design collaboration
- Simplify coordination between teams
- Reduce workflow bottlenecks
Learn from an Industry Expert
The webinar will be presented by Martin Cox, EMEA Partner Success Manager.
Martin brings more than 20 years of experience across the construction and CAD software industries, with expertise spanning customer success, training, consultancy and workflow best practices.
His experience working directly with AEC professionals gives him a deep understanding of the real challenges teams face when managing complex design workflows.
This session is designed to provide practical, actionable knowledge rather than generic demonstrations.
Why Attend This Webinar?
This session is ideal for:
- Architects
- BIM managers
- Interior designers
- Construction professionals
- Surveying teams
- SketchUp users
- Revit users
- AEC consultants
- Anyone managing scan-to-CAD workflows
By attending, you will discover how to unlock:
- Faster project delivery
- Better design coordination
- More accurate modelling workflows
- Improved interoperability
- Greater workflow efficiency
- Reduced project friction
For teams working on refurbishment, renovation or existing building projects, these workflow improvements can create major operational benefits.
Why Join Through Elmtec?
As a UK Gold Reseller for SketchUp, Elmtec works closely with AEC professionals across the UK to help businesses get more value from their design technology investments.
We do more than provide software licensing.
We help organisations:
- Improve workflows
- Increase productivity
- Navigate software ecosystems
- Support technical adoption
- Deliver better project outcomes
This webinar is part of our continued commitment to helping design professionals stay ahead of evolving workflows and technologies.
Reserve Your Place Today
If you are looking to improve your scan-to-CAD workflows, simplify Revit interoperability and work more efficiently with point cloud data, this webinar is not one to miss.
Join us on 10th June and discover how connected workflows inside SketchUp can help transform the way you manage projects from initial site context through to detailed design delivery.