

SketchUp terrain plugins are your essential tools for creating terrain in SketchUp and will elevate your scenery and introduce realism in your designs.
Understanding the Importance of Terrain and Topography in SketchUp
Creating an accurate representation of terrain in SketchUp enables you to create visually appealing designs. With natural contours, slopes, and land features, your architectural wonder harmonises with the environment. Terrain and topography in SketchUp also play a crucial role in site analysis, spatial planning, and environmental integration.
Learning how to model realistic terrain in SketchUp with SketchUp terrain plugins improves your visualisation of the object. Terrain also helps with shadow studies. Ultimately, creating terrain in SketchUp improves client relationships, as they’ll have a deeper understanding of how their objects interfere with their surroundings.
Utilising SketchUp's Native Tools for Terrain Creation
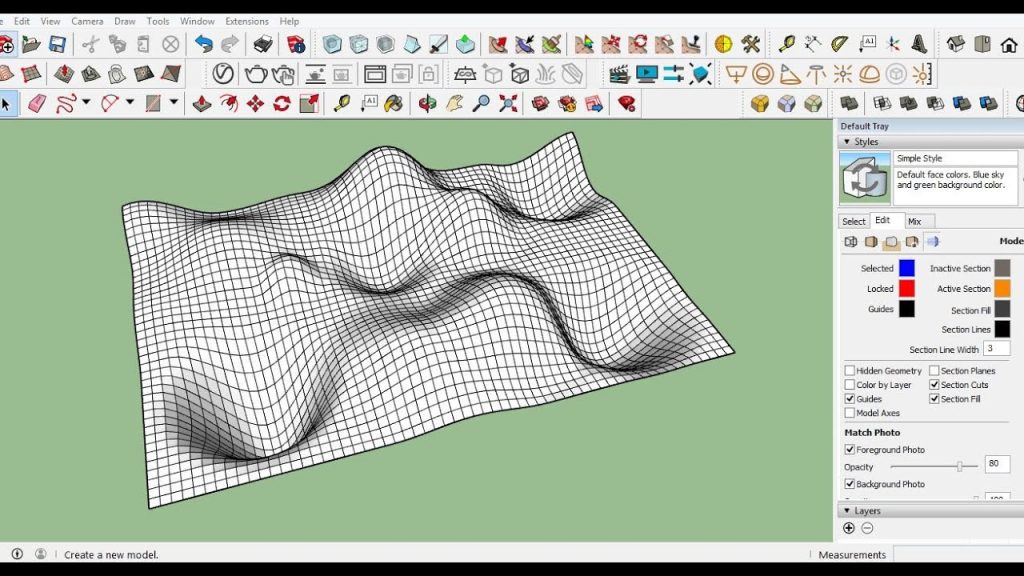
SketchUp terrain plugins are simple to use:
- Sandbox Tools (contains Smoove tool) – creates terrain and topography in SketchUp or helps you import it
- From Contours – imports or lets you draw contour lines
- From Scratch – draws a grid for the terrain design
- Stamp – helps you place objects on terrain
- Drape – creates a flat surface, such as roads
- Follow Me tools – creates 3D shapes along a path
Once you are ready to do topography in SketchUp, start with the Sandbox Tool- you can then use From Contours to manipulate valleys and hills. The Smoove tool is among the most powerful SketchUp terrain plugins, ideal for adding texture to materials and managing terrain edges. Select the section of terrain, then head over to the Sandbox tool, select the Smoove tool, and set the right radius.
Next, click on the geometry to ensure your proportions are correct, so you can present visual coherence in the design. Remember, SketchUp offers a great set of textures and materials you can use to accurately model terrain in SketchUp. Access this in the Material Picker section.
Essential Plugins for Advanced Terrain Creation
If you need more options, SketchUp supports various plugins that offer advanced functionality, including:
- Artisan
- SUbD
- FredoScale
Artisan is a powerful organic modelling tool that supports creating terrain in SketchUp with:
- Subdivision modelling is ideal for creating sculptures
- Soft transformation is perfect for managing terrain edges
- Sculpt brush allows the overall terrain management
- Paintbrush adds textures to any surface
- Polygon reduction
Now, the SUbD plugin is your best friend if you want to subdivide and smooth a mesh to start managing topography in SketchUp.You can also manipulate boundary corners and edge visibility.
Finally, there’s FredoScale – a magnificent set of tools for geometry manipulation. It offers better scaling, tapering, stretching, twisting, bending, and more, so you can properly model terrain from all angles.
To start using plugins, download the .rbz files and install and manage them via SketchUp Extension Manager. If you face issues, try restarting the software, checking plugin compatibility, updating to the latest version, clearing the cache, and adjusting SketchUp’s settings. Sometimes you may experience lags due to model complexity, so try reducing it.
Techniques for Importing and Integrating GIS Data
Importing Geographic Information System (GIS) data gives you accurate terrain representation, with all its contour lines, elevation info, and geographical data you need to create terrain in SketchUp.
Use the Modelur feature to import GIS and start modelling terrain in SketchUp. Visit File, then Geo-location to set the geolocation data. Modelur supports GeoJSON (.geojson) or Shapefiles (.shp) files, saved in the WGS84 (EPSG:4326) coordinate system.
Open your current model in SketchUp, then move to the File – GIS Data Import window. Select the file, determine the offset, and import files as one of three available options. Set the mapping parameters and scale, and import the GIS Layer for an accurate representation of terrain and topography.
Remember to select reliable GIS data sources for accurate terrain and object representation, so you model the right way. Ensure the coordinates of the data you import match the ones you used in SketchUp to avoid scaling and alignment problems.
Then, align GIS layers before you import data for a proper representation of the landscape. If the GIS information didn’t load up to scale, use the Tape Measure tool to check the distances and adjust.
With GIS, you’ve saved time on manual terrain creation and got an accurate representation of real-world objects. If you need additional help, visit SketchUp’s tutorials and learn how to do topography in SketchUp easily.
Enhancing Terrain with Vegetation and Water Features
Once you’ve learned how to model terrain in SketchUp, it’s time to play with vegetation and water features. Use Skatter and Laubwerk tools to render huge amounts of vegetation and quickly populate scenes. These offer authentic 3D plants and scattering tools to help you model terrain in SketchUp.
To introduce various water bodies in your topography SketchUp, use the Sandbox From Contours and the Flowify extensions. VRay is there for a photorealistic water scene. Include surrounding objects which will reflect on the surface and render the imagery for high-quality results.
Remember, selecting the right vegetation while creating terrain in SketchUp can be tricky. Research to learn more about the flora in certain areas and consider the site conditions, climate and seasonal changes of the region.
When you focus on doing topography in SketchUp, remember that not all plants thrive in every terrain. Focus on realistic scaling and form a balance of plant clusters. Mix the plant species and types of water elements for a harmonious scene.
Elevating Your SketchUp Projects with Realistic Terrain and Topography
Creating terrain in SketchUp improves the visual impact of the scene and introduces realism. Additionally, these elements show you how your models will behave in the real world.
Mastering how to do topography in SketchUp, import GIS and use the Artisan, SUbD, or Follow Me tools will give you all you need to experiment with diverse terrains. Now you are ready to transform a bland scene into an immersive, hyper-realistic and contextually accurate design setting.
Visit the Elmtec site to explore free trial options, SketchUp’s native tools, and additional plugins to elevate your design projects to new heights.

