
In this article, we will discuss additional design and rendering tips, with a focus on the V-Ray SketchUp exterior lighting tutorial to help manage ambience.
Master the Art of Exterior Design and Rendering
The impact of spatial organisation around a building can’t be overstated.
Luckily, SketchUp and V-Ray can help drastically. SketchUp utilises the strength of V-Ray to help you elevate your exterior design projects with streamlined workflow, intuitive camera settings, and adaptive learning techniques.
With V-Ray SketchUp exterior rendering settings you can explore faster rendering, AI denoiser, and automatic exposure. Focusing on key elements like proportions, colour palette, or landscaping becomes easy.
SketchUp’s exterior lighting tutorial helps you explore global illumination, lighting controls, and rendering optimisations. Now, you can introduce real-life lighting setups for captivating atmospheres and bring your renders to life or incorporate textures and materials such as PBR metallic reflections, wood, or concrete into your designs.
Optimising Workflow for Efficient Exterior Designing
We start by arranging four essential V-Ray toolbars for easier access:
- The first toolbar is packed with commonly used buttons for changing assets, rendering settings, and content library.
- The V-Ray lights toolbar is your go-to for natural and artificial light settings.
- The V-Ray objects toolbar contains V-Ray geometries.
- The V-Ray utility toolbar has all the tools you need to explore the project and map the textures.
Open the Asset editor to configure V-Ray SketchUp exterior rendering settings. If you wish to add a new level of realism to the imagery, head over to Chaos Cosmos – an extensive library of materials and 3D assets.
Now it’s time to explore the tools for precise modelling:
- The Tape measure tool measures distances and sets guide points.
- The Protractor tool will help you measure angles
- The Measurement box will show you all the numbers you should know
- Line lets you connect segments
- The Erasers tool fixes errors
- Rectangle introduces rigid forms to the scene
- The Push/Pull feature lets you easily manage surfaces
- The Follow Me tool will extrude a shape along a connected line
- The Offset tool helps you manipulate what you made
The tool also gives you control over the rendering process. Use Image sampling tools to produce high-quality and accurate rendering scenes with the optimal usage of time and resources.
As you finalise your rendering, check out the Interactive Rendering button and the V-Ray frame buffer to observe and adjust the final appearance of your render via Adjustment layers.
If you work with complex exterior projects, you might face some challenges. Luckily, SketchUp can help you with layer management and object grouping. Start by clearly defining the scope of your project and utilise the software to:
- Import reference images
- Focus on components, structures, and landscape elements
- Group elements
- Organise elements via SketchUp’s Groups and Components feature
- Properly name Groups and Components
- Assign each element to the appropriate layer depending on function, visibility, or rendering phase
- Turn off unnecessary layers to avoid confusion
- Apply Tags to groups of components to easily navigate your view
Once you are done with your rendering, you’ll likely share it with other architects, designers, or clients. The SketchUp tutorials show an easy way of creating an animation of your exterior scene. You can export it in two ways, one for fast views and the second one for final production:
- Set up the camera and animation setting
- Enable the Animation slider in the Asset editor
- Open V-Ray Vision for the preview
- Head to Export settings to select a video or export each frame separately
- Define a file type
- Select the resolution mode from the project
- Use any third-party software for presentation
Chaos Cloud is also a great platform to share your work, receive feedback and improve collaboration. It allows pinned comments and speeds up the review process.
Advanced Tips for Realistic Exterior Rendering
Realistic exterior rendering means you should focus on several aspects of imagery, such as:
- Light (HDRI lighting or sunlight for shadows and mood)
- Materials and textures (a selection of options and customisations for realistic surfaces)
- Selecting the viewpoint via Position Camera (for a better sense of the space, focal point, and perspective)
Now, it’s time to play with V-Ray SketchUp exterior rendering settings to set the rendering speed which depends on several factors:
- The engine you use (CPU, RTX, or CUDA)
- Quality of the render
- Global illumination (where the Brute force option takes longer and the Irradiance map does not)
The CPU rendering is usually the fastest. Disable Interactive and Progressive render, set the Quality to Medium+, and use the V-Ray Denoiser. Move onto Render output, set the Safe frame, image size, and select the desired Aspect ratio. If you wish to know how light affects your design, head over to V-Ray SketchUp exterior lighting tutorial page.
You can also elevate exterior renderings with various tools in Adobe Photoshop.
Now that you’re done with rendering and have your visualisations saved, it’s time to share them with others or include them in your portfolio. Use SketchUp and Enscape, Mood Boards, or even Virtual Reality to present the final concept.
V-Ray SketchUp Exterior Lighting Tutorial
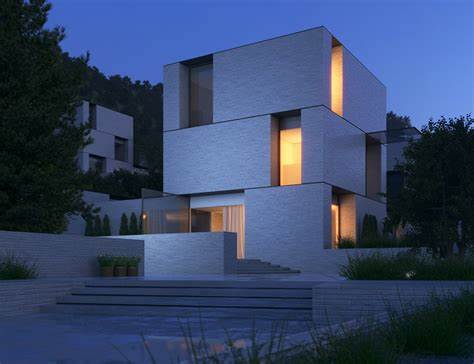
The lighting plays a crucial role in the visual appeal of the design, realism, and mood. Setting up artificial light, daytime, or nighttime can drastically change the appearance and ambience. The tutorial can point you in the right direction regarding Sun and Sky Systems.
Start by creating a darker, evening scene, then move to Chaos Cosmos Browser to select HDRI and set the proper light. Do all the rest from the Lighting toolbar – simulate light or increase its intensity. From there, you can also adjust the colours to balance the cold and warm tones in the image for a more realistic scene.
If you wish to change the Shadow settings, head over to the Shadows tray and set a specific time for your scene. Consult the tutorial for more options. The detailed V-Ray SketchUp exterior lighting tutorial also shows you how to change the size of the sun. There, you’ll find useful tips and tricks on how to adjust exposure settings and use Dome light to make your scenes vivid.
Use Colour and Intensity to change the hue of the sunlight. The Filter mode will give you a warmer tone, compared to the Override mode, which is cooler. Then there’s Intensity, which determines how strong the light is.
Remember to optimise render settings for improved efficiency and fast rendering. Decrease the noise, increase the time limit, and set the Quality slider to optimal. If you still struggle to get optimal results with your V-Ray SketchUp exterior rendering settings, go back to the V-Ray SketchUp exterior lighting tutorial and compare SketchUp Free and Pro to see which features work together.
Elevate Your Exterior Designing with V-Ray for SketchUp
V-Ray, SketchUp, and Chaos Cloud give you a playground filled with skies, powerful real-time rendering, and 3D content. Combine proper V-Ray SketchUp exterior rendering settings and explore V-Ray SketchUp exterior lighting tutorial to level up your exterior design, get faster outputs, and enjoy the powerful lighting features for beautiful and realistic scenes.
You can get all this and more on Elmtec. Elmtec has been here for more than a quarter of a century as a leading distributor of professional software and hardware. Reach out to Elmtec on their site to explore free trial options, purchasing, and an in-depth V-Ray SketchUp exterior lighting tutorial.


